RadRover Rear Rack installation guide
The RadRover rear rack allows a rider to carry gear, use pannier bags, and add accessories to the rear of the bike.
Watch the installation video and follow the steps below to install a rear rack on a RadRover. This guide uses a RadRover 5, but the steps will be the same for a RadRover Step-Thru.
Tools needed:
- A 4 mm Allen wrench
- An 8 mm wrench
- A torque wrench with a 4 mm Allen bit
- Flat side cutters
- The RadRover rear rack kit from Rad Power Bikes
Hardware bolt head, style, and size may vary between models and require different tools. Use the appropriate head size and type of tool for your bolts. Ensure the tool is pressed firmly into the bolt head and turn slowly to prevent stripping.
- Get the bike ready for maintenance. Turn off the bike, remove the battery, and press and hold MODE to discharge remaining power.
- Unplug the taillight connector. Trace the cable from the taillight to the connector. Snip zip ties as needed to create cable slack, and pull the connector directly apart, without twisting.
- Remove the taillight mounting bracket. Use a 4 mm Allen wrench to remove both bolts securing the taillight bracket to the frame. Press the tool into the bolt head fully, and turn the tool slowly to prevent damaging the bolt head. Set the taillight and bracket aside. Recycle the hardware according to local rules.
- Remove the taillight from the taillight mounting bracket. Snip zip ties as needed. Use an 8 mm wrench to remove the locknuts and washers. Set the taillight, locknuts, and washers close by; they will be used to mount the taillight to the built-in mount on the rear rack. Keep the bracket for future use or recycle it according to local rules.
- Secure the taillight to the rear rack. Locate the rear rack, the taillight, and taillight mounting hardware set aside earlier.
- Place the taillight into position on the built-in mount on the rear rack.
- Install the taillight mounting hardware. On the other side of the mount, pass a washer and locknut onto each bolt end. Thread on the locknuts by hand, then use an 8 mm wrench to tighten the locknuts securely.
- Locate the taillight extension cable and plug in the compatible connector end to the taillight.
- Line up the internal notch and pins, and external markings, and press directly together, without twisting, to connect.
- Zip tie the cable to the cable guides on the side of the rear rack, as shown. Trim the zip ties to be flush and smooth.
Continue to the next section to install the rear rack on the bike.
- Line up the internal notch and pins, and external markings, and press directly together, without twisting, to connect.
- Place the taillight into position on the built-in mount on the rear rack.
- Locate the four rear rack mounting bolts, two flat washers, and two locknuts included in the kit.
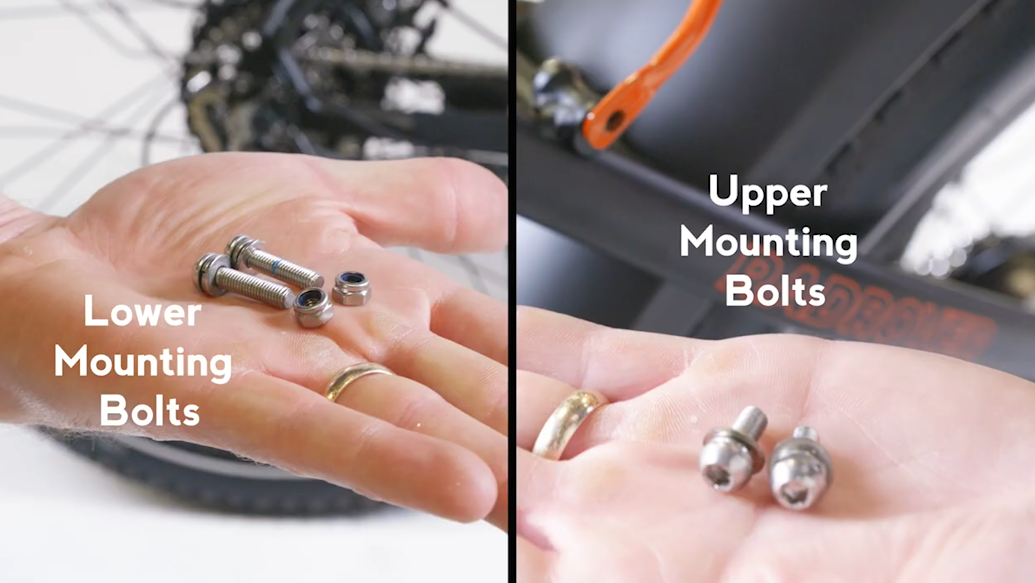
- Place the rack into position so the lower mounting holes align with the outside mounting points on the seatstay and the upper holes align with the mounting points on the outside of the frame. Adjust the fender by hand, if needed.
- Loosely secure the rear rack to the lower mounting points using the two bolts.
- Carefully thread a bolt through the rear rack mounting hole and into the seatstay mounting hole partway, by hand. If needed, use a 4 mm Allen wrench to help install the bolt partway. Press the tool into the bolt head fully and turn the bolt slowly to prevent damaging the bolt head.
Tightening only partway will help make it easier to align and thread the other three bolts into their mounting points. A small amount of resistance is normal, but take your time and make sure you don’t cross-thread the bolts or damage the threads in the frame.
- Repeat with the other bolt on the other seatstay. Leave the bolt loosely secured for now.
- Carefully thread a bolt through the rear rack mounting hole and into the seatstay mounting hole partway, by hand. If needed, use a 4 mm Allen wrench to help install the bolt partway. Press the tool into the bolt head fully and turn the bolt slowly to prevent damaging the bolt head.
- Loosely secure the rear rack to the upper mounting points using the two remaining bolts.
- Line up the mounting holes on the rack and the bike frame and install the bolts. Carefully thread a bolt partway through the rear rack mounting hole and into the frame mounting point. If needed, use a 4 mm Allen wrench to help install the bolt partway. Press the tool into the bolt head fully and turn the bolt slowly to prevent damaging the bolt head.
Tightening only partway will help make it easier to align and thread the other three bolts into their mounting points. A small amount of resistance is normal, but take your time and make sure you don’t cross-thread the bolts or damage the threads in the frame.
- Repeat with the last bolt. Leave the bolt loosely secured for now.
- Hold the rack in alignment with the mounting point, and at the same time, use a 4 mm Allen wrench to tighten each of the top bolts about three full turns, alternating between the two bolts to tighten them evenly.
- Line up the mounting holes on the rack and the bike frame and install the bolts. Carefully thread a bolt partway through the rear rack mounting hole and into the frame mounting point. If needed, use a 4 mm Allen wrench to help install the bolt partway. Press the tool into the bolt head fully and turn the bolt slowly to prevent damaging the bolt head.
- Tighten all four mounting bolts fully.
- Thread in the lower bolts fully. On the lower mounting bolts, use a 4 mm Allen wrench to thread in each bolt fully. Pass a washer and a locknut onto each bolt end. Use an 8 mm wrench on the locknut and a 4 mm Allen wrench on the bolt head and tighten each bolt fully.
- Torque the upper and lower mounting bolts to 7 Nm.
- Thread in the lower bolts fully. On the lower mounting bolts, use a 4 mm Allen wrench to thread in each bolt fully. Pass a washer and a locknut onto each bolt end. Use an 8 mm wrench on the locknut and a 4 mm Allen wrench on the bolt head and tighten each bolt fully.
- Adjust the rack to be approximately level. Use a 4 mm Allen wrench to loosen the two bolts on the upper mounting arm clamp. Slide the rack forward or backward to adjust the angle. With the rack in the desired position, tighten the bolts securely and torque to 7 Nm.
- Plug in the taillight connector.
- Route the extension cable, as shown. Make sure the cable runs between the wheel and seatstay, and that the cable is away from moving parts.
- Plug in the remaining connector end to the extension cable. Line up the internal notch and pins, and external arrows, and press each side directly together, without twisting, to connect.
- Route the extension cable, as shown. Make sure the cable runs between the wheel and seatstay, and that the cable is away from moving parts.
- Loosely install zip ties around the taillight cable and cable guides on the seatstay so the cable is out of the way of moving parts. Tighten the zip ties and trim them to be flush and smooth.
- Reinstall the battery, test the bike fully before riding, and ride Rad!