LCD Display features and operation
Various ebikes from Rad Power Bikes come with an LCD display that shows details such as battery charge, speed, and more! This guide will explain what ebikes do and do not include this component, and will walk you through the various features of the LCD display.
Which models have an LCD Display
Most bikes from Rad Power Bikes include an LCD Display. Notable exceptions include the following:
Models that come with an LED display. These models include the RadRunner 1 and 2, RadMission, and RadExpand 5. These ebikes can be upgraded to an LCD display using the LCD display upgrade available for purchase on our website! Take a look at The Scenic Route's blog post about it HERE and our installation guide HERE.
Models that come with the Rad UI Display and/or Rad UI Remote. These models include the RadRover 6 Plus, RadCity 5 Plus, RadRunner 3 Plus and RadTrike. The Owner's Manual for those ebikes include comprehensive information on their display systems.
Watch the video below, or click through each heading to learn more about the LCD display features and how to use them!
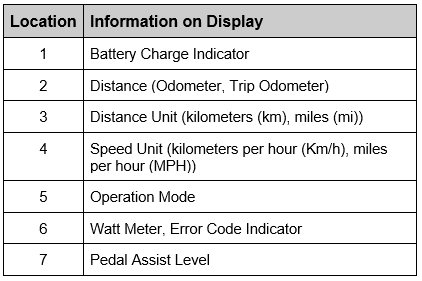
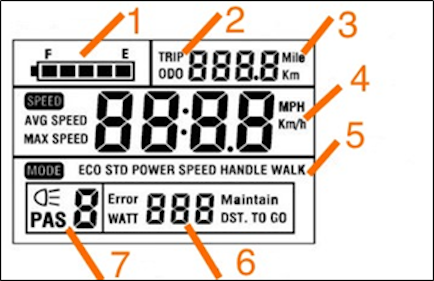
The LCD display shows the following information:
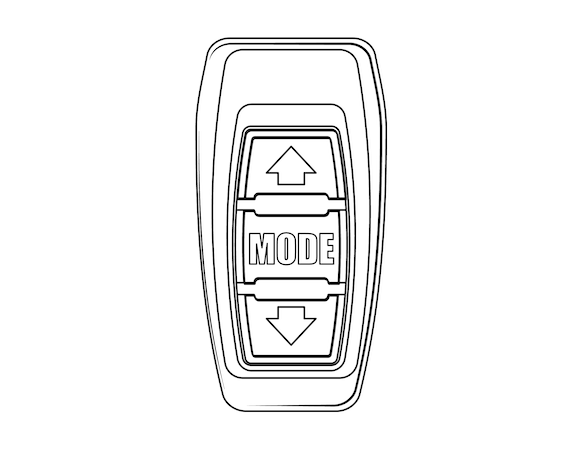
The display remote has three buttons; an up arrow, a MODE button, and a down arrow.
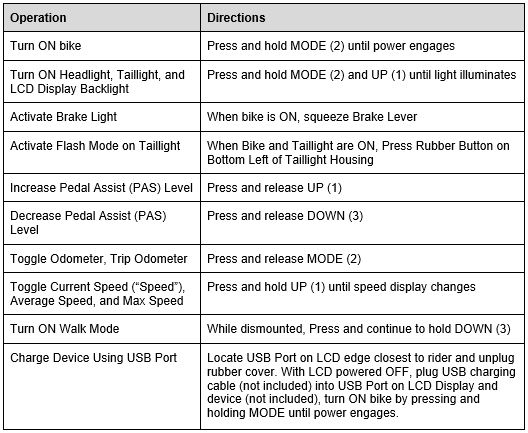
Each button and combinations of the 3 buttons perform a variety of operations and toggle between different information on the LCD Display. Check out the table below to see how you can view different information on your display with the touch of a button!
LCD Display Operations
Click HERE to learn more about walk mode.
Walk mode must only be used while dismounted from the bike and with both hands on the handlebar. Always keep at least one hand on a brake lever to allow quick cutoff of the motor assistance if necessary and to maintain control of the bike.
The LCD display has a built-in USB charging port, so you can charge while you ride!
To charge:
- Turn off the LCD display. Press and hold MODE until the display turns off.
- Connect the device to the charging port using a USB cable. Plug a USB cable into the charging port on the display, then plug in the other end to your device.
- Turn on the LCD display. Press and hold MODE until the display turns on.
The USB charging port can charge many, but not all, USB devices. Some devices (e.g., large phones) that require higher power to charge may not indicate that they’re charging when plugged in. If the LCD display reads “USB,” but the USB device doesn’t display its charging indicator, the device is receiving supplemental power more slowly than it’s using power—so the device’s state of charge may decrease, but not as quickly as it would if it weren’t plugged in.