Remove and reinstall a rear wheel on a multi-speed ebike
This article will step you through everything you need to remove and reinstall a rear wheel on a multi-speed ebike from Rad Power Bikes. If you have a single-speed ebike or need to remove a front wheel, you need to follow slightly different procedures. Consult these resources:
For front wheel removal:
For removal of a rear wheel on a single-speed ebike:
If you're removing your rear wheel to fix a flat tire, you'll need a patch kit or a replacement inner tube. See the Remove, Inspect, and Replace Tire Components article for instructions.
You'll need the following for the rear-wheel removal and reinstallation process:
- A friend
- A pump with Schrader valve and pressure gauge
- Your ebike's Owner's Manual (the latest version is available here)
- A shop towel, paper towels, or nitrile gloves
- Wooden blocks (or something similar to prop up your handlebars when you turn your bike upside down)
- Flat-side cutters
- A smartphone or other digital camera
- Zip ties
- Tools to remove and reinstall your wheel axle. (Consult your Owner's Manual for information on tools and what torque value you'll need to apply to your reinstalled fasteners, including your torque arm bolt and axle nuts.)
- Get ready for maintenance. Turn off your bike, remove the battery, and press the "MODE" or Power button to discharge remaining power.
- Remove any accessories that might interfere with or get damaged by this process. You'll be turning your bike upside down, so this may include accessories attached to your handlebars or to your rear rack.
- If your bike has any folding mechanisms or latches, make sure they are properly secured.
- Put your bike into its highest gear. Prop the bike on the kickstand, lift the rear wheel and rotate the pedals forward while shifting to the highest gear. This will shift the chain to the smallest cog on your rear wheel, which will help you get your chain off later.
- Have a friend help you turn your bike over. Squeeze the rear-brake lever to lock the rear wheel while you lift the front and rotate the bike on its rear wheel. Rest the handlebar grips on wooden blocks or something similar that can keep the bike stable and prevent damage to handlebar components.
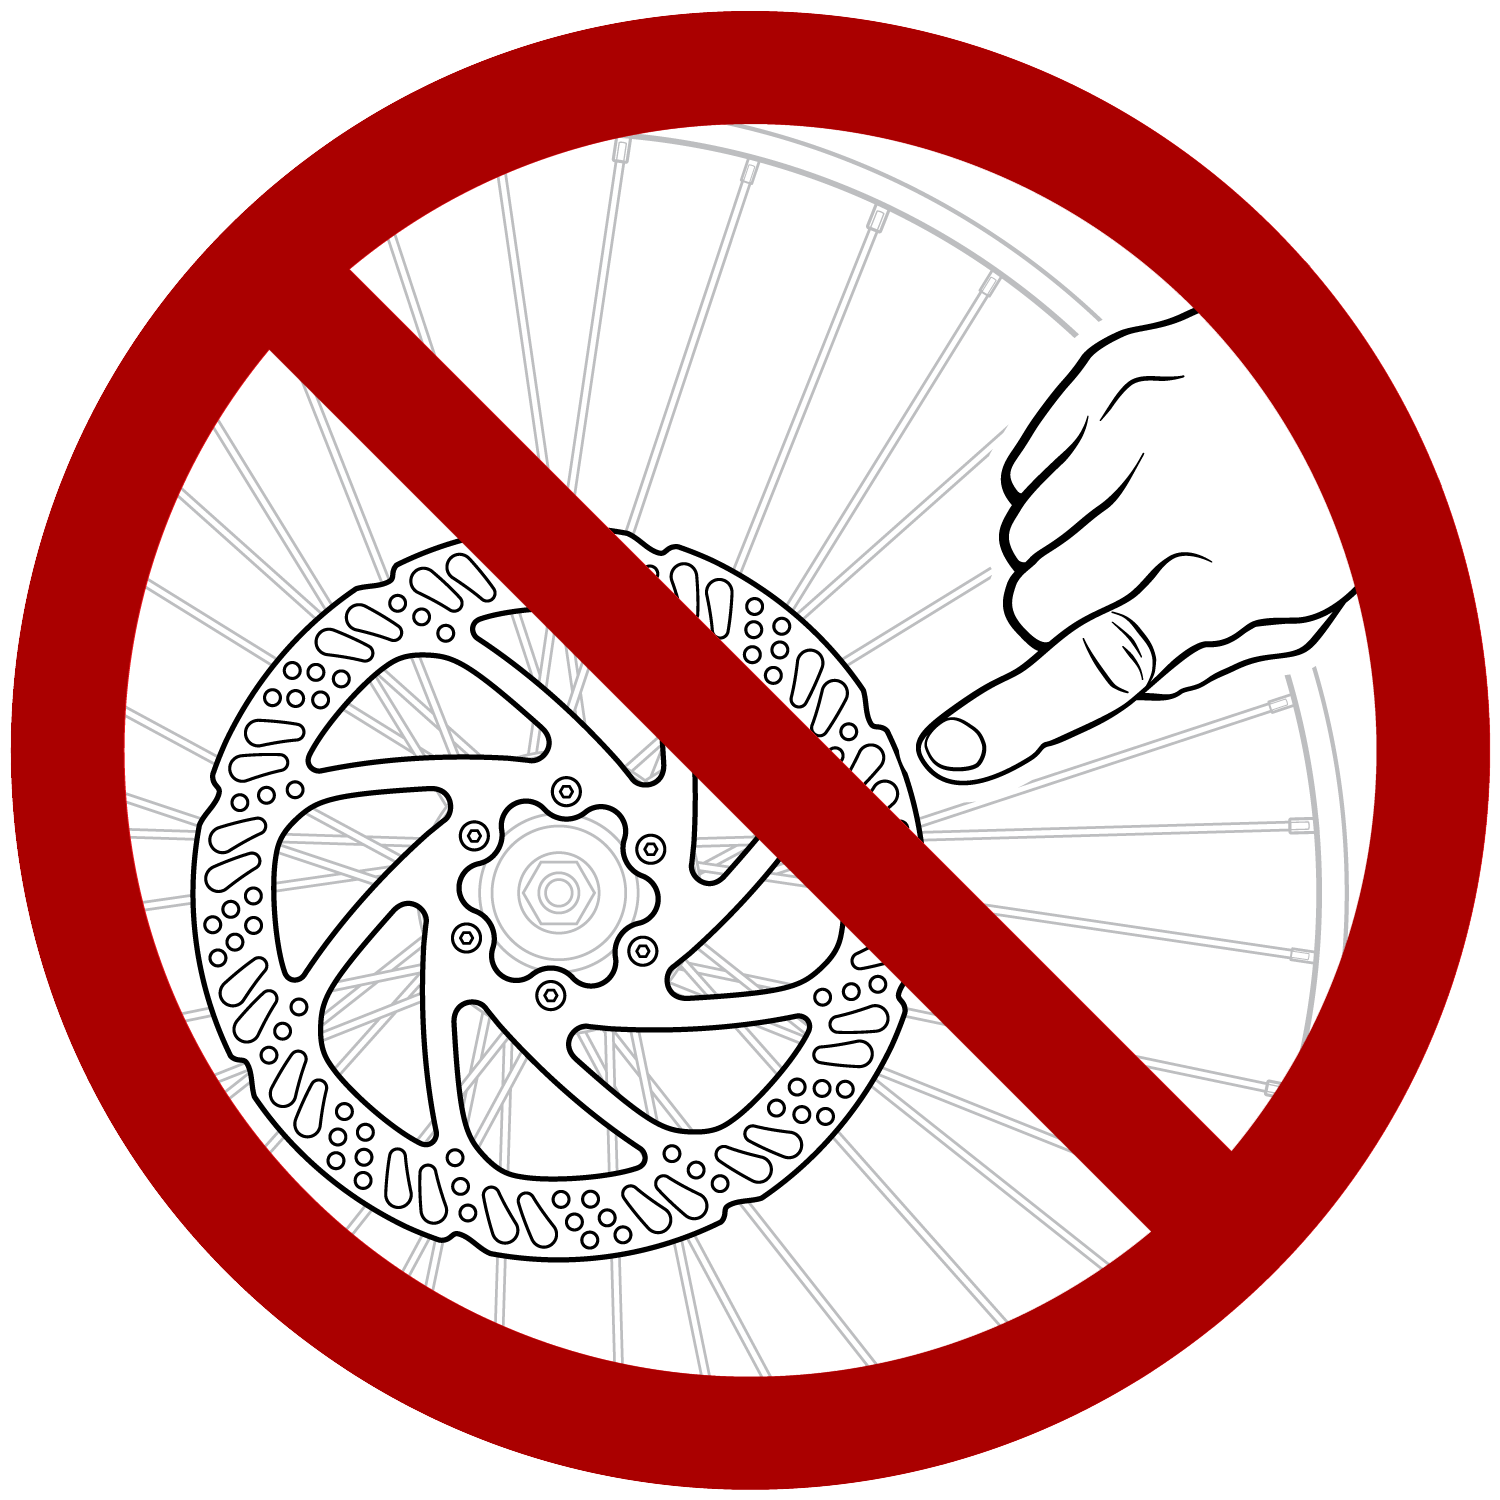
The next several steps will have you working near the brake rotor. Be sure not to touch it, especially with bare hands. Nitrile gloves or similar protective gloves can keep your hands clean and provide a barrier between your hands and the brake rotor.
|
Do not touch the brake rotor, which has sharp edges and can cause serious injury. Touching the brake rotor or brake pads with bare skin can also transfer natural oils. Oils or other lubricants can decrease braking performance. We recommend wearing protective gloves when working near the braking system. |
 |
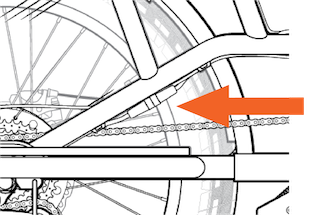
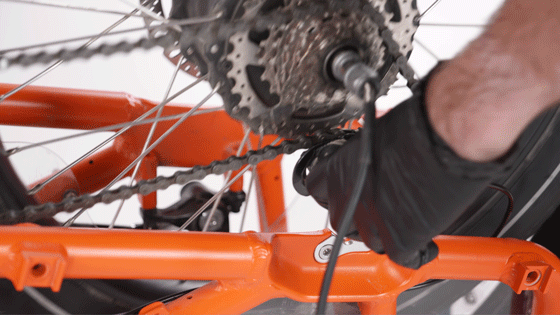
- Disconnect the motor cable. Trace the cable coming out of the motor on the rear wheel to the connector mounted on the chainstay. Snip the zip tie holding the connector in place, and then disconnect the motor cable by pulling the connector ends apart without twisting.
- Remove the torque arm bolt and set it aside. The torque arm and its bolt are located on the brake rotor side of the ebike.
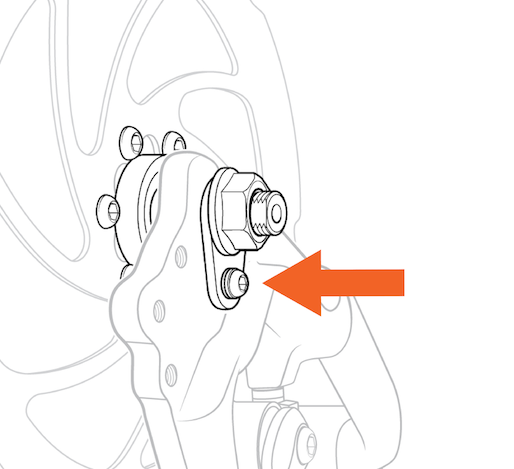
- Loosen the axle nut. Take a picture of the axle nut and any washers located with it on the outside of the dropout so that you can replace them in the same order later. Here's an example of the hardware configuration on a bike with the motor cable exiting through the axle. Your hardware may vary.
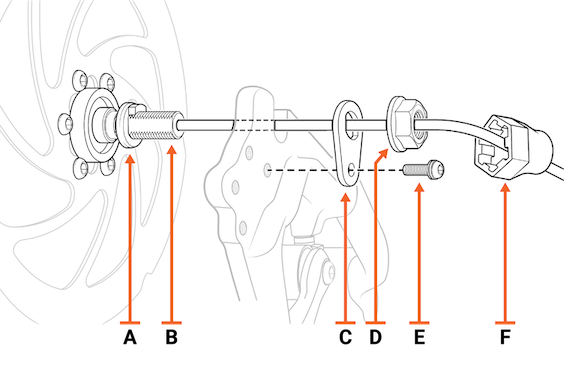
A. Torque washer
B: Axle
C: Torque arm
D: Axle nut
E: Torque arm bolt
F: Axle cap (only on models with motor cable exiting through axle) - Remove the axle nut and washers and set them aside, but leave the torque washer on the axle. The torque washers are located on the inside of the dropout, and they have a tab that nestles into the dropout.
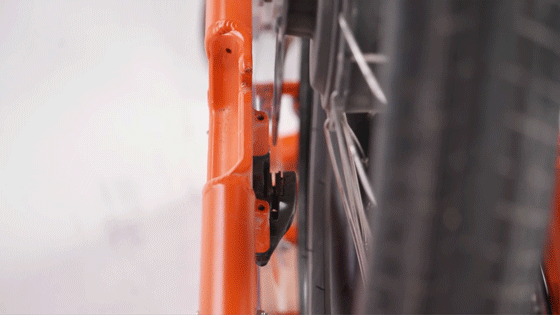
- On the other side of your bike, remove the bashguard and set aside. Your bashguard may be held on by two bolts, or it may be clamped against the dropout by the axle nut. If it's clamped down by the axle nut, your bashguard will loosen in the next steps and you can remove it then.
- Loosen the axle nut on the chain side of the bike, but don't try to remove it if the motor cable exits through the axle nut. Here's an example of the hardware configuration on a bike with the motor cable exiting through the axle. Your hardware may vary.
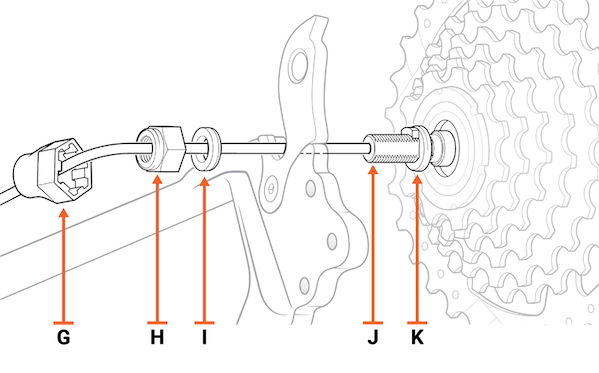
G: Axle cap (only on models with motor cable exiting through axle)
H: Axle nut
I: Washer
J: Axle
K: Torque washer - Gently pull the derailleur toward the back of the bike to keep it from blocking the wheel's axle.
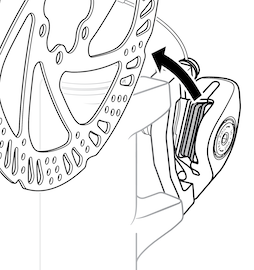
- Slowly pull the wheel upward, keeping it straight so you don't bend the brake rotor as it exits the brake pads.
- Slip the chain off the gear. If your motor cable is on the drive side of the bike, you'll need to maneuver the chain around the motor cable too.
- Continue lifting the wheel until it's clear of the bike.
- Rest the wheel someplace safe, with its brake rotor protected, until you're ready to perform whatever maintenance task you need to do while your wheel is off.
- Get your wheel ready for installation. Make sure your torque washers are still on the axle and pushed toward the center of your wheel. If one has fallen off the axle, put it back on and make sure that both torque washers' tabs are oriented in the same direction.
- Rotate the wheel so that the tabs on the torque washers are angled to slide into the dropouts with the tabs going into the dropouts last.
- Begin lowering the wheel. Before your brake rotor gets close to the brake pads, lift the bike chain over the motor cable and onto the smallest cog.
- Pull the derailleur arm backward so that it doesn't obstruct your axles on the way to the dropouts.
- Keep lowering the wheel, and carefully slot the brake rotor between the brake pads. Keep your wheel straight to prevent bending the brake rotor.
- Fully insert the wheel axles into the dropouts. If necessary, you can rotate the axle to fine-tune the angle of the torque washers. The axle needs to go all the way into the dropouts on both sides. If there is a gap between the axle and the dropout, use a 10 mm wrench to carefully turn the axle to line up the flat sides with the sides of the dropouts, and adjust the wheel so it is fully seated in the dropouts.
- Put rear axle retention hardware back onto the axles according to their original order. Refer to the illustrations above, "Rear axle retention hardware, brake side" and "Rear axle retention hardware, drive side." Begin with the torque arm bolt, which can help seat the axle. The axle nuts go on last, with the flared side facing into the wheel. Hand-tighten the axle nut, tighten further with a wrench, and then use a torque wrench to tighten the axle nut to the value listed in your Owner's Manual.
- Use a wrench to tighten the axle nuts, and then torque to the value listed in the Owner's Manual.
NOTICE: A highly experienced bike mechanic may be able to accurately tighten the axle nut without a torque wrench, but if you are not an experienced mechanic, you will need a torque wrench to tighten your axle nuts. If your motor cable exits through the axle nut as shown here, the only accurate way to torque it is by using a torque wrench outfitted with a crowfoot bit.Failure to torque your axle nuts and other fasteners on your bike to the required values in your Owner's Manual can lead to component failure, accidents, severe injury, or death.
- Reinstall the bashguard if it didn't already go on with the rest of the axle hardware.
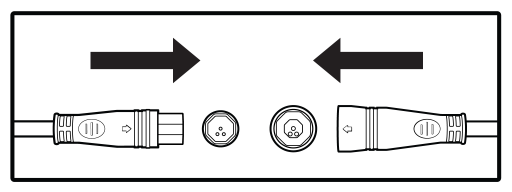
- Reconnect the motor cable. Align the external arrows and the internal pins and press the two sides of the connector together without twisting. Replace the zip tie that you removed earlier. Make sure your zip tie doesn't grab the chain, and snip off the excess without leaving any sharp points.
- Rotate your pedals forward (as though riding) to ensure the chain moves through the drivetrain smoothly and your brake rotor spins straight between the brake pads. If there's wiggle in your brake rotor, you may have bent it while reinstalling. If that happens, take your ebike to a local bike shop for rotor repair or replacement.
- Have a friend help you turn the bike back right-side up.
- Reattach any accessories you removed before the process, torqueing any fasteners to the value specified in the instructions they came with.
- Reinstall your battery.
- Test that you can shift among all of your gears.
- Run through the pre-ride safety checklist and the brake tests outlined in your Owner's Manual. Now you're ready to Ride Rad!