Battery charging guide
This article will give you an overview of the best practices for charging your battery so that it charges efficiently and safely. To learn about the basics of battery usage on your ebike, including how to power on the battery, remove the battery, check the battery charge level, and battery range and life expectations, refer to the Battery essential resources article. The most authoritative information on the battery that came with your ebike is your Owner's Manual.
The high-quality, state-of-the-art, lithium-ion battery that came with your ebike from Rad Power Bikes is designed with safety in mind, but all ebike (and all vehicle) batteries store considerable power and must be handled correctly. Any damage or misuse of your battery or charger can cause a safety hazard. Follow all safety and procedural instructions below and in your Owner's Manual.
Using aftermarket battery accessories or products that have not been tested by Rad Power Bikes for safety and compatibility may void your warranty, result in or property damage, create a safety hazard, or cause injury. If you use products not tested and recommended by Rad Power Bikes, you do so at your own risk
Charging your battery with a charger other than one supplied by Rad Power Bikes and designed for your specific ebike model can cause damage to your ebike’s electrical system or create a safety hazard. Only use the battery charger that came with your ebike.
Using a damaged battery or charger can damage additional components or create a fire hazard. Stop using your battery and charger and contact Rad Power Bikes immediately if any of the following occur:
- Your charger’s flexible power cord or output cable, or the electrical cables on your bike is frayed, has broken insulation, or any other signs of damage.
- Your battery or charger is physically damaged, non-functional, or performing abnormally.
- Your battery or charger experienced a significant impact from a fall, crash, or shipping damage, with or without obvious signs of damage.
- Your battery is leaking a clear, pungent, gel-like substance (which is potentially corrosive and flammable).
- Your battery was submerged in liquid or had extensive water exposure or damage.
- Your charger becomes too hot to touch (it’s designed to get warm with normal use), makes an unusual smell, makes a popping sound, or shows other signs of overheating.
Store any damaged battery or charger in a safe, dry location away from the house and other flammable materials/structures and, as soon as possible, recycle or otherwise dispose of it according to local rules. Contact Rad Power Bikes Product Support if you have any questions. In the case of a leaking battery as described above, call Rad Power Bikes immediately.
Some of the details in this article are specific to either external or semi-integrated batteries, so make sure you know what type you have.
Your ebike from Rad Power Bikes is designed for either an external battery that mounts on the frame, a semi-integrated battery that partially nests into the frame, or an integrated battery that mounts within the frame profile. All of these batteries are high-end, lithium-ion batteries, but they have some slight differences in how they're secured to the frame, how they are activated, and best charging practices. We'll call out such differences in the rest of this article.
|
External battery |
Semi-integrated battery |
Integrated battery |

Batteries depend on chemical reactions to charge and to release energy, and these reactions are most efficient at moderate temperatures. At very low temperatures, your battery may not charge or release energy efficiently or at all. At very high temperatures, your battery can get too hot, causing internal damage or even a fire hazard. Your battery is designed to shut off automatically at extreme temperatures, but you still need to be careful.
Please see your Owner's Manual or the Battery essential resources article for additional safety information and the recommended temperature range for riding and storage.
Recommended charging range: 41°F to 77°F (5°C to 25°C)
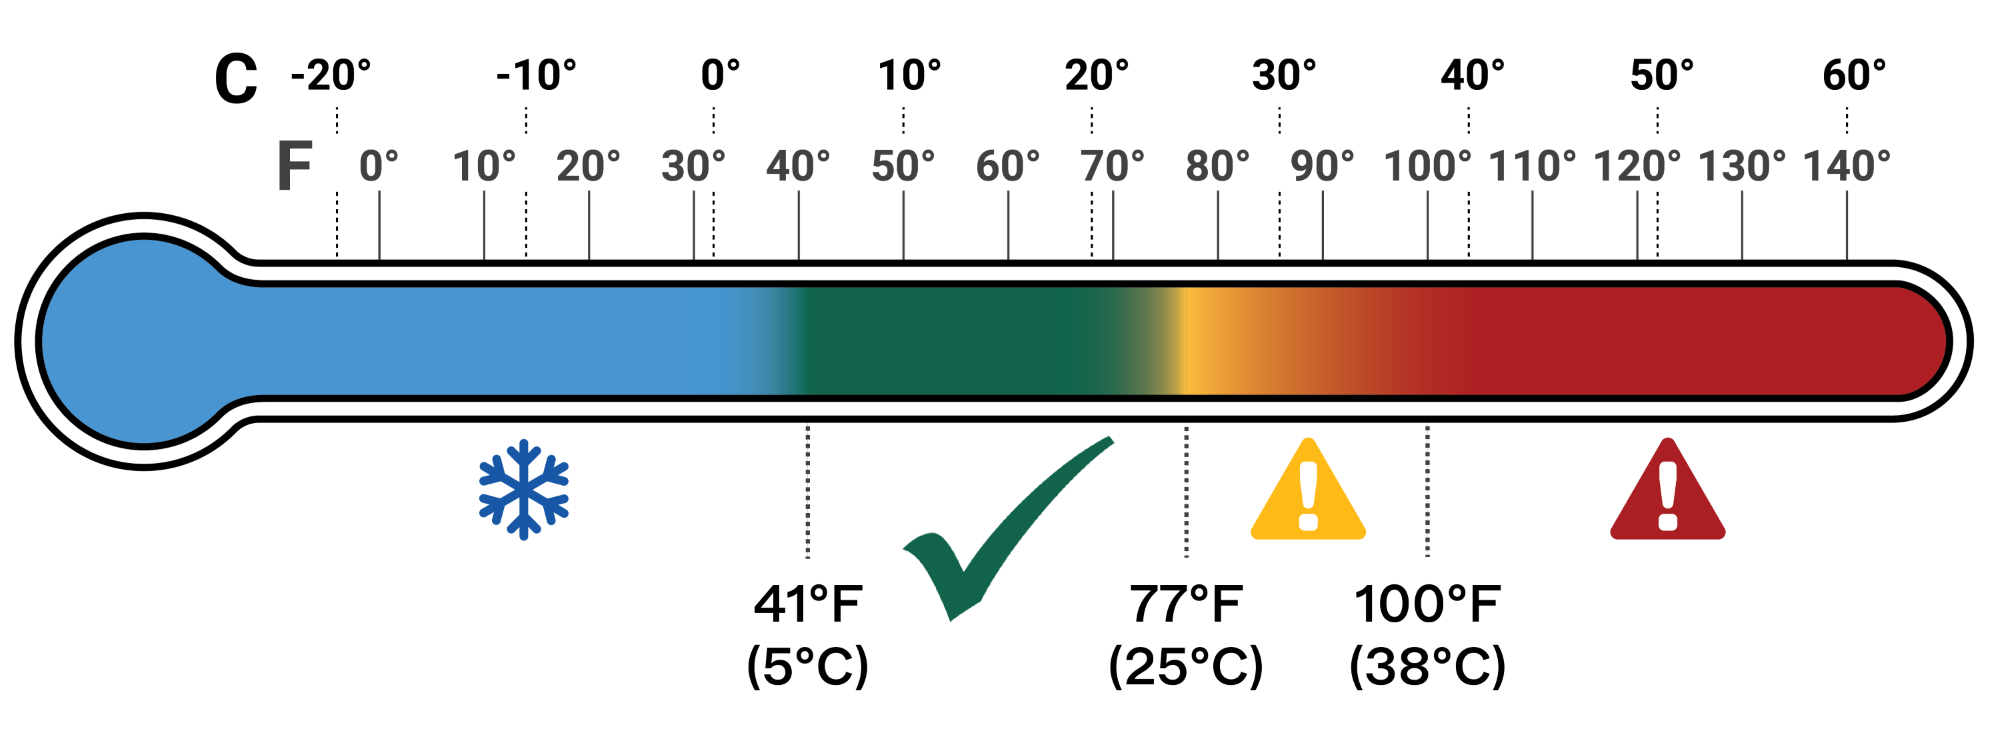
For best charging performance and to minimize wear and tear on components, we recommend charging at ambient temperatures of 41°F to 77°F (5°C to 25°C). Batteries generate heat while charging, but your battery from Rad Power Bikes is designed to air-cool, so keep it uncovered with the light facing up on a flat, stable, hard, unheated surface. At relatively low temperatures, charging can take longer.
Do not charge your battery when it is warm from riding or in ambient temperatures above 100°F (38°C) to prevent unnecessary wear and tear on battery and charger. If the battery has turned off to prevent heat damage, wait until the battery cools down to turn the battery back on. Never charge your battery on or near heat-generating devices.
Where to charge. Always charge in a safe, dry, indoor area that is away from children, direct sunlight, dirt, debris, tripping hazards (including electrical cords), or any materials that could ignite in the unlikely event of a charger or battery malfunction. Arrange the bike, battery, and charger to eliminate the potential for falls or other impacts. Make sure you stay close enough to it to check on it occasionally.
When charging any powerful battery, locate it somewhere you can get to it easily (or maneuver past it to safety) in the unlikely event it catches fire. Do not place it in a hallway or near a door such that it could block your exit in an emergency.
Letting a battery charge unattended increases the risk that a charging problem will go undetected and lead to component damage or a fire hazard. Always charge your battery where you can monitor it.
When to charge. A new battery will arrive with 50% to 75% of a full charge. You can ride the bike right away, without charging, once the bike is assembled and verified as safe by a professional, reputable bike mechanic.
We recommend charging the battery fully after each ride so your battery can power you for the full range the next time you ride Rad! The battery has no "memory," so you can charge your battery after each and every use, even if you just take a spin around the block.
A battery with a partial charge can be left without immediately charging back to full. Charge the battery as soon as possible when the battery bar on the display is flashing to indicate the battery is low.
You can charge your battery either when it's on or off your ebike as long as the charging environment meets the criteria described in the previous sections.
- Turn off your ebike.
- Remove the battery if you want to charge it away from the ebike. To remove the battery, insert your key in the keyport and turn to the unlocked position.
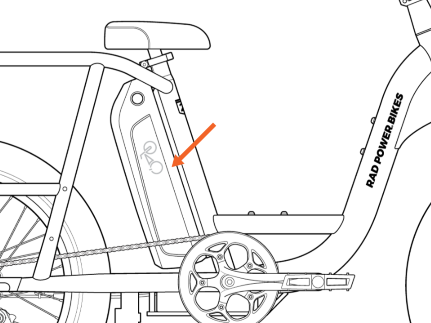
- External batteries only: If you're charging your battery while it's on the ebike, use your key to align the keyport with position "B" in the illustration below.
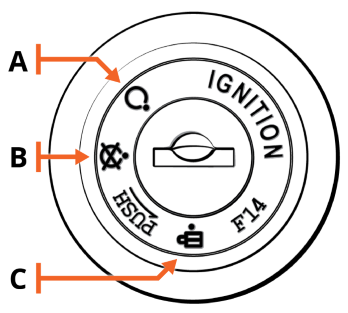 |
External battery keyport key positions: A = "On" (with battery locked to the frame) B = "Off" (with battery locked to the frame) C = "Off" (with battery unlocked from the frame, i.e., for removing the battery) |
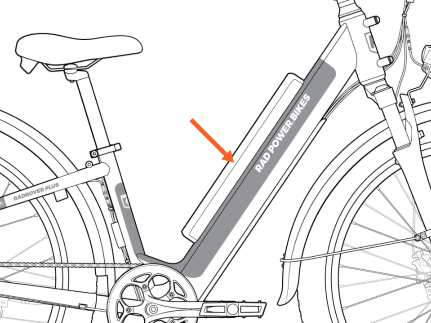
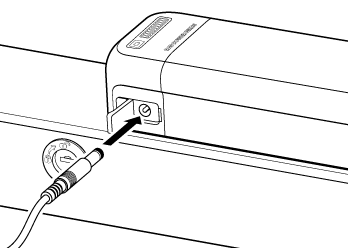
- Locate the charging port of the battery. Do not confuse the keyport and charging port. (The charging port includes a flexible cover. The keyport does not have a cover.)
|
Semi-integrated batteries |
Integrated batteries |
|
External batteries, example 1 |
External batteries, example 2 |


- Place the charger on a flat, secure surface if you have removed it from your ebike. Ensure the charging indicator light or lights are facing up.
- Plug the charger into the battery charging port. Open the flexible cover on the charging port. Connect the charger's round barrel connector to the charging port on the side of the battery.
- Plug the charger into a power (wall) outlet. Look for the charge status on your charger, indicated by the color of one or two LEDs (small lights):
- If your charger has one LED: While actively charging, the LED light on the charger will be red. When the LED turns green, charging is complete.
- If your charger has two LEDs: Older model chargers have two LED indicator lights--one labeled 'Charge' and the other 'Power'. While actively charging, both lights will be red. Once charging is complete, the Charge light on the left will turn green and the Power light will remain red.
- When charging is complete, unplug the charger from the power (wall) outlet, and then unplug it from the battery. Be sure to pull gently on the plugs, not on the cables themselves.
The charger will stop charging automatically when the battery is full, but we recommend unplugging the charger once charging is complete to reduce unnecessary wear and tear on charging components and to avoid unnecessary electricity use. Store the charger carefully, making sure its plug does not come in contact with liquids, dirt, debris, or metal objects, which can damage the plug and interfere with future operation.
External batteries. If you have an external battery and suspect a blown fuse, please follow the directions in our Battery fuse replacement guide.
Semi-integrated and integrated batteries. You cannot change a fuse on semi-integrated and integrated batteries. These batteries and their chargers are specially designed to prevent conditions that can blow a fuse, so it's extremely unlikely that you are having an issue that could be solved with a fuse replacement. Please consult the troubleshooting information here and in your Owner's Manual to pinpoint potential causes of whatever problem you're observing.
You do not need to balance your battery unless your Owner's Manual or Rad Power Bikes Product Support recommends it. Batteries from Rad Power Bikes stay well balanced under normal use conditions. Follow the use, charging, and storage instructions in the Owner's Manual, and your battery will provide you with excellent performance.
For general information about your battery, please see our Battery essential resources article or consult your Owner's Manual.
Why is my battery not charging?
If you’ve followed steps in this article, and the battery is not charging as expected, refer to the Why is my battery not charging? article for additional troubleshooting steps.
Why are the battery charge lights on the battery not lighting up?
The most common reason is that the battery needs charging. But if you’ve charged the battery correctly and still no lights illuminate, try the simple solutions below. If neither of these apply, we recommend reviewing battery instructions found in your Owner’s Manual.
- External Battery: Not having the key turned all the way clockwise to the ON position. Make sure the key is in the ON position, and then press the battery level indicator. A full battery will show 1 red light and 3 green lights.
- Semi-Integrated Battery: Your battery may be in SHIP MODE (this is an deep-sleep state that prevents bikes from turning on during shipping). This can happen inadvertently at times. To take a battery out of SHIP MODE, press and hold the battery charge level button for at least three seconds. Then press the battery level button again to see if the battery charge lights illuminate. Not all semi-integrated batteries have the ship mode feature, but for those that do, these steps often solve the problem.
Why do the charge levels on my battery and remote not match?
If the charge level on the battery and the display or remote don't match, use the following steps to identify the problem.
- If the two sets of charge indicators show only a slight difference in charge levels (e.g., a difference of one bar), that difference is likely caused by variations in how the battery and display/remote round the percentage to the nearest tenth or fifth. A minor difference like this is normal.
- If, however, the charge indicators on your battery and your display/remote mismatch by several indicator lights, there may be an issue which can be resolved by fully charging the battery. First, remove the battery from the frame and charge until full using the steps described above. Once fully charged, re-install the battery on the frame and power on the bike. The battery level and charge indicator on the display/remote should now both display a full charge.
Why am I not getting the advertised mile range on a single charge?
Several factors could affect mileage, and the most common reasons can sometimes be the simplest to resolve. If none of the following factors help resolve your issue, please reach out to our support team for additional help.
- Underinflated tires (low PSI): Low tire pressure is the number one reason for not getting expected miles from a single battery charge. Check tire pressure frequently to make sure tires are inflated to the recommended PSI value (pound per square inch). A mere 10 PSI below the recommended value can significantly lower the miles you’ll get on a single charge. You’ll find the PSI value stamped on the side of the tire.
- Cargo or extra weight: Heavier loads will demand more from your battery, causing lower mileage (just like a car). Rad ebikes can carry a LOT of extra weight, but each model has a “payload capacity” limit, defined as the combined weight of the rider, passenger(s), additional gear, accessories, and cargo. If your ebike is carrying the higher end of this limit, the battery charge will not last as long as when the ebike is carrying just the rider.
- Hills and road surface: A battery that’s powering an ebike across a flat, smooth surface (e.g. a paved bike trail) will last longer than if it’s powering that same ebike up hills or across bumpy, varied terrain (e.g., gravel or dirt).
- Throttle or Pedal Assist System (PAS) usage: Using the throttle and PAS consumes extra battery power. Using lower pedal assist levels can increase your mileage per charge.
- Stop-and-go traffic or headwinds: Frequently stopping and then getting your ebike up to speed, or riding into headwinds can also lower the miles your battery gets on a single charge.
- Air temperature: The environmental temperature while riding the ebike or while the battery is in storage can impact mileage. If you're riding in below (or near) freezing conditions, you can expect slightly less range. Storing the battery above room temperature can hurt performance too.