RadWagon 5 (2024) error 30 / connector check guide
Use this procedure to check the cable connections on your RadWagon 5 that may be causing electrical error messages or preventing the bike from powering on. This procedure will require you to power down your ebike, unplug individual cables and inspect them for damage, then carefully reconnect them and power on the ebike to see if that resolved the issue. Repeat the process with each cable until the issue is resolved, or you isolate the problem to a specific component.
Tools needed:
- 4 mm Allen wrench
- Torque wrench with Allen bits
- Flat-side cutters
- Replacement zip ties
- Bike stand (optional)
- Nitrile gloves (optional)
Take pictures of cable connections and cable routing before you start disconnecting cables, as once you resolve the issue you will need to reconnect and reinstall all of the cables in their original position.
- Get the ebike ready for maintenance. Turn off the ebike, remove the battery, and press and hold the power button to discharge any remaining power.
- Inspect the battery and battery mount terminal contacts. If the contacts are damaged, dirty, or wet, the part may need to be replaced. Take a photo and contact Product Support for help. If the contacts are in good condition, set the battery aside for now.
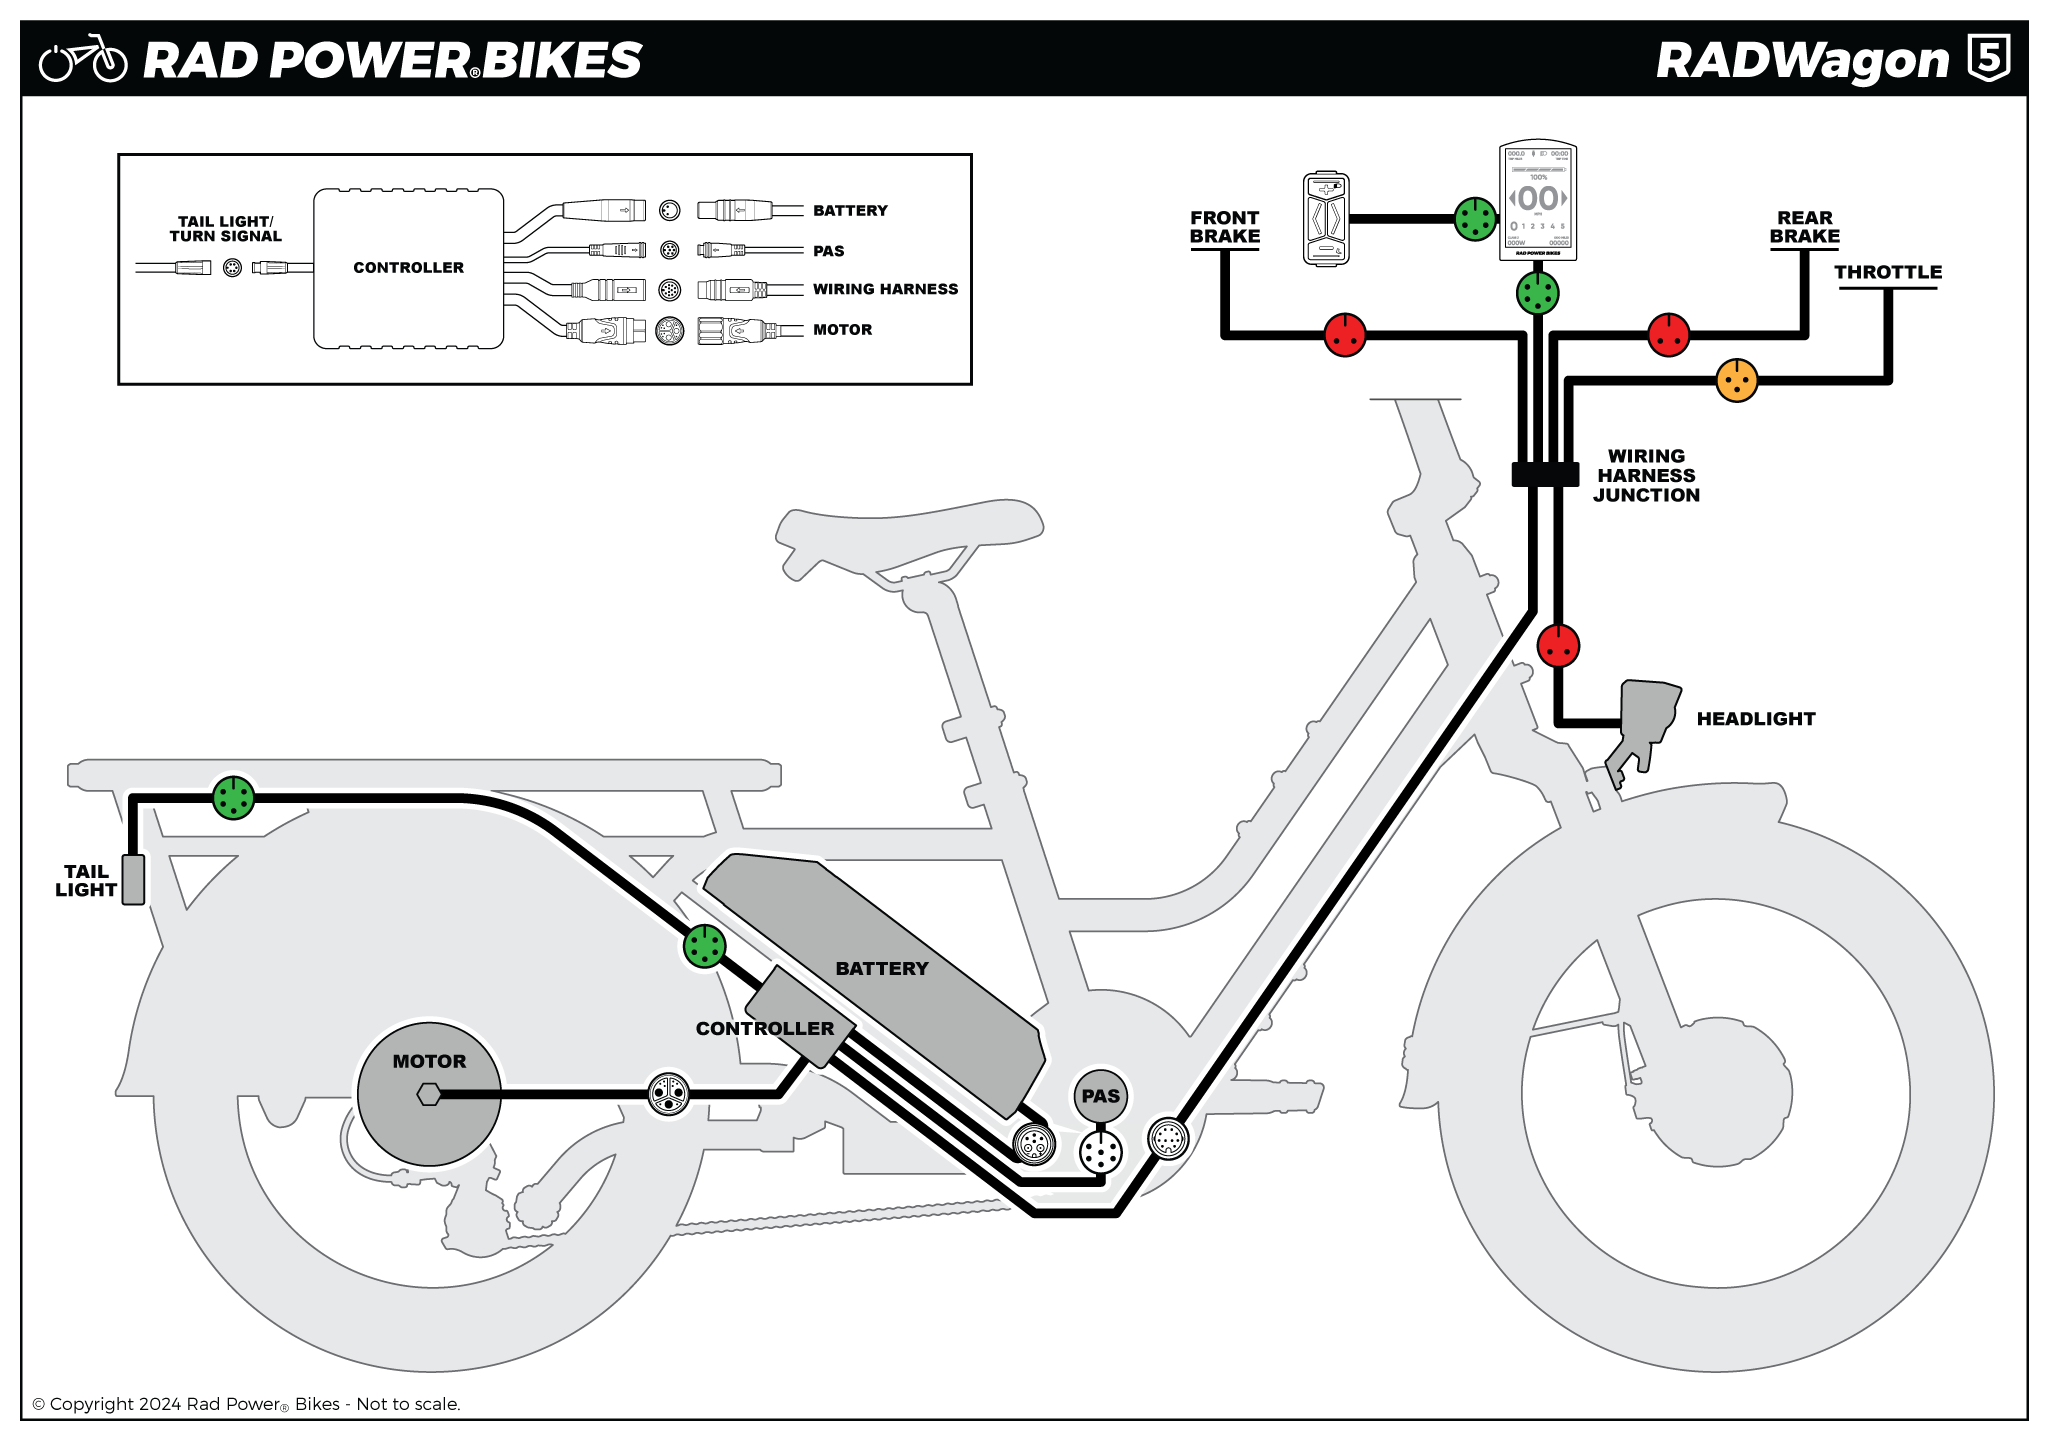
- Inspect the wiring harness cables. The cables at the front of the ebike connect to a junction box, and is then routed through the frame and connects to the controller. The cable connectors will be located in front of the handlebar, and may require you to temporarily remove the wiring harness cover to disconnect.
- Unplug each of the following cables (see diagram) one at a time. Snip any nearby zip ties if you need cable slack, and pull each side of the connector apart, without twisting, to unplug.
- Front brake sensor
- Rear brake sensor
- Throttle
- Color display
- Remote
- Headlight
- Inspect the inside of the connector. If the inside is damaged, dirty, or wet, the part may need to be replaced. Take a photo and contact Product Support for help.
- Plug the connector back in, reinstall the battery, turn the bike on, and check whether the error is resolved. Repeat the process for each cable to try and isolate the source of the error.
- If the wiring harness cables are not the source of the error, check the connections to the controller next.
- Unplug each of the following cables (see diagram) one at a time. Snip any nearby zip ties if you need cable slack, and pull each side of the connector apart, without twisting, to unplug.
- Inspect the controller cables. Locate the controller mounted behind the battery tray.
- Use a 4 mm Allen wrench to remove the three bolts securing the battery tray. Move the battery tray out of the way so you can access the controller cable connections inside the frame opening.
- Unplug each of the following cables (see diagram) one at a time. Snip any nearby zip ties if you need cable slack, and pull each side of the connector apart, without twisting, to unplug.
- Taillight
- Battery
- Wiring harness
- PAS
- Motor (mounted on chain stay, snip zip ties and then unscrew connectors to pull apart)
- Inspect the inside of the connector. If the inside is damaged, dirty, or wet, the part may need to be replaced. Take a photo and contact Product Support for help.
- Plug the connector back in, reinstall the battery, turn the bike on, and check whether the error is resolved. Repeat the process for each cable to try and isolate the source of the error.
- If the issue persists after checking all cable connections, contact Rad Power Bikes Product Support.
- Return cables to original positions. Carefully return cables to their original positions and replace any zip ties. Use flat-side cutters to snip off zip tie excess, and ensure the cut is flush and smooth with no sharp point. Check that all cables are out of the way of moving parts, and turn the handlebar to ensure that it can move freely.
- Reinstall battery tray. Use the Allen wrench to re-install the battery tray mounting bolts. Use a torque wrench to tighten the mounting bolts to 5 Nm.
- Reinstall the battery, test the bike fully, and ride Rad!