RadRover Step-Thru 1 (2020) error 30 / connector check guide
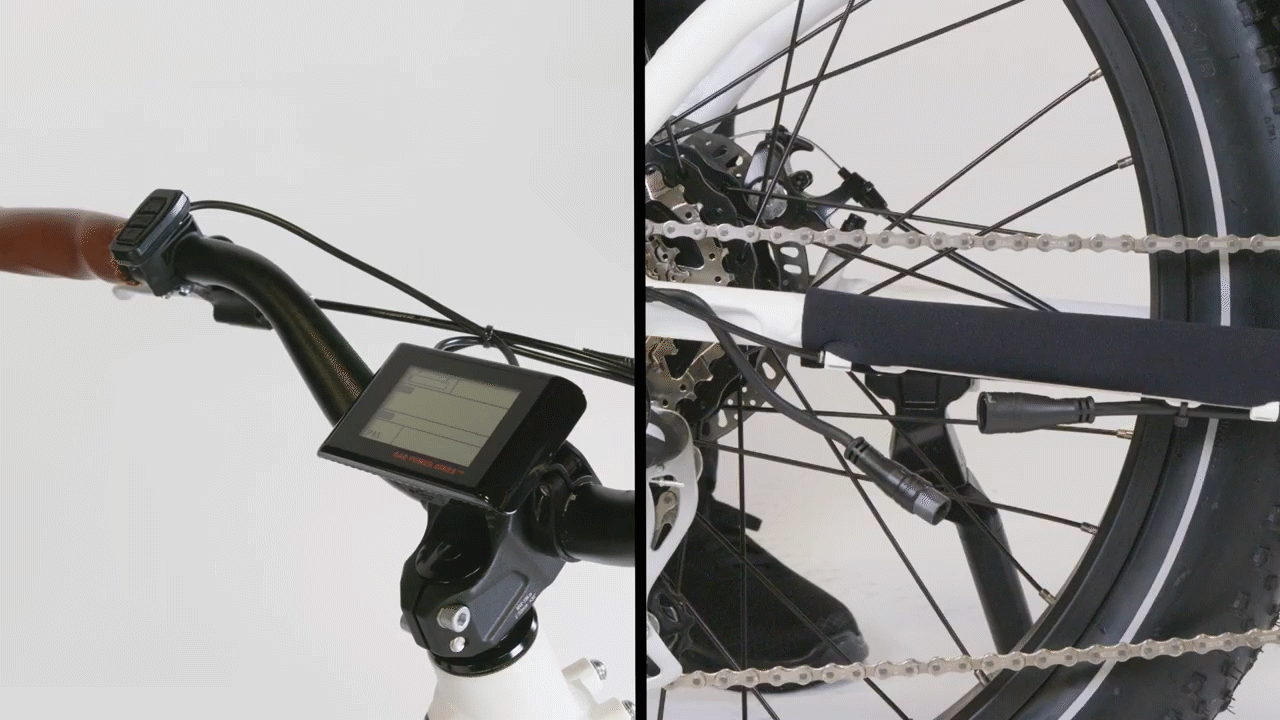
If your RadRover Step-Thru 1 (2020) fails to power on or the LCD display shows an "Error 30," you can troubleshoot the issue by resetting the connection to the bike's electrical components. It is important to check and reset all connectors until the error is resolved, even if they appear to be fully seated and in good condition.
Follow the steps below to troubleshoot a communication error.
Tools needed:
- Flat side cutters
- A flat head screwdriver
- A camera
- A few zip ties
Do not insert any tools into the connectors, use metal tools on the internal pins, or attempt to straighten bent bins. Doing so can lead to irreversible damage to the component or cause injury or death.
The process for checking the connectors below will involve unplugging the connector, inspecting the inside for damage, plugging in the connector, and turning on the bike to check if the error continues while the connector is plugged in.
Click the heading below to begin troubleshooting.
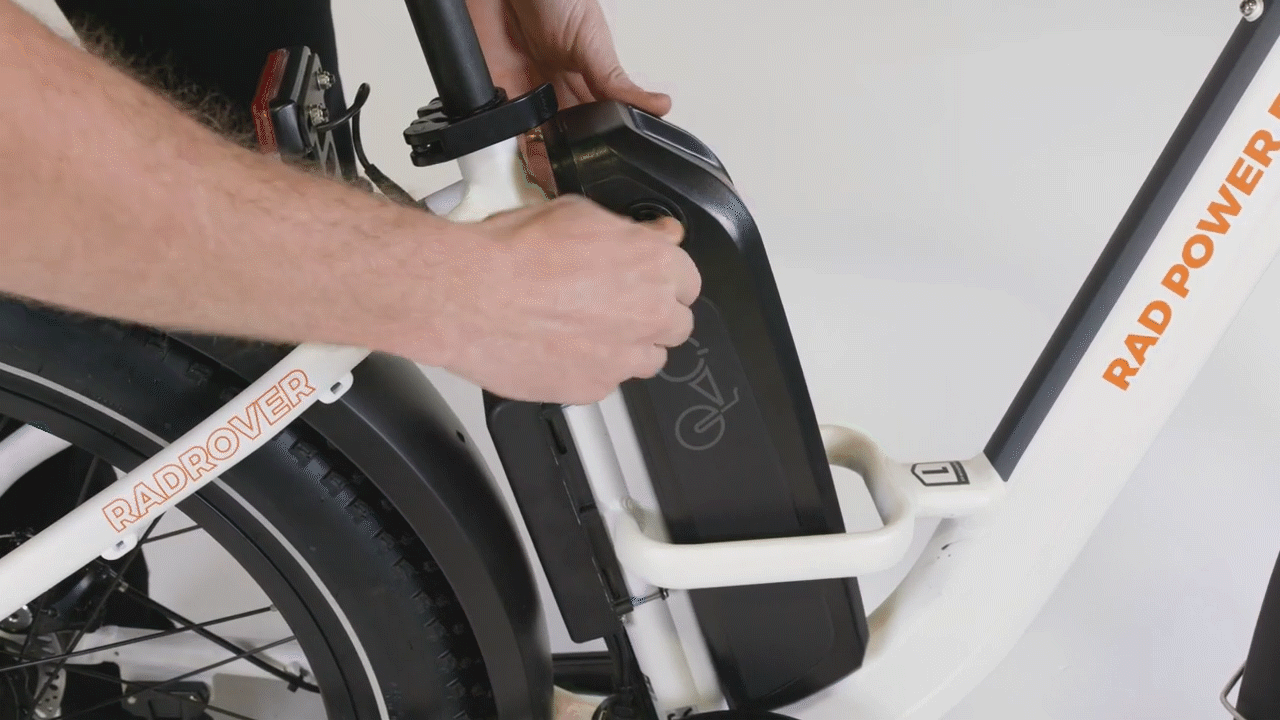
- Get the bike ready for maintenance. Turn off the bike, remove the battery, and press and hold the MODE button to discharge remaining power.
- Check the battery and battery mount terminal contacts. Visually inspect the terminal contacts for any dirt, damage, or moisture. If the terminal contacts are damaged or wet, take a photo and contact Product Support for more help. Do not attempt to repair or clean the contacts. If the terminal contacts look normal, set the battery aside for now and continue troubleshooting.
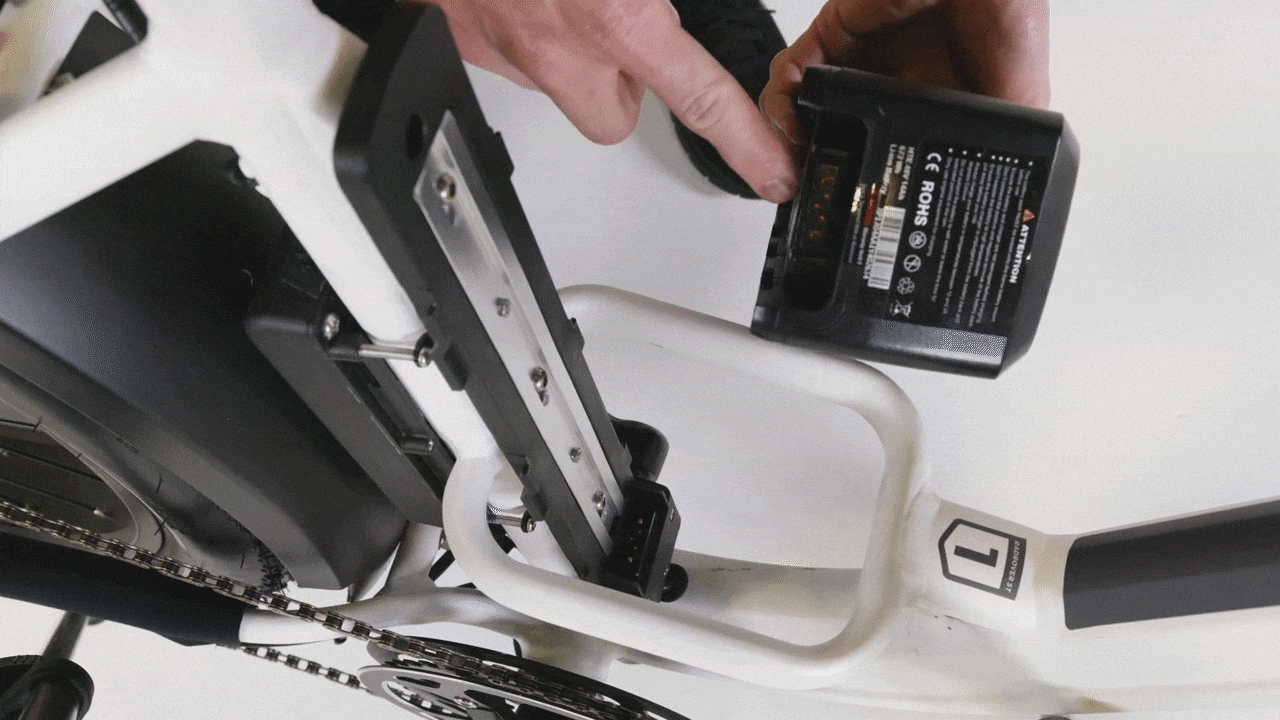
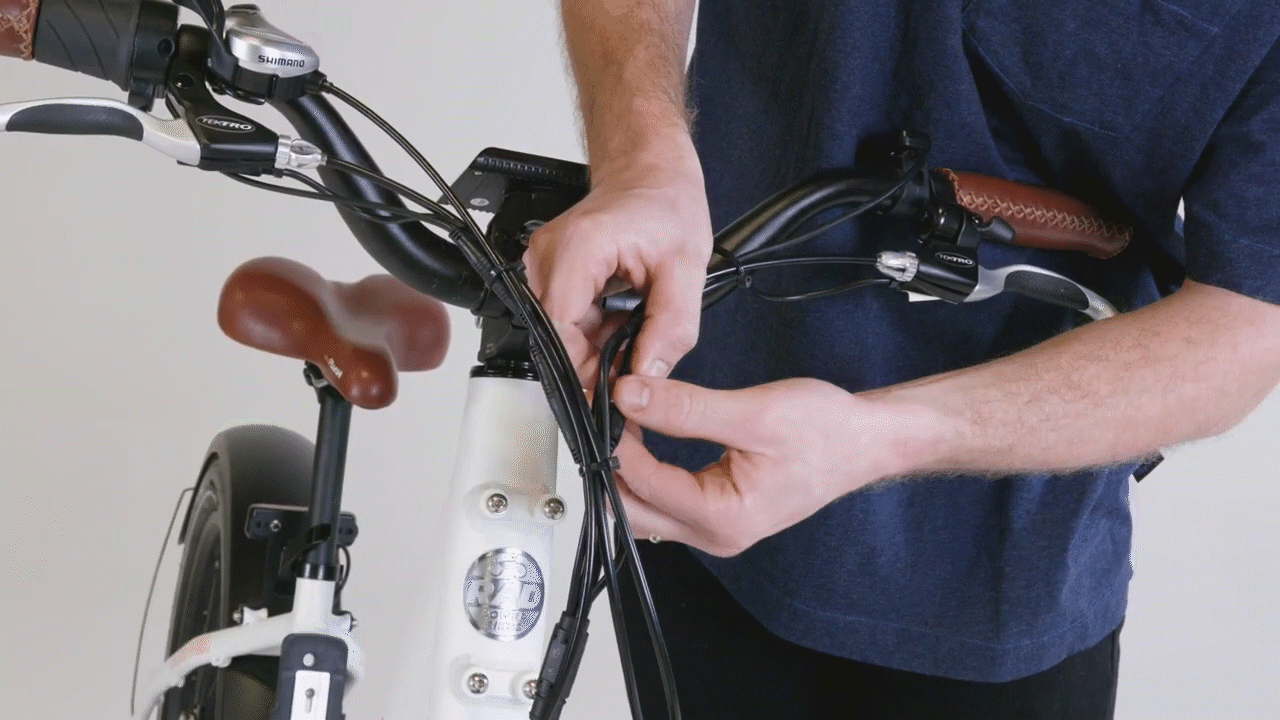
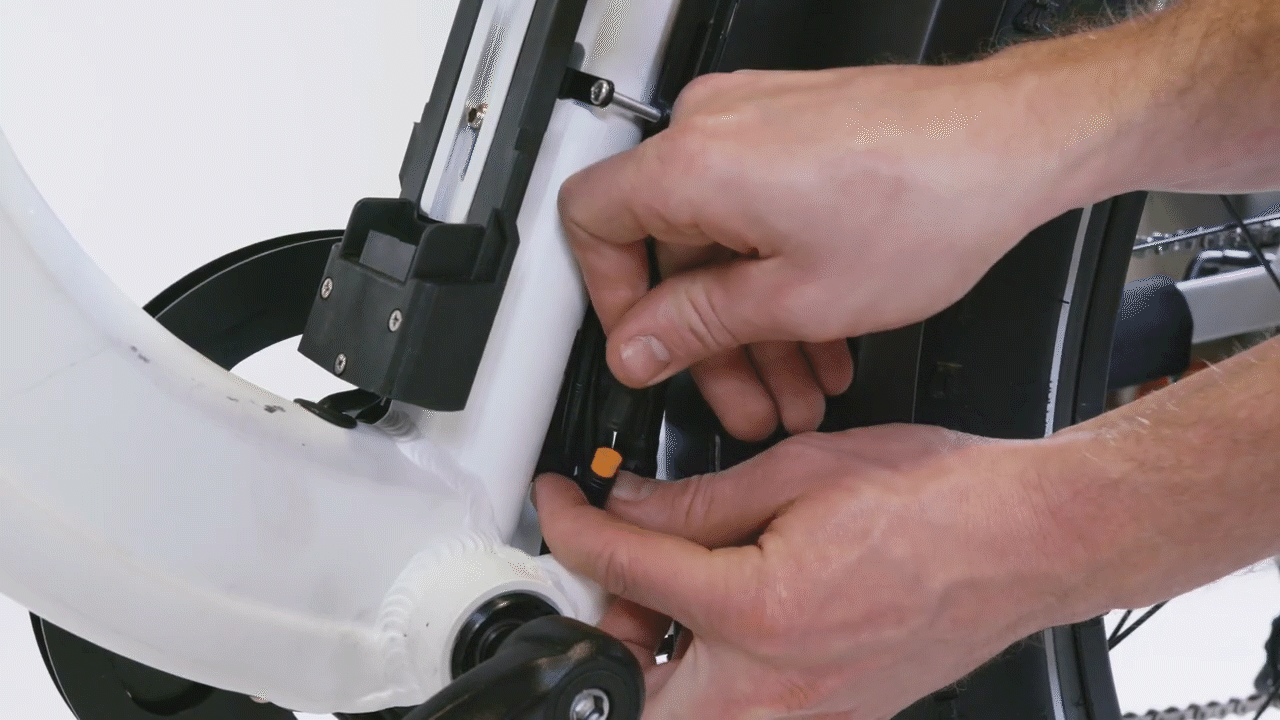
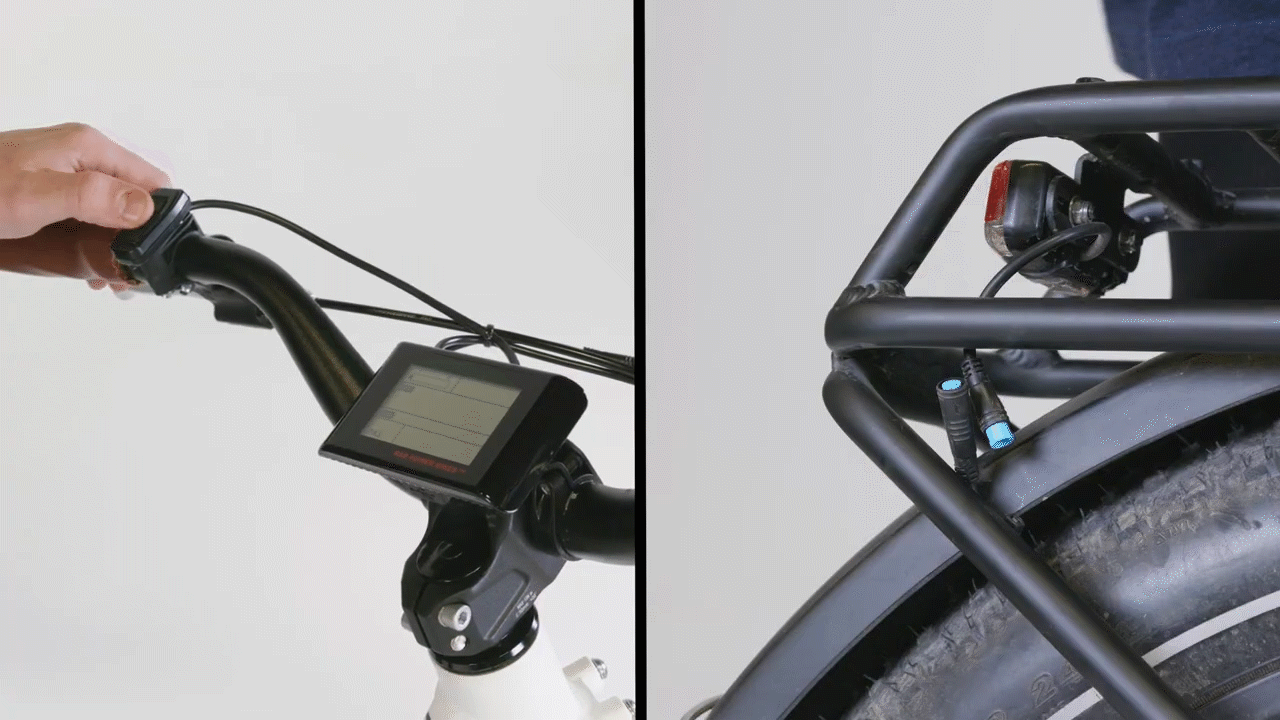
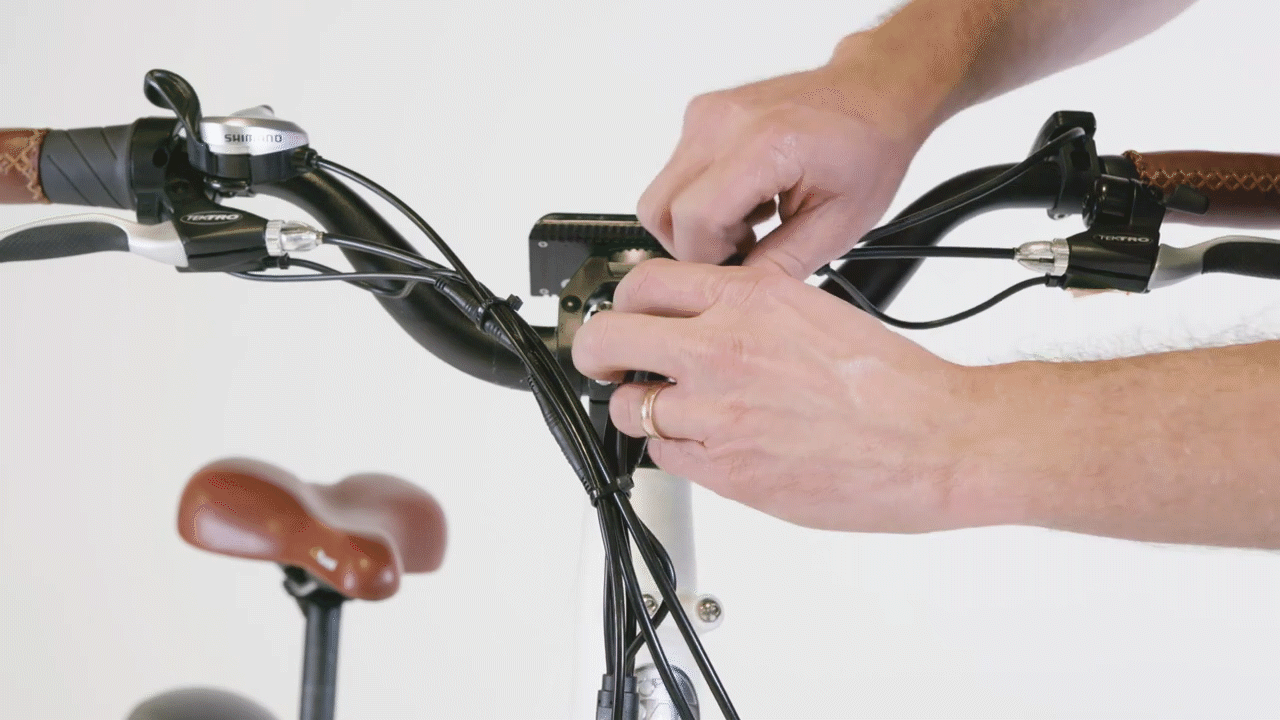
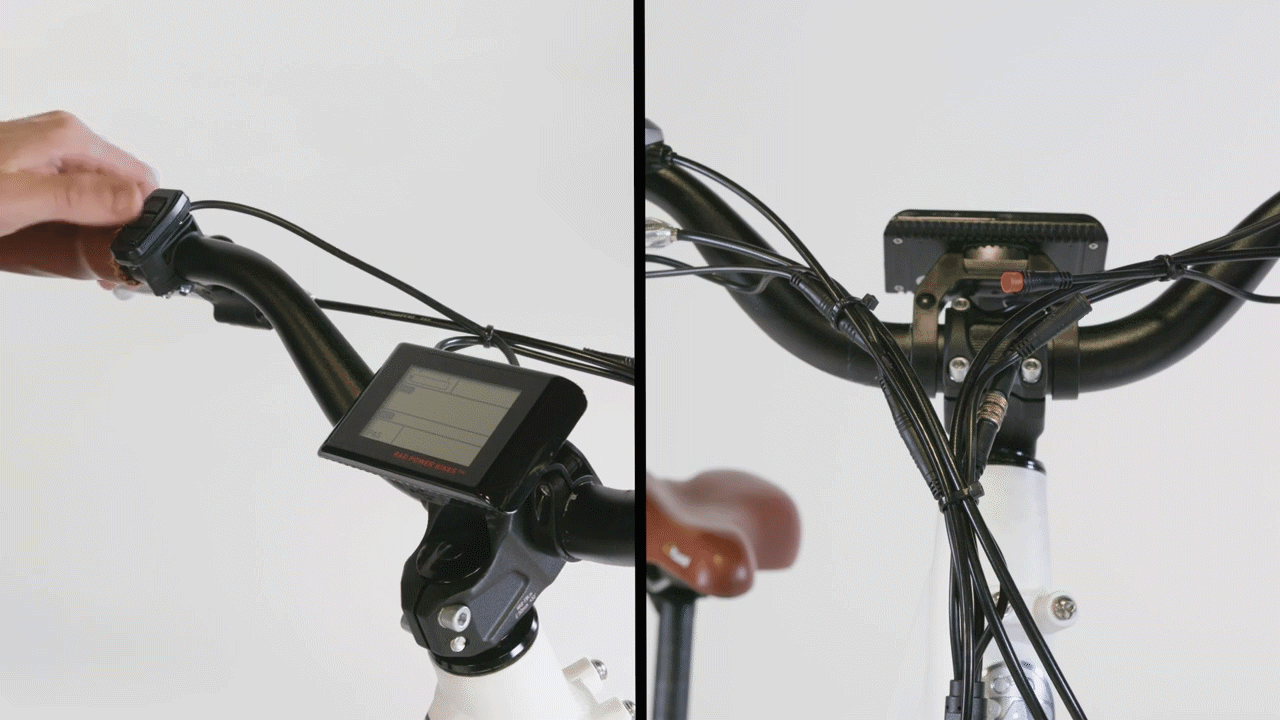
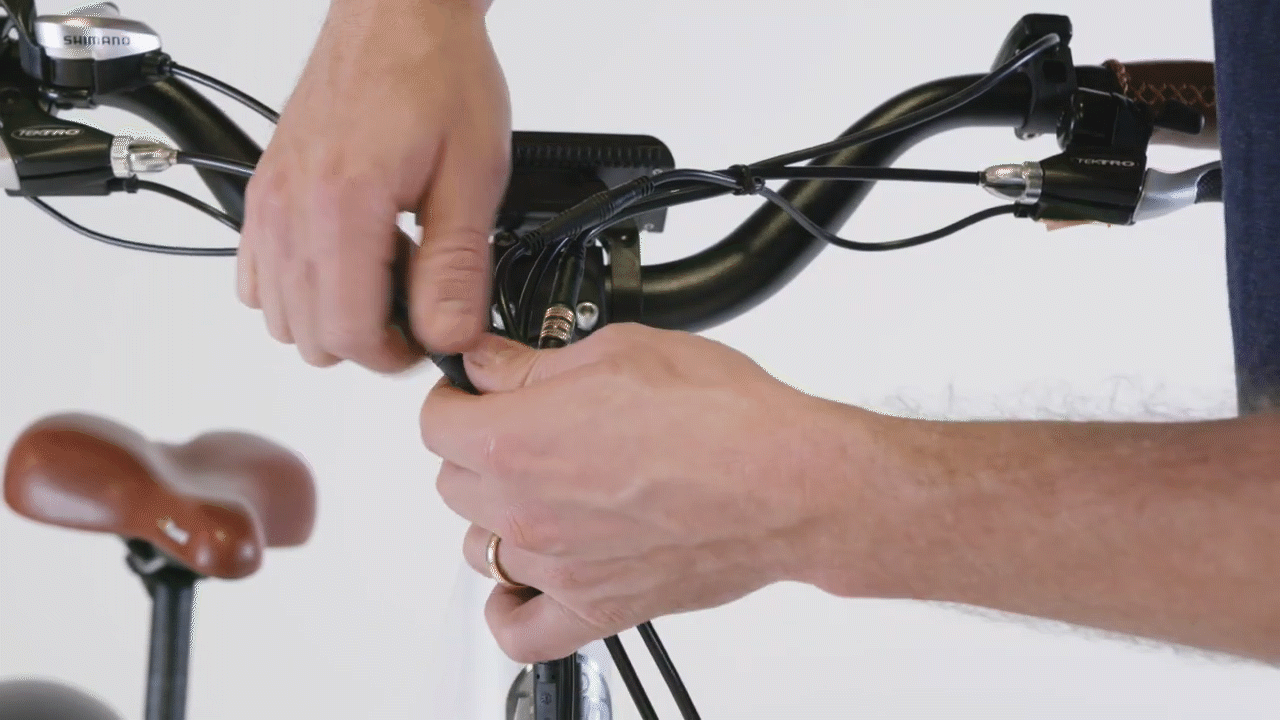
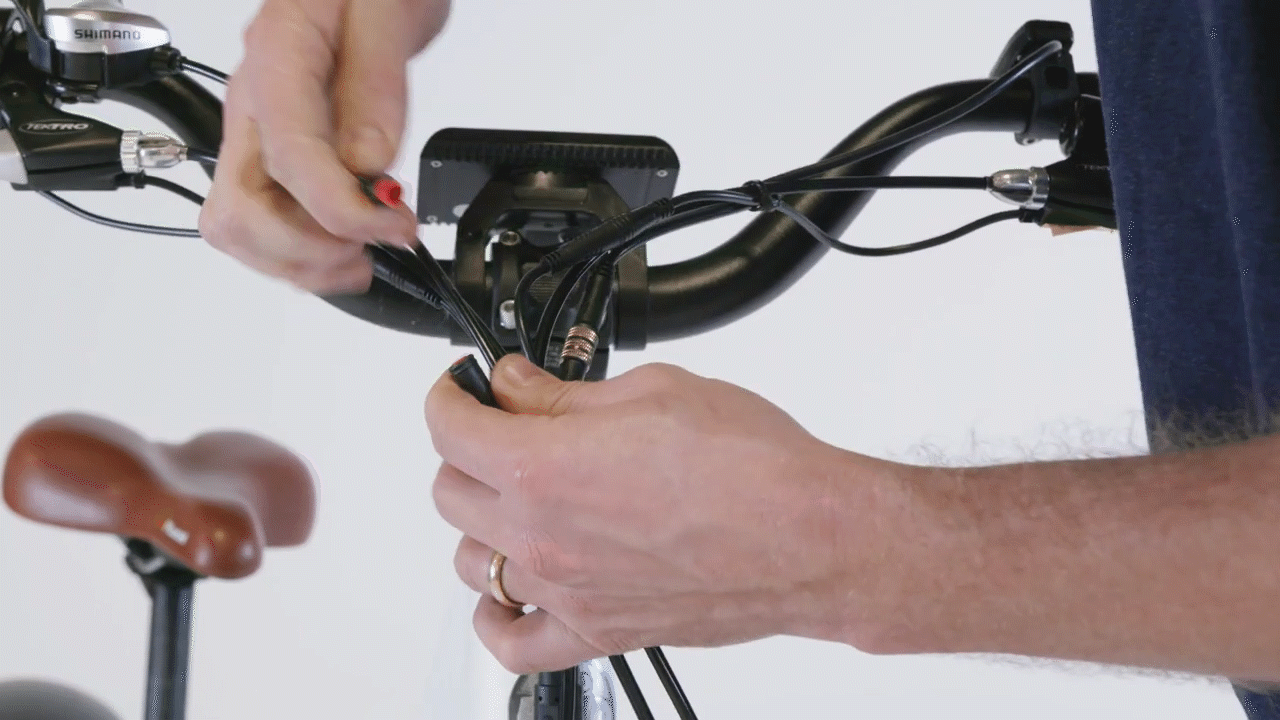
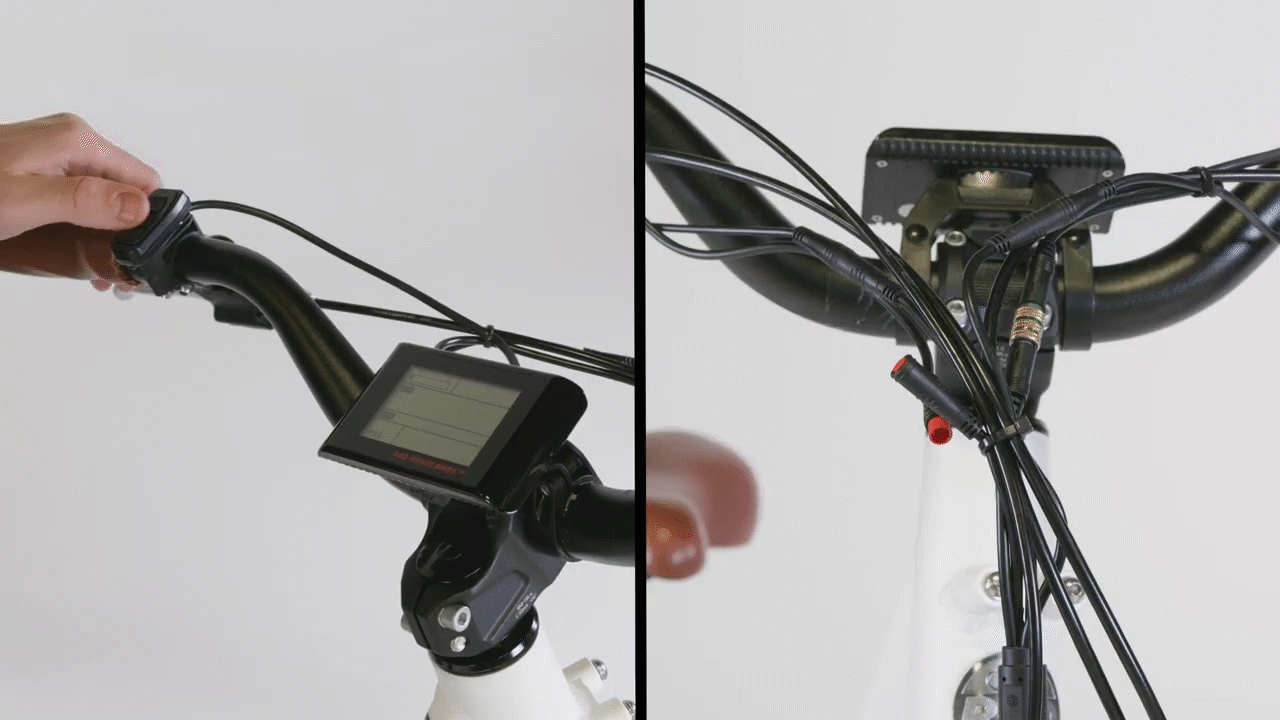
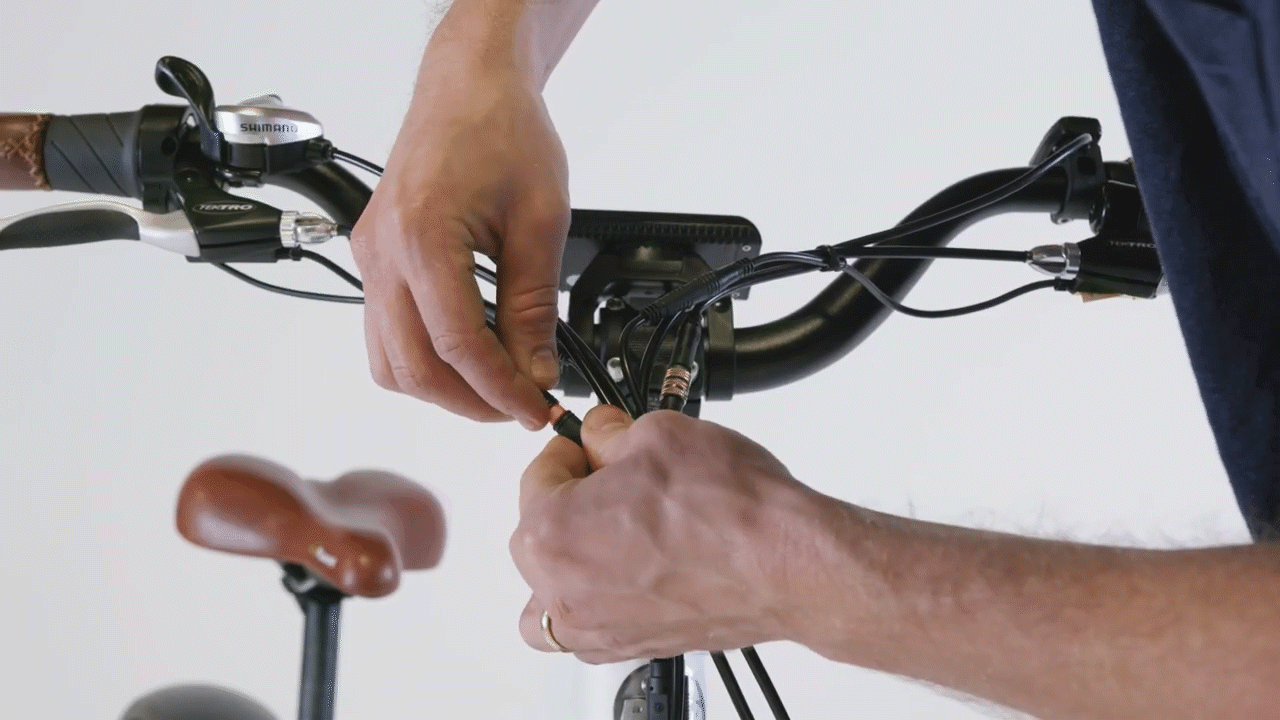
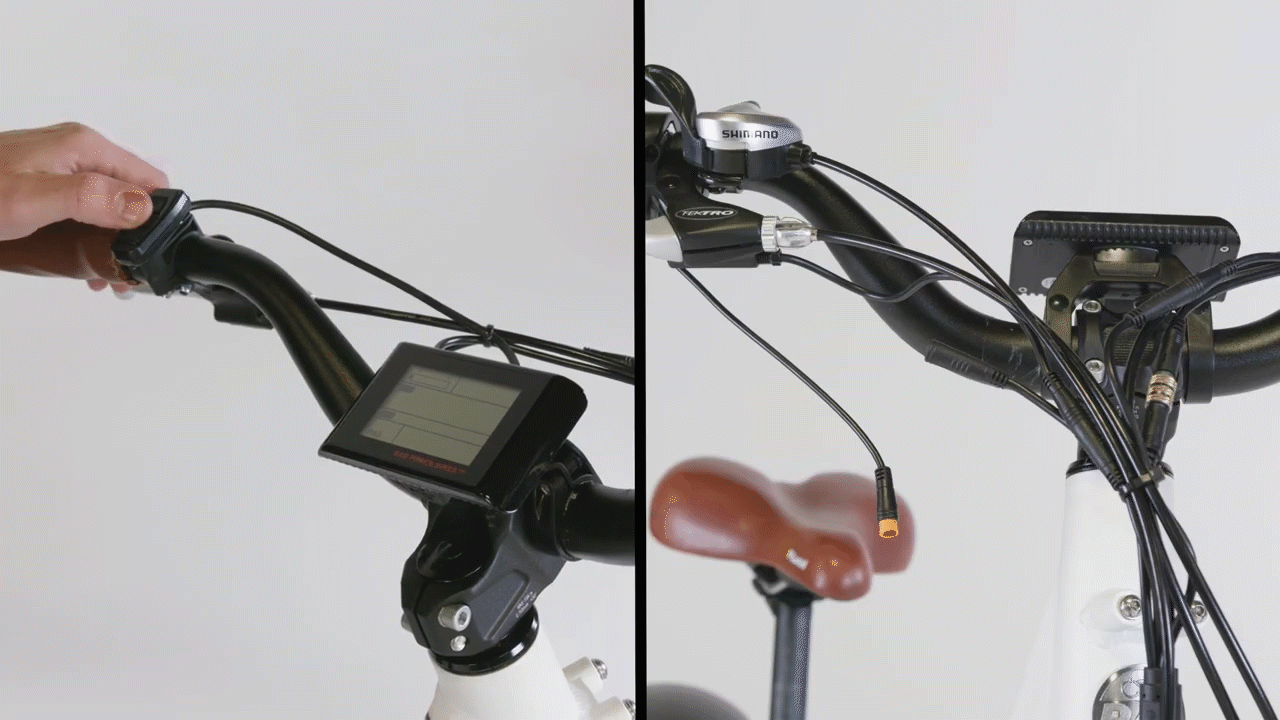
- Locate and unplug the display connector. Follow the cable from the part to the connector. Snip zip ties for easier access. Untwist the metal portion of the connector fully, then pull directly apart, without twisting, to unplug.
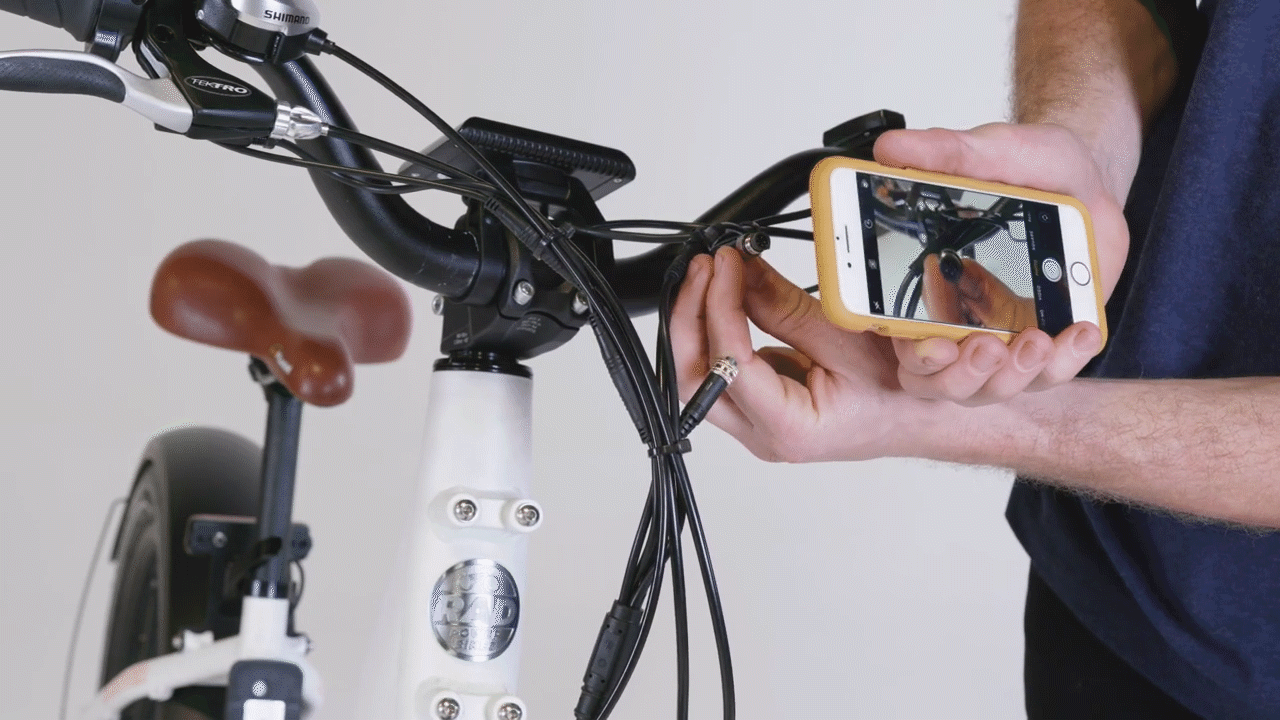
- Inspect the inside of the connector for damage, dirt, or moisture. If the inside of the connector is damaged, dirty, or wet, take a photo and contact us for more help. Do not attempt to fix broken or bent pins or clean the inside of the connector. If the connector looks normal, continue troubleshooting.
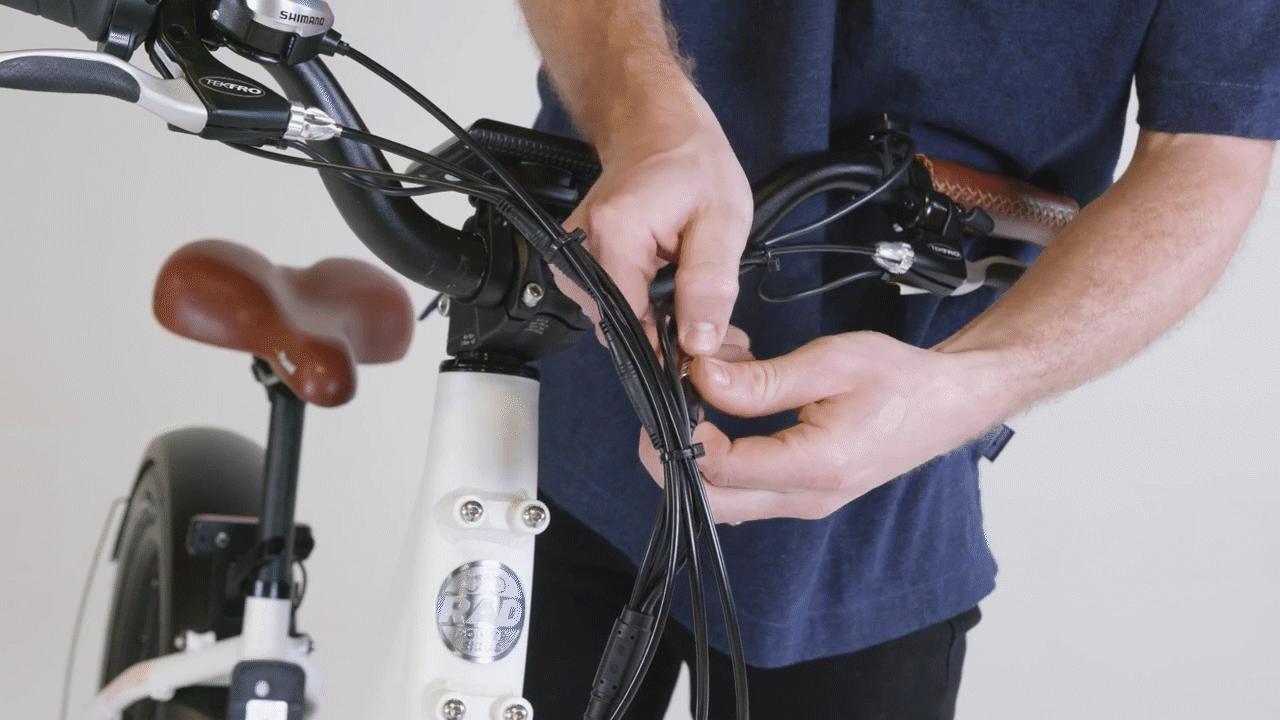
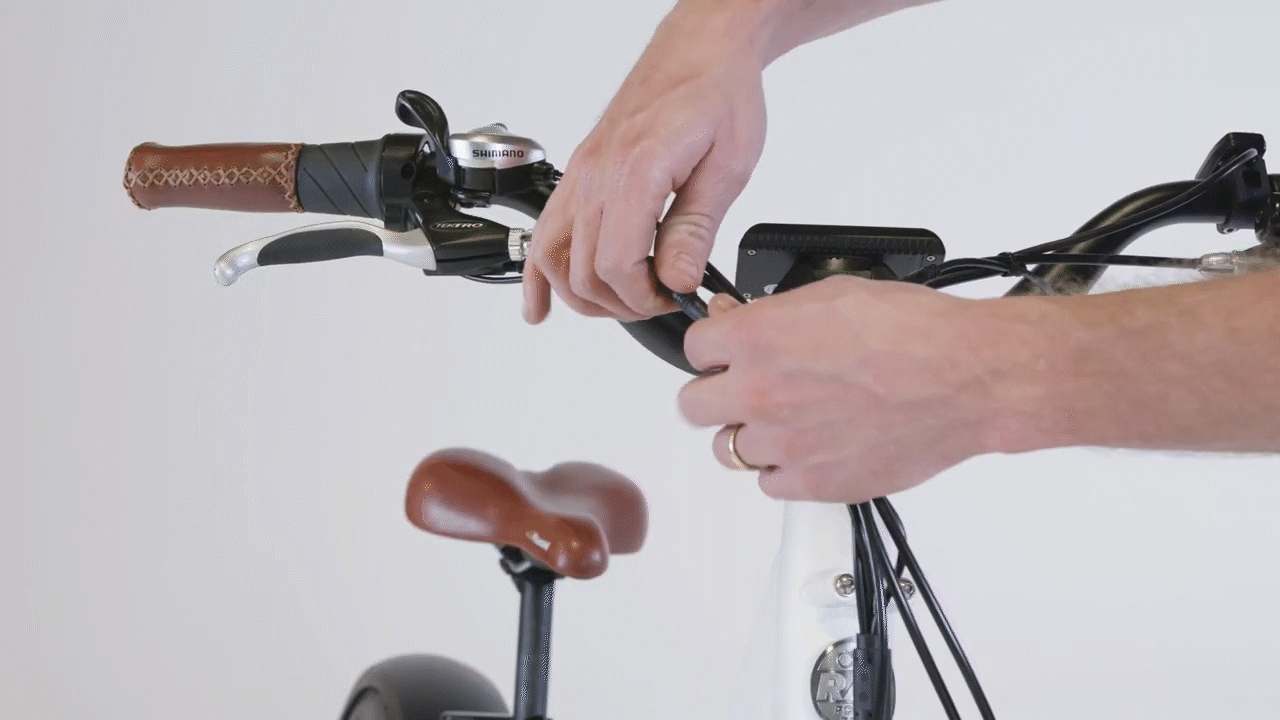
- Plug in the connector. Line up the internal notch and pins (and external indicators) and press directly together without twisting. Then twist the metal portions until the connector is secure. Replace any snipped zip ties and trim them to be flush and smooth.
- Reinstall the battery and turn on the bike to check if the error is resolved. If the error is resolved, the connector was likely loose and triggered the error. Test the bike fully and ride Rad! If the error continues, turn off the bike, remove the battery, discharge remaining power, and continue troubleshooting.
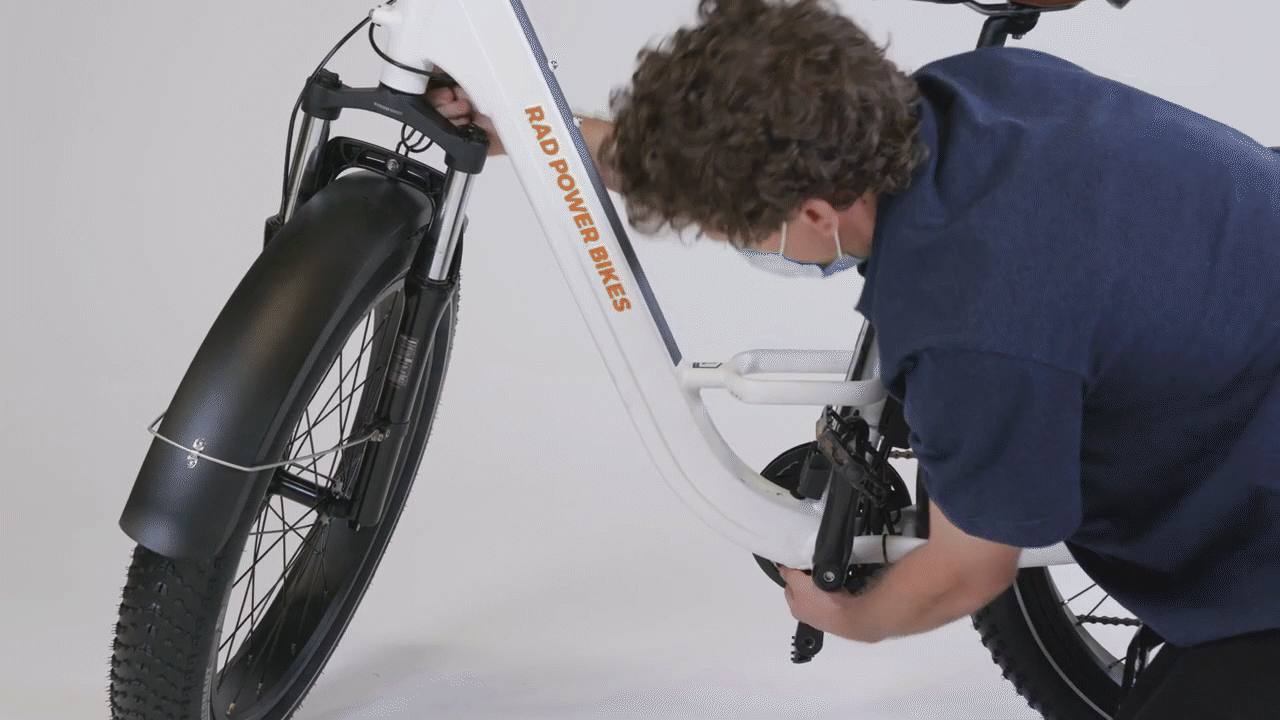
- Locate and unplug the wiring harness connector. The wiring harness connector is located inside the downtube.
- Turn the handlebar and feed the wiring harness into the downtube. Locate the wiring harness cable at the front of the bike and gently feed the cable into the upper cable opening of the downtube.
- Unseat the rubber grommet at the lower cable opening of the downtube. Use a flat head screwdriver and careful pinching movements to carefully unseat the rubber grommet. Be careful not to damage the grommet during removal. Snip the zip tie securing the cables at the bottom of the downtube, if needed.
- Access and unplug the wiring harness connector. At the bottom of the downtube, carefully pull the wiring harness cable until the connector is out of the lower cable opening. Use caution to avoid unplugging the connector while inside the downtube. Once the connector is out of the downtube, pull each side of the connector directly apart, without twisting, to unplug.
- Turn the handlebar and feed the wiring harness into the downtube. Locate the wiring harness cable at the front of the bike and gently feed the cable into the upper cable opening of the downtube.
- Inspect the inside of the connector for damage, dirt, or moisture. If the inside of the connector is damaged, dirty, or wet, take a photo and contact us for more help. Do not attempt to fix broken or bent pins or clean the inside of the connector. If the connector looks normal, continue troubleshooting.
- Plug in the connector.
- Locate both connector ends and ensure the connector end passes through the grommet. Line up the internal notch and pins (and external indicators) and press directly together without twisting.
- Insert the connector into the lower cable opening of the downtube. Double-check that the connector is secure and gently pass the connector into the lower cable opening.
- Adjust the wiring harness at the front of the bike. At the front of the bike, gently adjust the wiring harness cable to add cable slack.
- Reinstall the rubber grommet. Gently work the grommet around the opening until fully seated.
- Replace any snipped zip ties and trim them to be flush and smooth.
- Locate both connector ends and ensure the connector end passes through the grommet. Line up the internal notch and pins (and external indicators) and press directly together without twisting.
- Reinstall the battery and turn on the bike to check if the error is resolved. If the error is resolved, the connector was likely loose and triggered the error. Test the bike fully and ride Rad! If the error continues, turn off the bike, remove the battery, discharge remaining power, and continue troubleshooting.
If the connector disconnects inside of the downtube:
- Remove the grommet on the upper cable opening and pull the wiring harness out of the downtube fully.
- Pull the cable and top half of the connector out of the cable opening in the frame.
- Tie the string to the top half of the connector end and tape it to keep it secure. Insert the string and connector end into the upper cable opening. Use the cable to help move the string through the downtube and out of the lower cable opening.
- Pull the string at the bottom of the downtube to pass the connector end through the downtube, out of the lower cable opening, and access the connector.
- Remove the tape, untie the string, and check the connector.
- Locate and unplug the battery tray connector. Locate the cable that exits the bottom of the battery tray and trace it until you find the connector. Snip zip ties for easier access if needed, then pull each side of the connector directly apart without twisting.
- Inspect the inside of the connector for damage, dirt, or moisture. If the inside of the connector is damaged, dirty, or wet, take a photo and contact us for more help. Do not attempt to fix broken or bent pins or clean the inside of the connector. If the connector looks normal, continue troubleshooting.
- Plug in the connector. Line up the internal notch and pins (and external indicators) and press directly together without twisting. Replace any snipped zip ties and trim them to be flush and smooth.
- Reinstall the battery and turn on the bike to check if the error is resolved. If the error is resolved, the connector was likely loose and triggered the error. Test the bike fully and ride Rad! If the error continues, turn off the bike, remove the battery, discharge remaining power, and continue troubleshooting.
If the error continues, continue troubleshooting to help isolate the part that may be causing the error. The process for checking the connectors below will involve unplugging the connector and turning on the bike to check if the error continues while the connector is still unplugged.
Click the heading below to begin troubleshooting.
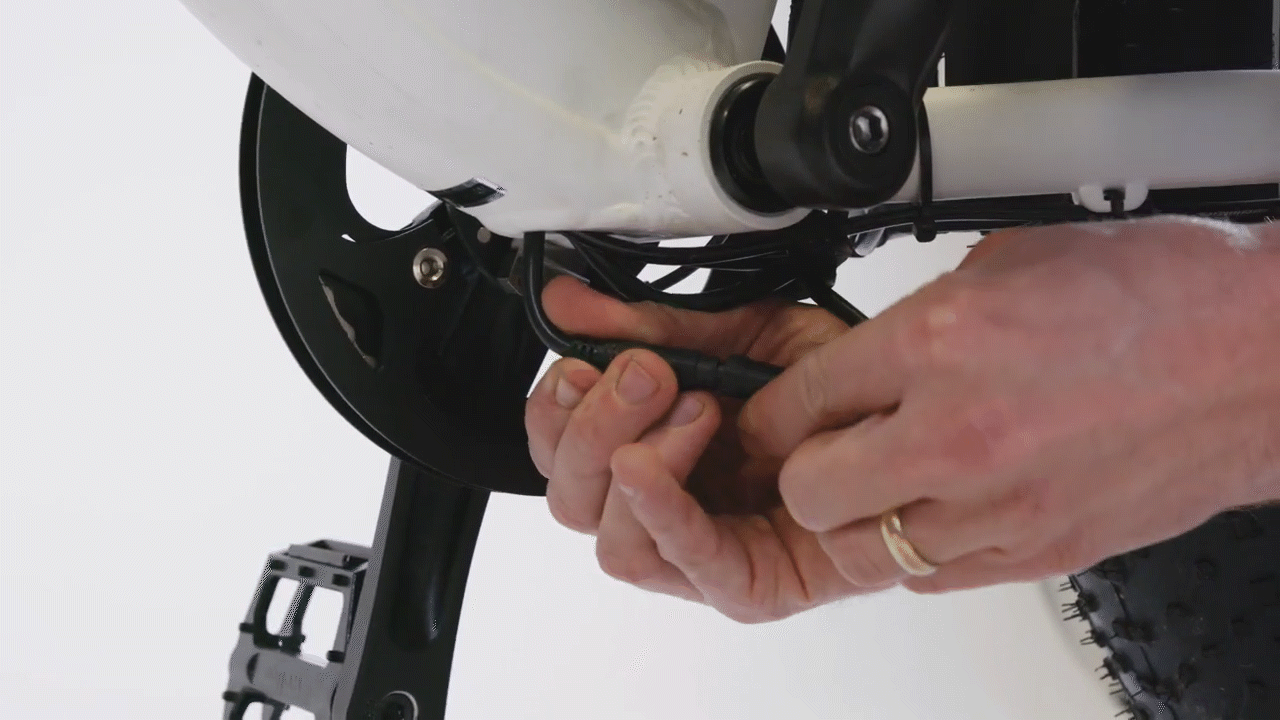
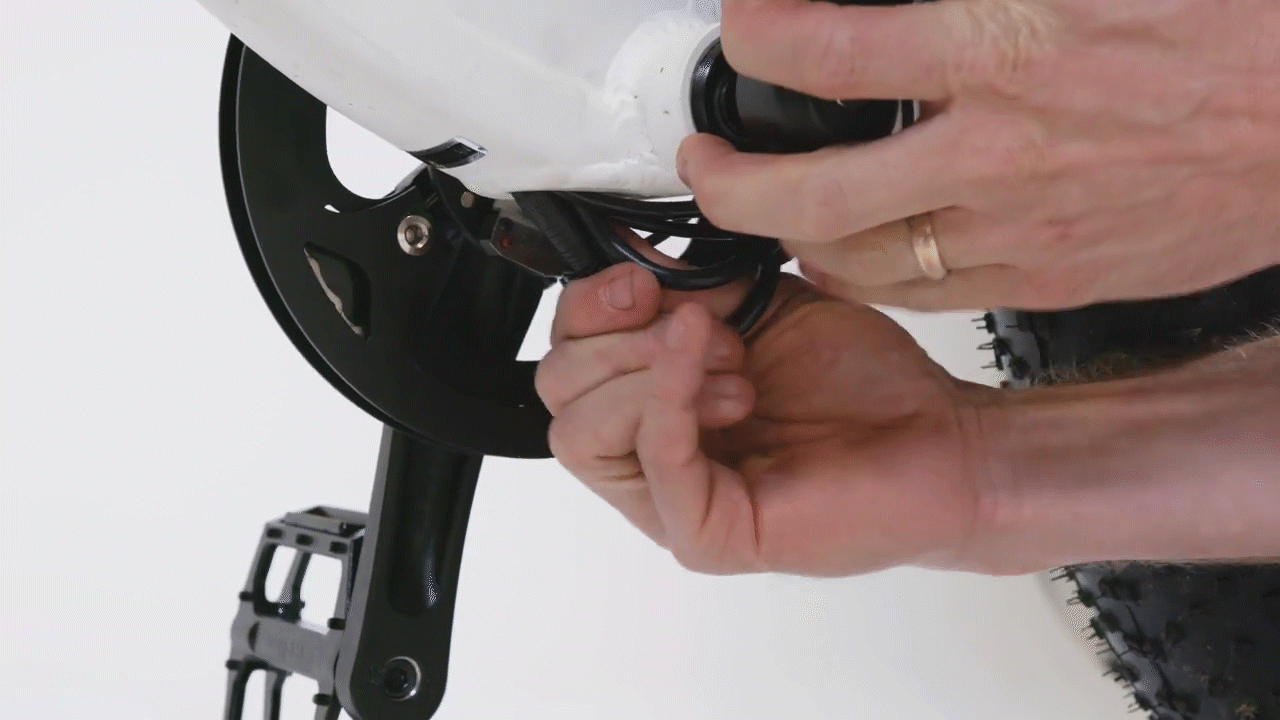
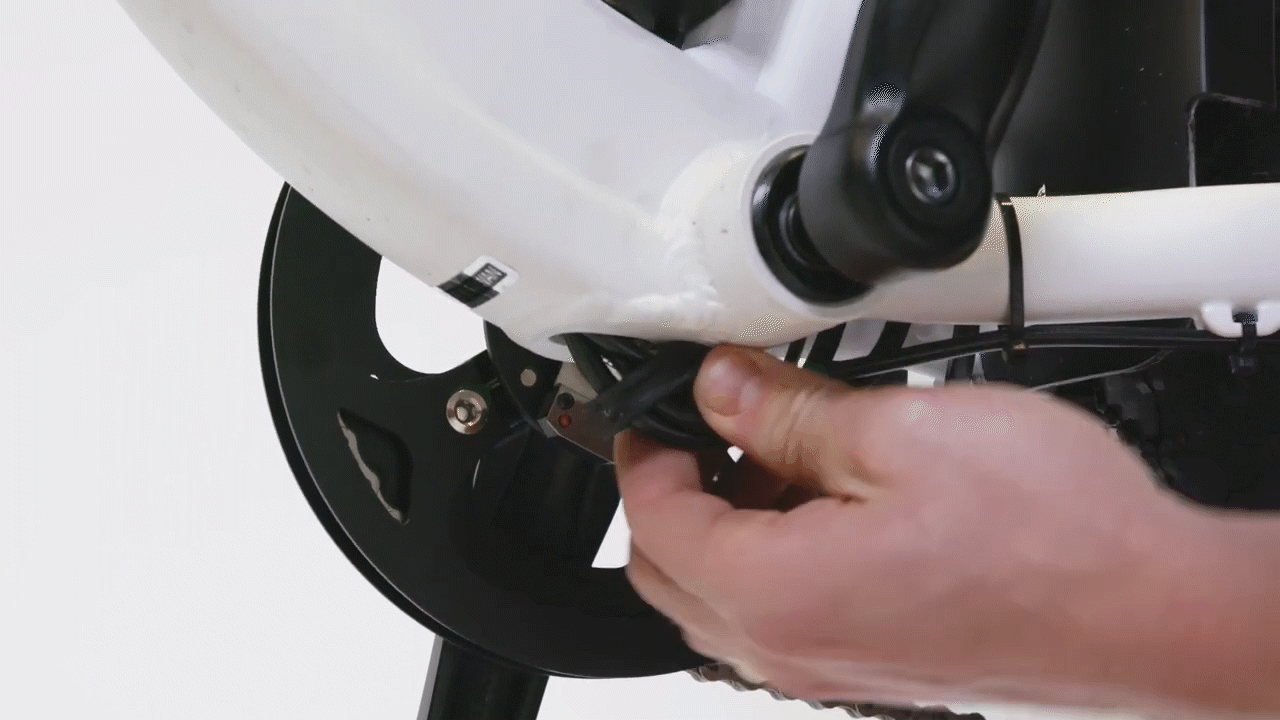
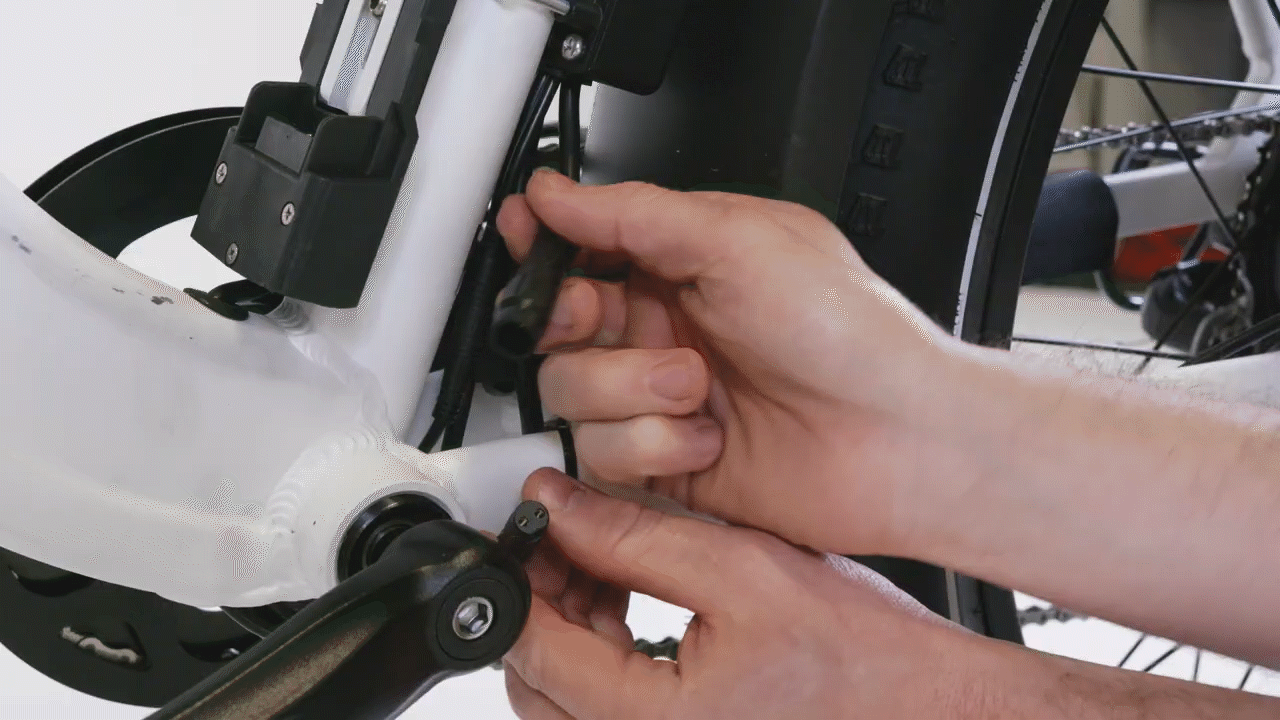
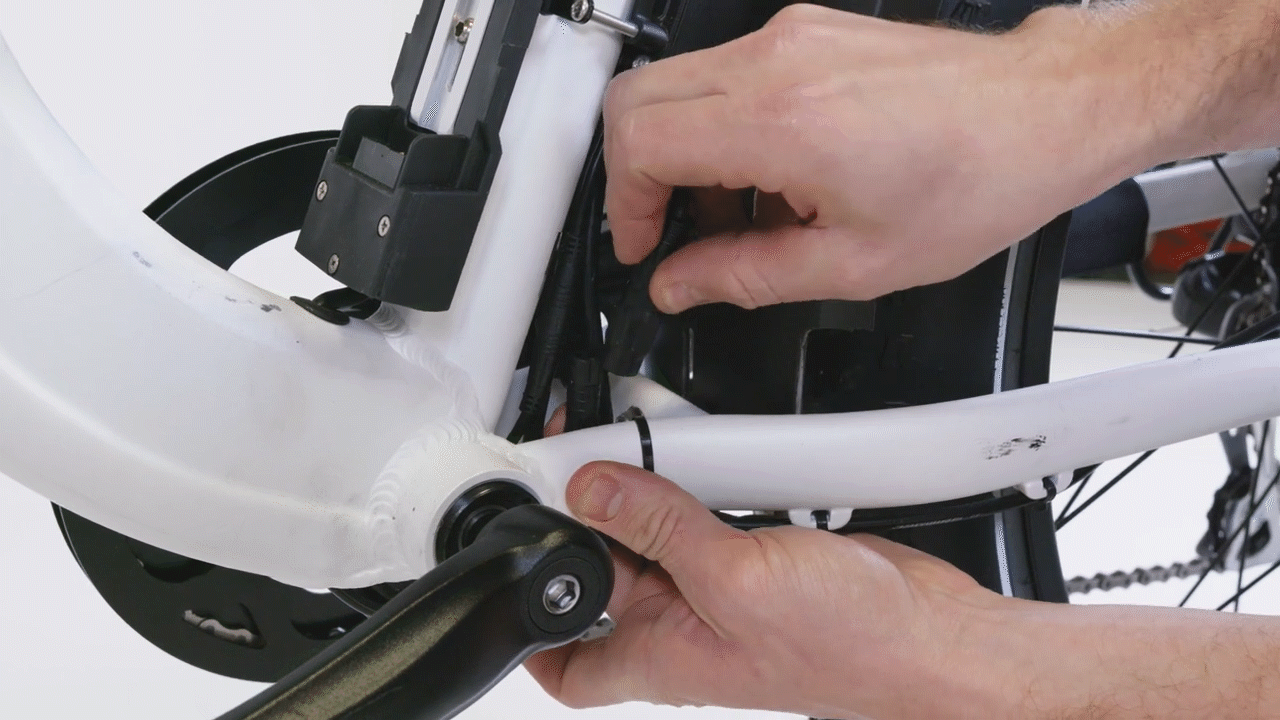
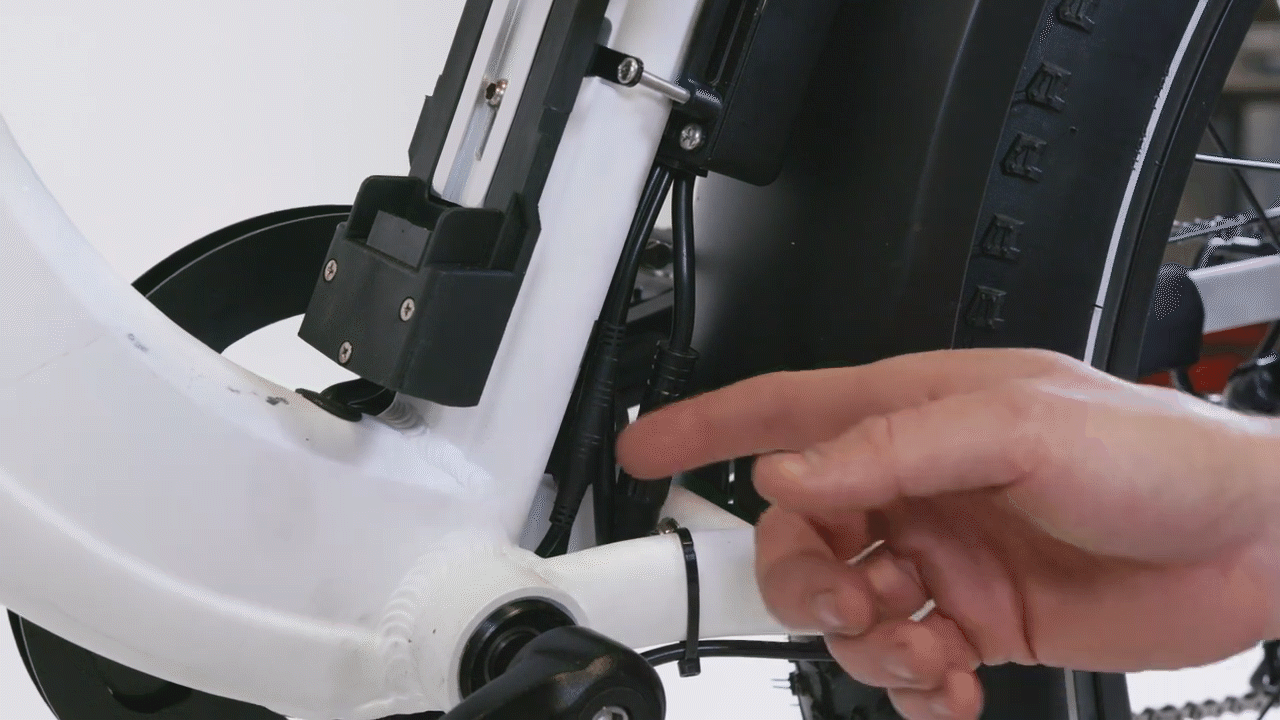
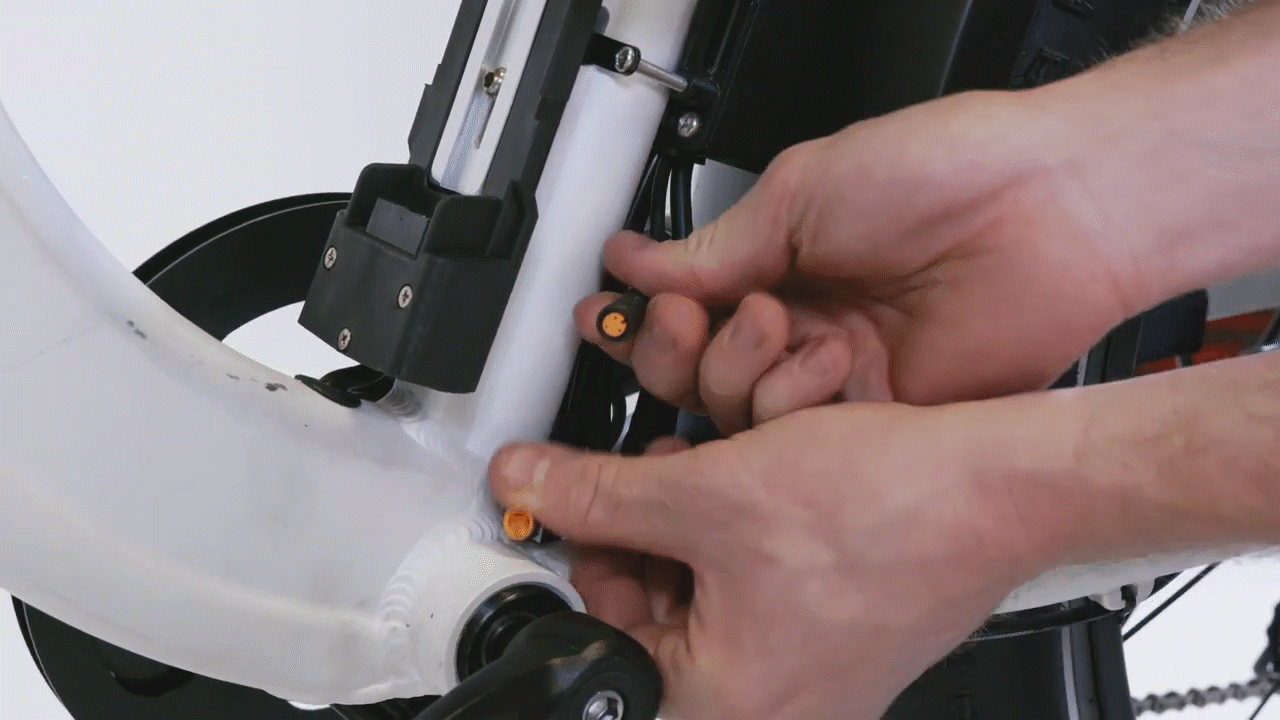
- Locate and unplug the pedal assist (PAS) connector near the bottom bracket. Follow the cable from the part to the connector. Snip zip ties for easier access, then pull each side of the connector directly apart without twisting.
- Inspect the inside of the connector for damage, dirt, or moisture. If the inside of the connector is damaged, dirty, or wet, take a photo and contact us for more help. Do not attempt to fix broken or bent pins or clean the inside of the connector. If the connector looks normal, continue troubleshooting.
- Check if the error continues with the connector unplugged. Leave the connector unplugged. Reinstall the battery, turn on the bike, and check if the error continues. If the error is resolved, the part likely triggered the error and may need to be replaced. Take a photo of the part and contact us for help. If the error continues, turn off the bike, remove the battery, discharge remaining power, and continue troubleshooting.

- Plug in the connector. Line up the internal notch and pins (and external indicators) and press directly together without twisting. Replace any snipped zip ties and trim them to be flush and smooth.
- Reinstall the battery and turn on the bike to check if the error is resolved. If the error is resolved, the connector was likely loose and triggered the error. Test the bike fully and ride Rad! If the error continues, turn off the bike, remove the battery, discharge remaining power, and continue troubleshooting.
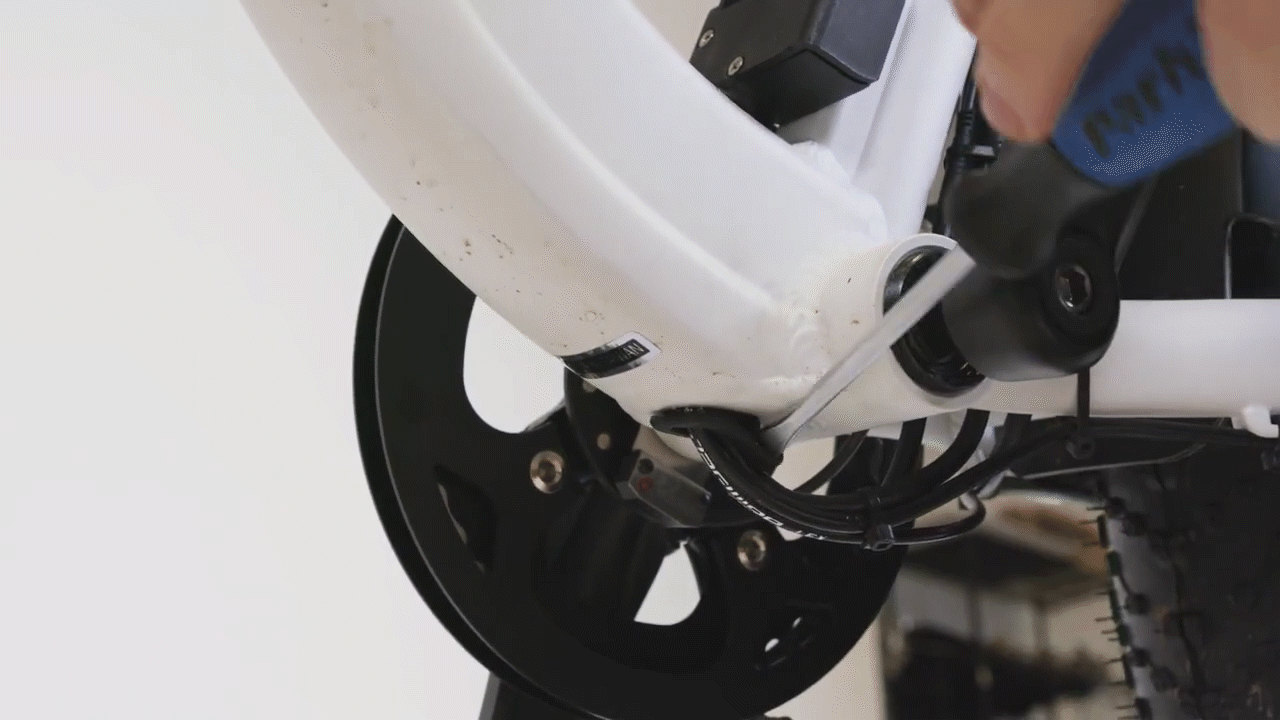
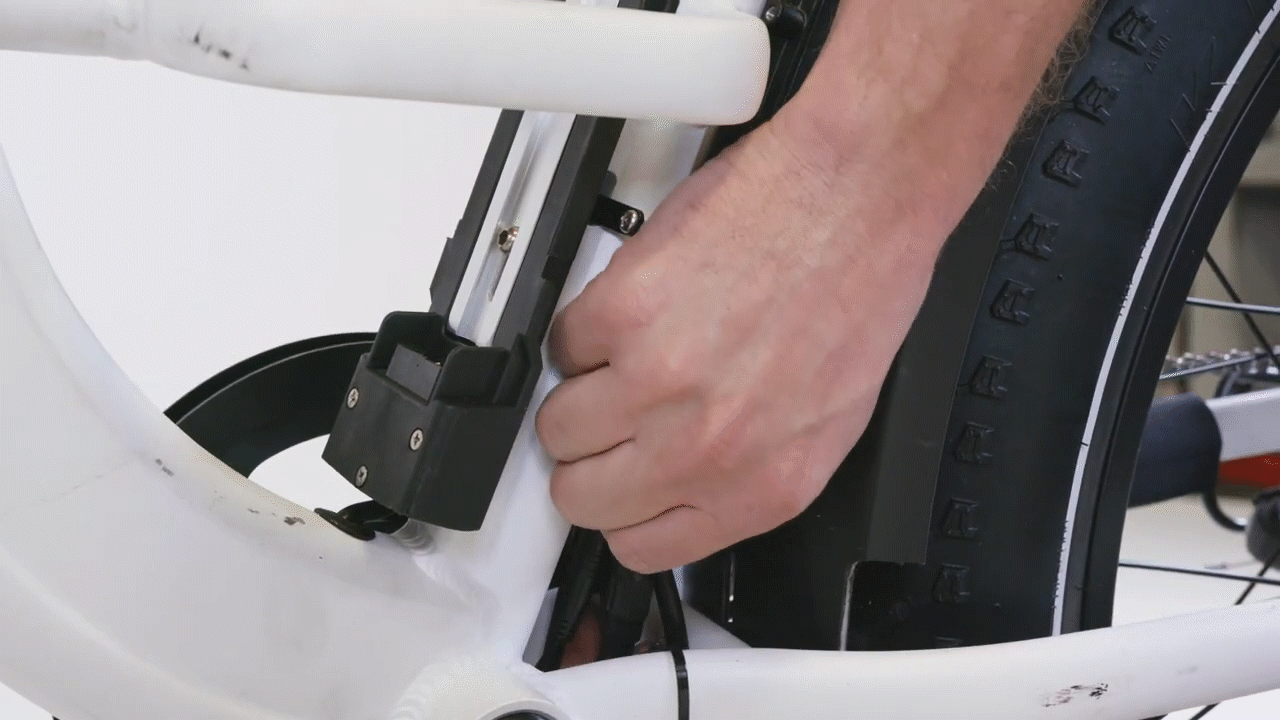
- Locate and unplug the motor connector near the chainstay on the rider's left side of the bike. Follow the cable from the part to the connector. Without touching the brake rotor, snip zip ties for easier access, then pull each side of the connector directly apart without twisting.
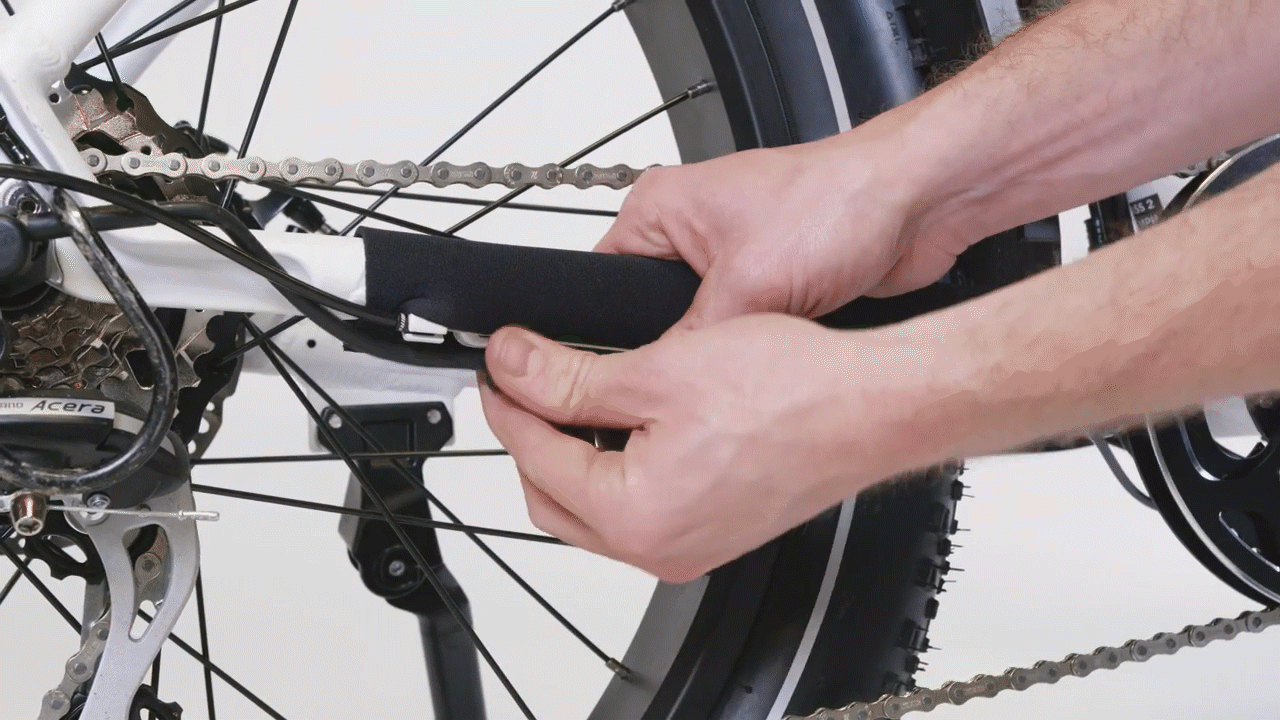
- Inspect the inside of the connector for damage, dirt, or moisture. If the inside of the connector is damaged, dirty, or wet, take a photo and contact us for more help. Do not attempt to fix broken or bent pins or clean the inside of the connector. If the connector looks normal, continue troubleshooting.
- Check if the error continues with the connector unplugged. Leave the connector unplugged. Reinstall the battery, turn on the bike, and check if the error continues.
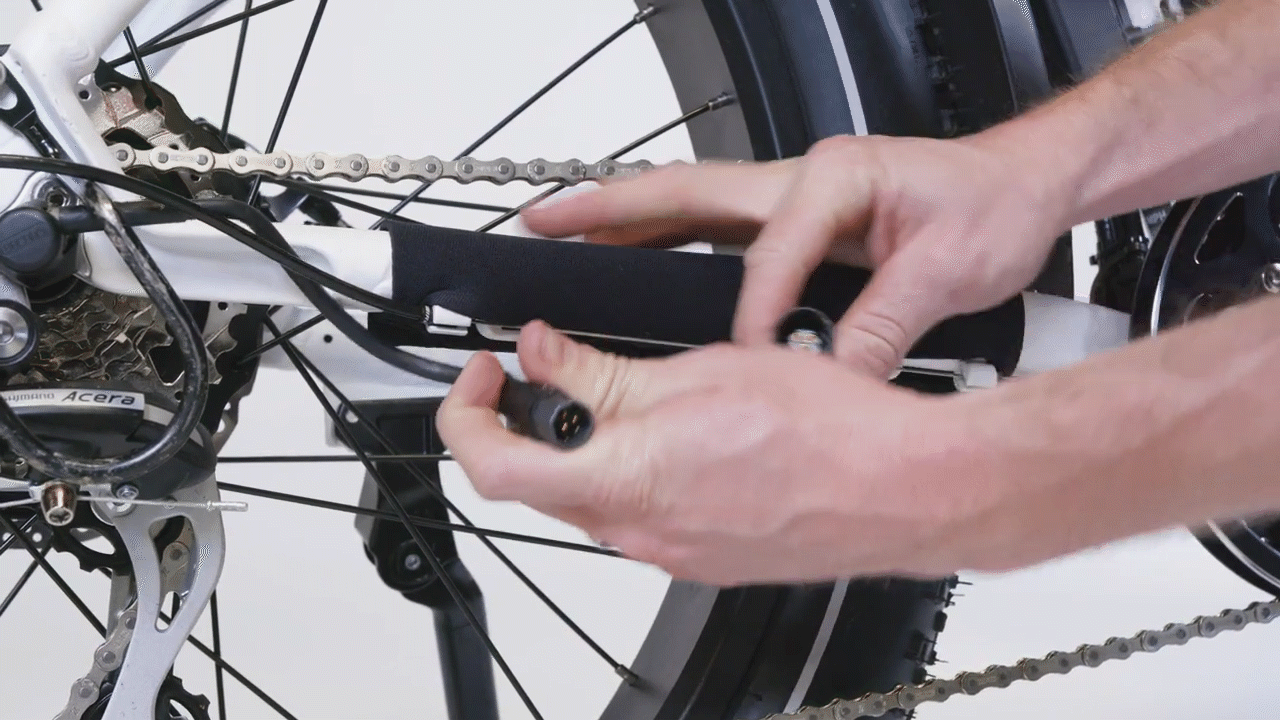
- Plug in the connector. Line up the internal notch and pins (and external indicators) and press directly together without twisting. Replace any snipped zip ties and trim them to be flush and smooth.
.gif?revision=1)
- Reinstall the battery and turn on the bike to check if the error is resolved. If the error is resolved, the connector was likely loose and triggered the error. Test the bike fully and ride Rad! If the error continues, turn off the bike, remove the battery, discharge remaining power, and continue troubleshooting.
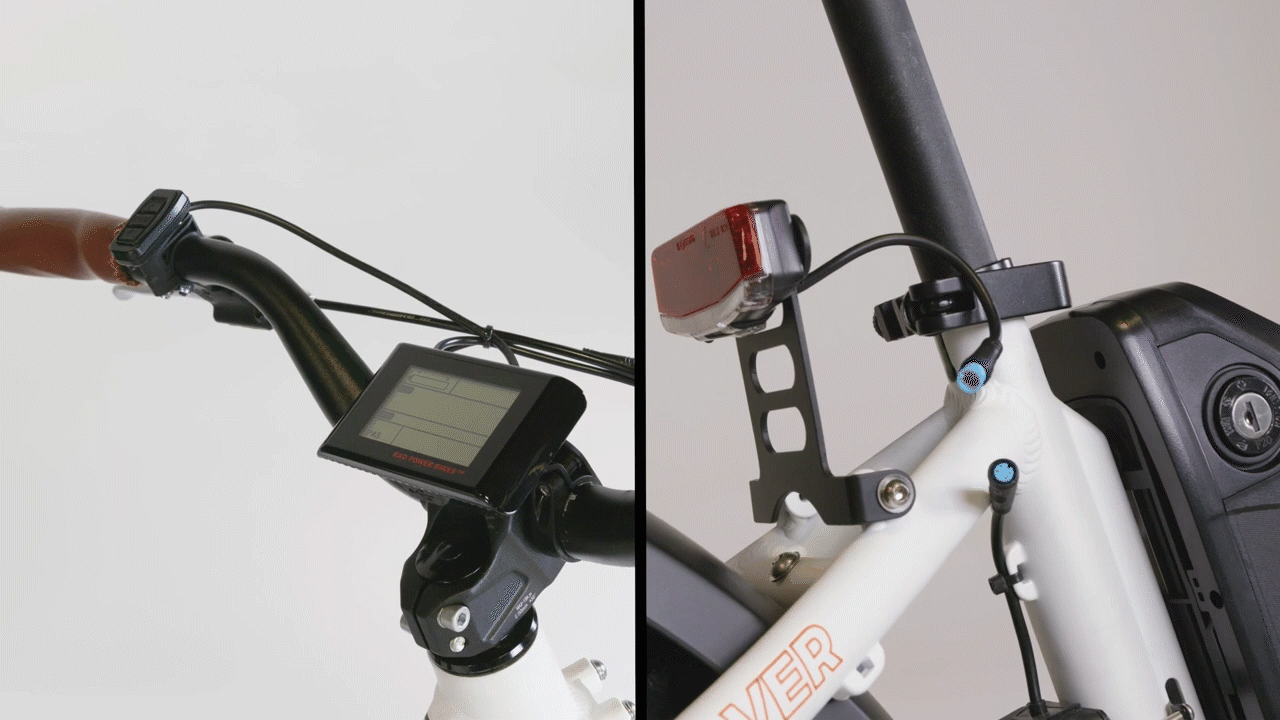
- Locate and unplug the taillight connector. Follow the cable from the part to the connector. Snip zip ties for easier access, then pull each side of the connector directly apart without twisting.
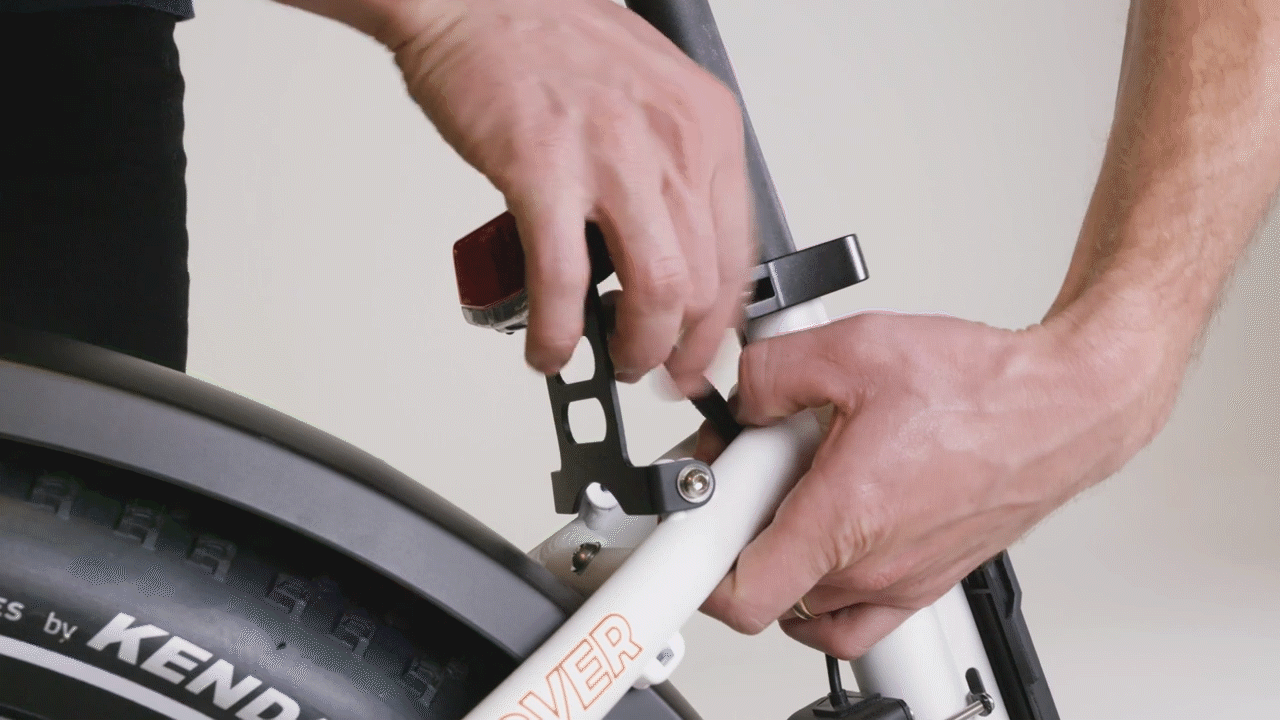
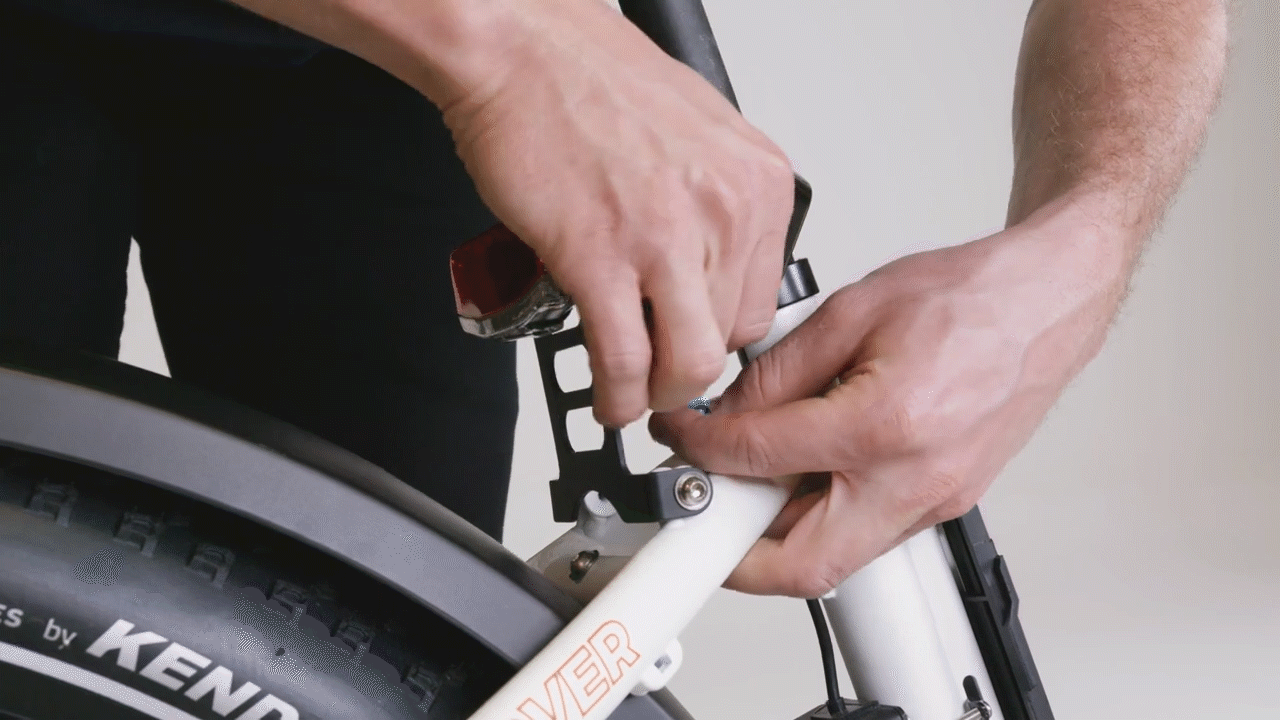
- Inspect the inside of the connector for damage, dirt, or moisture.If the inside of the connector is damaged, dirty, or wet, take a photo and contact us for more help. Do not attempt to fix broken or bent pins or clean the inside of the connector. If the connector looks normal, continue troubleshooting.
- Check if the error continues with the connector unplugged. Leave the connector unplugged. Reinstall the battery, turn on the bike, and check if the error continues. If the error is resolved, the part likely triggered the error and may need to be replaced. Take a photo of the part and contact us for help. If the error continues, turn off the bike, remove the battery, discharge remaining power, and continue troubleshooting.
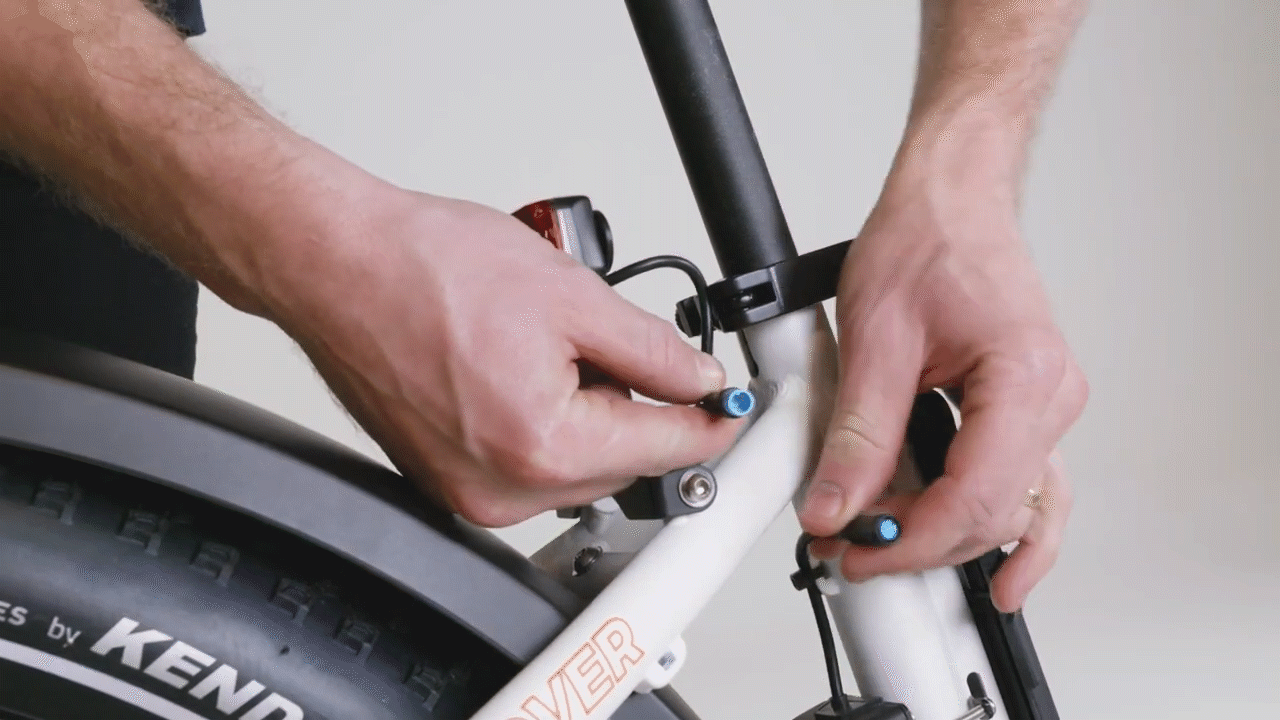
- Plug in the connector. Line up the internal notch and pins (and external indicators) and press directly together without twisting. Replace any snipped zip ties and trim them to be flush and smooth.
- Reinstall the battery and turn on the bike to check if the error is resolved. If the error is resolved, the connector was likely loose and triggered the error. Test the bike fully and ride Rad! If the error continues, turn off the bike, remove the battery, discharge remaining power, and continue troubleshooting.
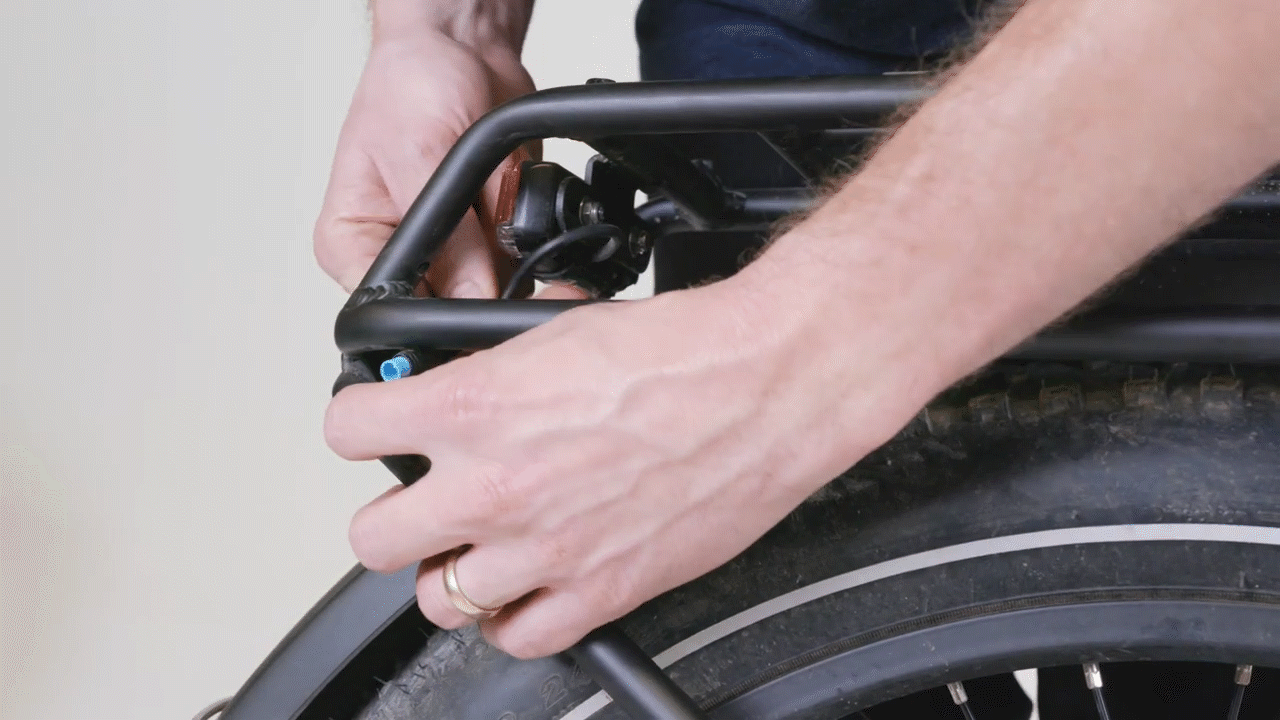
Note: This connector only exists on bikes that have a rear rack installed.
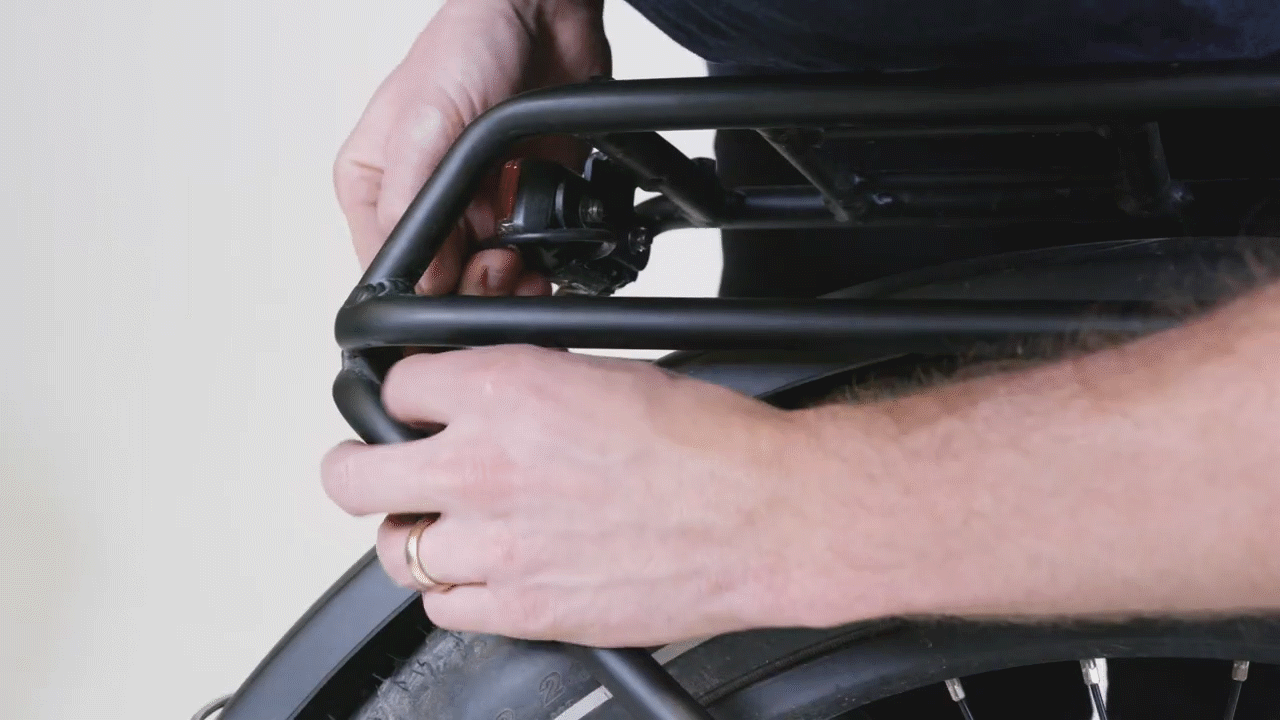
- Locate and unplug the second taillight connector on the rear rack. Follow the cable from the part to the connector. Snip zip ties for easier access, then pull each side of the connector directly apart without twisting.
.gif?revision=1)
- Inspect the inside of the connector for damage, dirt, or moisture.If the inside of the connector is damaged, dirty, or wet, take a photo and contact us for more help. Do not attempt to fix broken or bent pins or clean the inside of the connector. If the connector looks normal, continue troubleshooting.
- Check if the error continues with the connector unplugged. Leave the connector unplugged. Reinstall the battery, turn on the bike, and check if the error continues. If the error is resolved, the part likely triggered the error and may need to be replaced. Take a photo of the part and contact us for help. If the error continues, turn off the bike, remove the battery, discharge remaining power, and continue troubleshooting.
- Plug in the connector. Line up the internal notch and pins (and external indicators) and press directly together without twisting. Replace any snipped zip ties and trim them to be flush and smooth.
- Reinstall the battery and turn on the bike to check if the error is resolved. If the error is resolved, the connector was likely loose and triggered the error. Test the bike fully and ride Rad! If the error continues, turn off the bike, remove the battery, discharge remaining power, and continue troubleshooting.
- Locate and unplug the left brake connector. Follow the cable from the part to the connector. Snip zip ties for easier access, then pull each side of the connector directly apart without twisting.
- Inspect the inside of the connector for damage, dirt, or moisture. If the inside of the connector is damaged, dirty, or wet, take a photo and contact us for more help. Do not attempt to fix broken or bent pins or clean the inside of the connector. If the connector looks normal, continue troubleshooting.

- Check if the error continues with the connector unplugged. Leave the connector unplugged. Reinstall the battery, turn on the bike, and check if the error continues. If the error is resolved, the part likely triggered the error and may need to be replaced. Take a photo of the part and contact us for help. If the error continues, turn off the bike, remove the battery, discharge remaining power, and continue troubleshooting.

- Plug in the connector. Line up the internal notch and pins (and external indicators) and press directly together without twisting. Replace any snipped zip ties and trim them to be flush and smooth.
- Reinstall the battery and turn on the bike to check if the error is resolved. If the error is resolved, the connector was likely loose and triggered the error. Test the bike fully and ride Rad! If the error continues, turn off the bike, remove the battery, discharge remaining power, and continue troubleshooting.
- Locate and unplug the right brake connector. Follow the cable from the part to the connector. Snip zip ties for easier access, then pull each side of the connector directly apart without twisting.
- Inspect the inside of the connector for damage, dirt, or moisture. If the inside of the connector is damaged, dirty, or wet, take a photo and contact us for more help. Do not attempt to fix broken or bent pins or clean the inside of the connector. If the connector looks normal, continue troubleshooting.
- Check if the error continues with the connector unplugged. Leave the connector unplugged. Reinstall the battery, turn on the bike, and check if the error continues. If the error is resolved, the part likely triggered the error and may need to be replaced. Take a photo of the part and contact us for help. If the error continues, turn off the bike, remove the battery, discharge remaining power, and continue troubleshooting.
- Plug in the connector. Line up the internal notch and pins (and external indicators) and press directly together without twisting. Replace any snipped zip ties and trim them to be flush and smooth.
- Reinstall the battery and turn on the bike to check if the error is resolved. If the error is resolved, the connector was likely loose and triggered the error. Test the bike fully and ride Rad! If the error continues, turn off the bike, remove the battery, discharge remaining power, and continue troubleshooting.
- Locate and unplug the throttle connector. Follow the cable from the part to the connector. Snip zip ties for easier access, then pull each side of the connector directly apart without twisting.
- Inspect the inside of the connector for damage, dirt, or moisture. If the inside of the connector is damaged, dirty, or wet, take a photo and contact us for more help. Do not attempt to fix broken or bent pins or clean the inside of the connector. If the connector looks normal, continue troubleshooting.

- Check if the error continues with the connector unplugged. Leave the connector unplugged. Reinstall the battery, turn on the bike, and check if the error continues. If the error is resolved, the part likely triggered the error and may need to be replaced. Take a photo of the part and contact us for help. If the error continues, turn off the bike, remove the battery, discharge remaining power, and continue troubleshooting.
- Plug in the connector. Line up the internal notch and pins (and external indicators) and press directly together without twisting. Replace any snipped zip ties and trim them to be flush and smooth.

- Reinstall the battery and turn on the bike to check if the error is resolved. If the error is resolved, the connector was likely loose and triggered the error. Test the bike fully and ride Rad! If the error continues, turn off the bike, remove the battery, discharge remaining power, and continue troubleshooting.
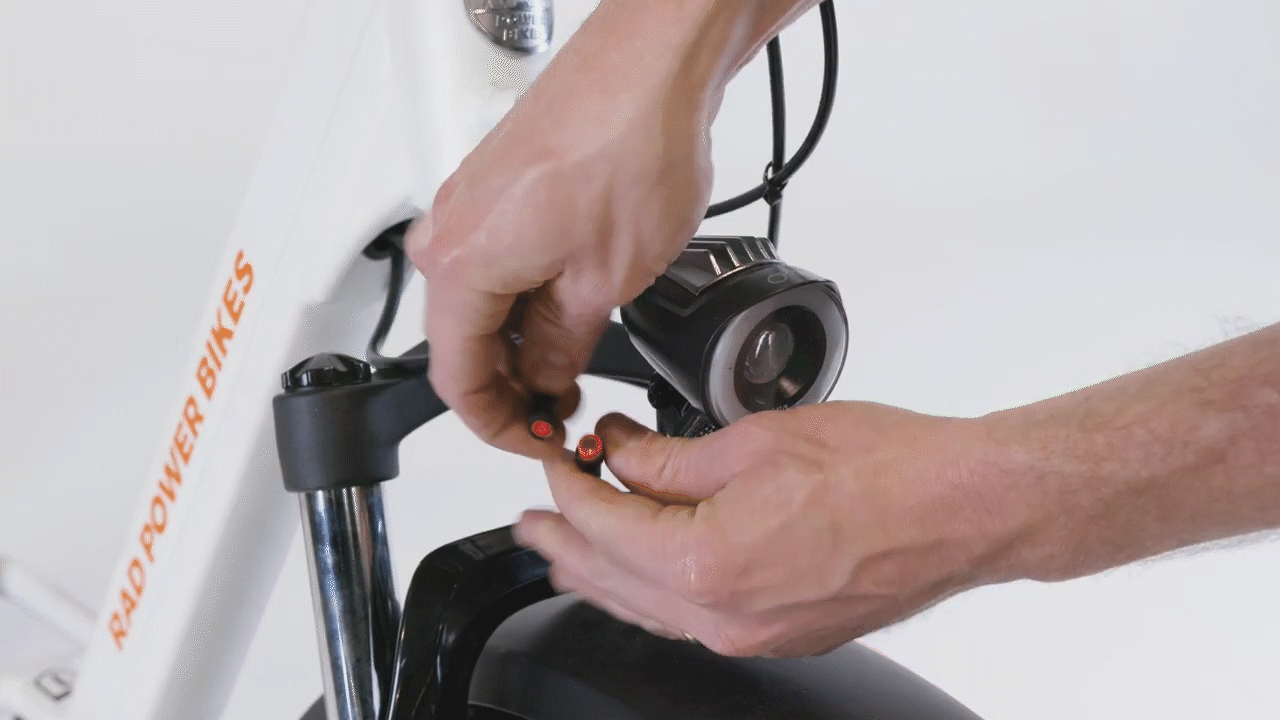
- Locate and unplug the headlight connector. Follow the cable from the part to the connector. Snip zip ties for easier access, then pull each side of the connector directly apart without twisting.
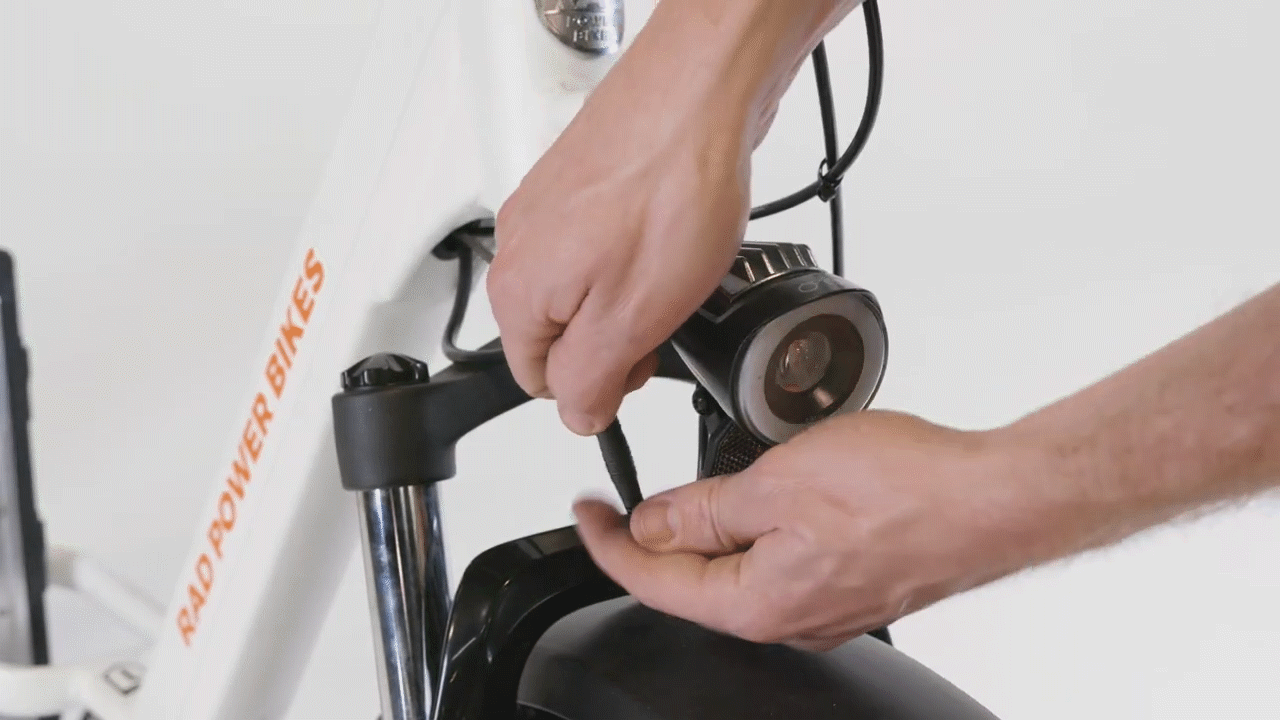
- Inspect the inside of the connector for damage, dirt, or moisture. If the inside of the connector is damaged, dirty, or wet, take a photo and contact us for more help. Do not attempt to fix broken or bent pins or clean the inside of the connector. If the connector looks normal, continue troubleshooting.
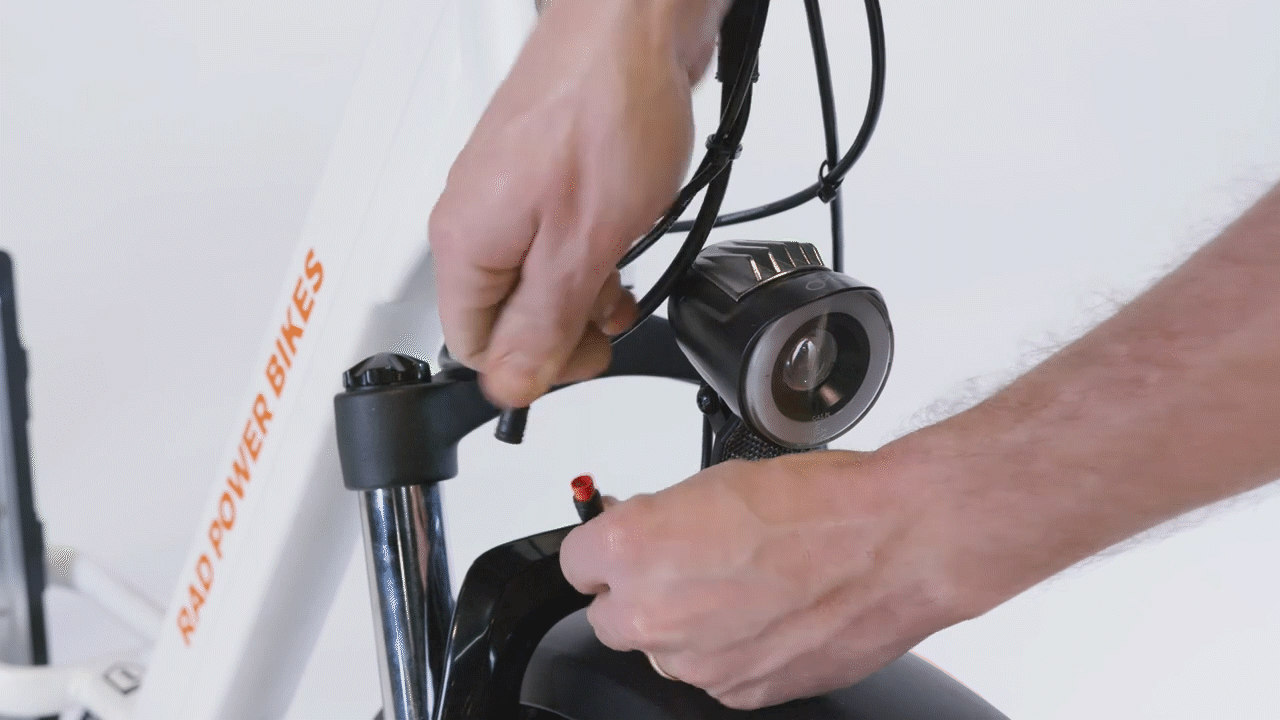
- Check if the error continues with the connector unplugged. Leave the connector unplugged. Reinstall the battery, turn on the bike, and check if the error continues. If the error is resolved, the part likely triggered the error and may need to be replaced. Take a photo of the part and contact us for help. If the error continues, turn off the bike, remove the battery, discharge remaining power, and continue troubleshooting.
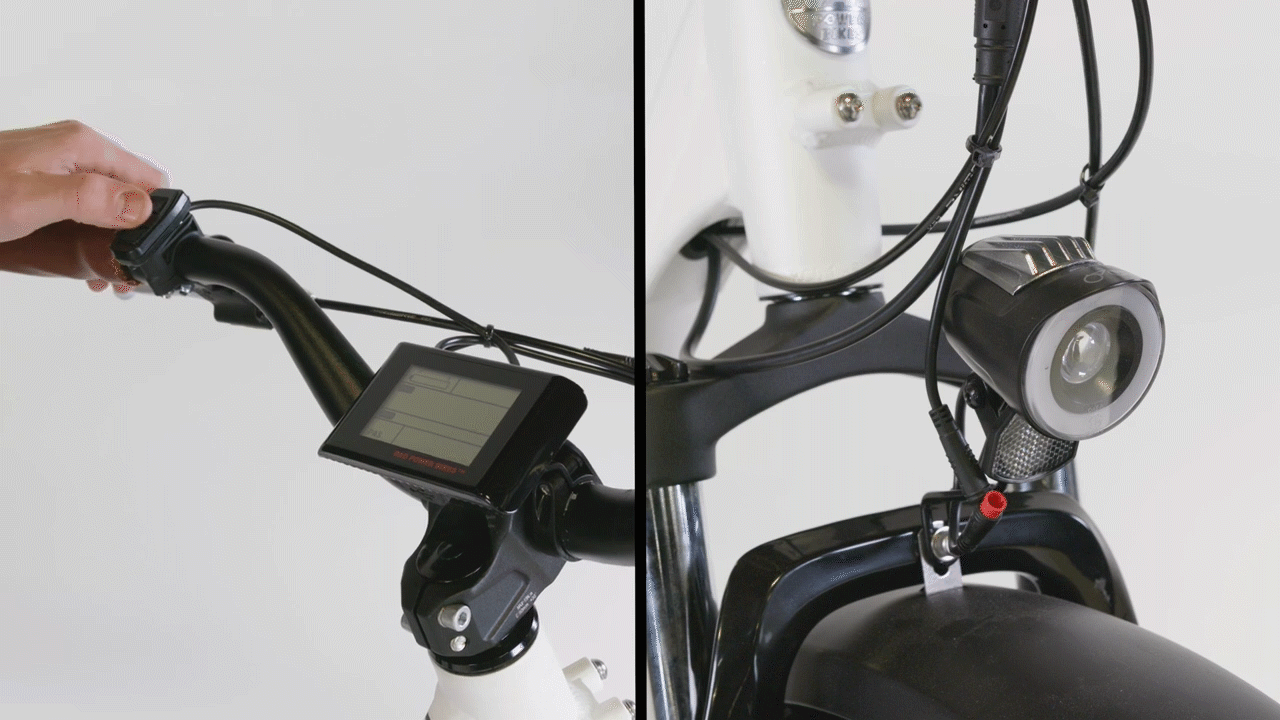
- Plug in the connector. Line up the internal notch and pins (and external indicators) and press directly together without twisting. Replace any snipped zip ties and trim them to be flush and smooth.
- Reinstall the battery and turn on the bike to check if the error is resolved. If the error is resolved, the connector was likely loose and triggered the error. Test the bike fully and ride Rad! If the error continues, turn off the bike, remove the battery, discharge remaining power, and continue troubleshooting.