New owners guide
Thanks for choosing Rad Power Bikes! We have put together some quick tips to help you ride Rad!
Safety
Everyone at Rad Power Bikes cares about your safety and the safety of those around you. We want you to thoroughly enjoy your amazing ebike safely and reliably for many years to come.
Click HERE for important safety information you need to know before your first ride.
In most of the US, electric bikes are considered bicycles and can be used in the same way as a pedal-only bicycle, but riders must be aware of ebike rules and regulations in their area before riding.
Click HERE to learn more about ebike regulations.
|
Before each ride, you must perform a full check of your ebike. Here is a quick summary of the main features to check:
Your Owner's Manual includes a comprehensive safely checklist tailored for your ebike model. You must review that information before riding your ebike. |
 |
Bike Components and Operation
Before you start riding, get to know the components on your bike and how they operate.
Your ebike is equipped with two ways to use power assistance: a pedal assist system (PAS), and a twist throttle. Practice using the pedal assist (PAS) and throttle in a flat, clear, open area until you understand how these power sources work together. Failure to understand how to safely operate the PAS and throttle together can result in loss of control, crash, injury, and/or death.
How Pedal Assist Works
You can use the pedal assist system (PAS) to call up assistance from the motor while you are pedaling. Pedal assist uses a cadence sensor built into the drivetrain of the ebike. The cadence sensor detects when you revolve the pedals and signals the electric motor to provide the level of pedal assistance (0-5) that you selected. Adjust the PAS level on the remote to the amount of motor help you want while you pedal.- Level 4/5 = Maximum help
- Level 1 = A little help
- Level 0 = PAS is off
|
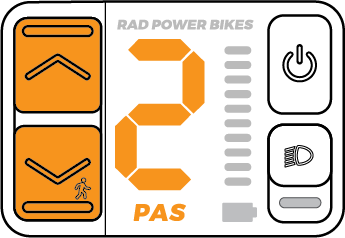
Rad UI Remote |
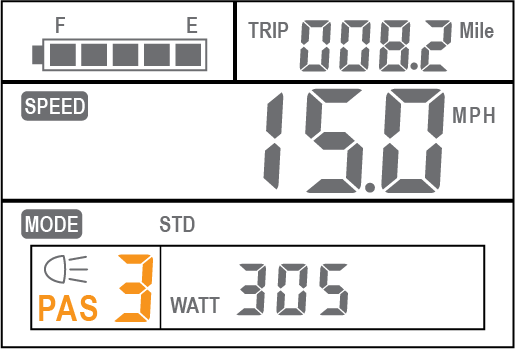
LCD Display |
LED Remote |
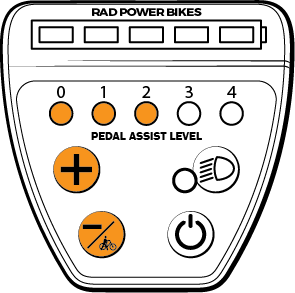
How the Throttle Works
The throttle is located on the right side of the handlebar. Twist it to propel the ebike forward. The more you twist, the more powerfully the motor will propel you. Once you release the throttle or apply the hand brake, the throttle power will stop. You do not need to pedal to get power from the throttle.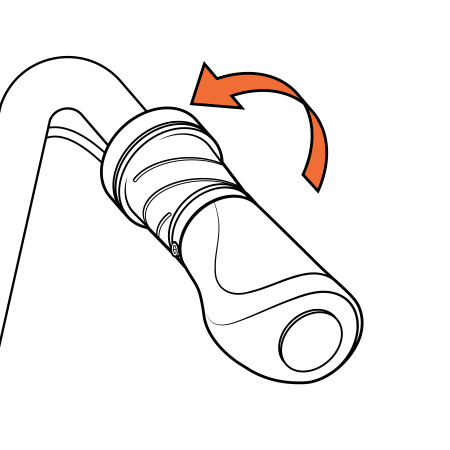
Shifting Gears
The gears operate independent of the electrical system and throttle. Downshift to a low gear for easier starts and riding up hills. Click the upshift button to a high gear for fast crusing once you're up to speed.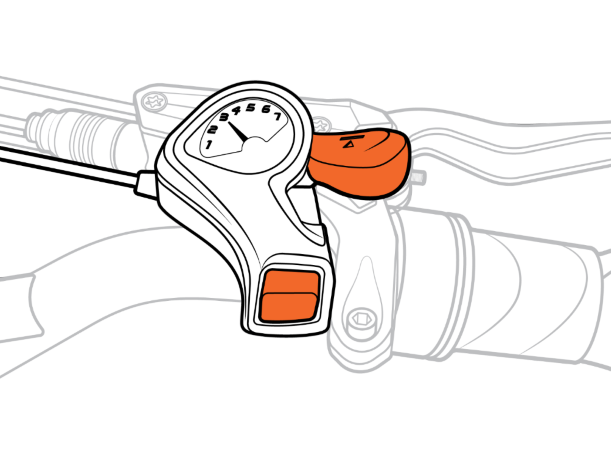
The battery that comes with your ebike is a state-of-the-art, lithium-ion battery that’s designed to give you years of power with proper care and use.
|
 |
Recommended tire pressure will always be printed on the sidewall of each tire. Suggested pressure can be printed as a given maximum (e.g. MAX 60 PSI) or a range (e.g. 80-100 PSI). Even when a range is given, to optimize performance do some testing within that range, as your bike model, payload and riding surface will dictate the optimum PSI for you.
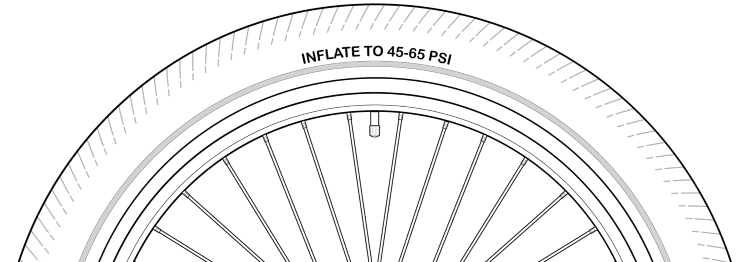
Click HERE to learn more about tire pressure and determine the right tire inflation for your riding needs.
All ebikes by Rad Power Bikes are equipped with an adjustable seatpost, and most models come with an adjustable seat, handlebar and suspension fork. It's important to adjust these bike components to the rider's comfort and proportions to ensure a comfortable and safe ride.
Click HERE to learn how to adjust your ebike for comfort and safety.
The serial number is stamped into the metal of the frame, either at the front of the bike below the RAD badge, or on the underside of the bottom bracket. It is also listed on the outside of the bike box your bike was packaged in.
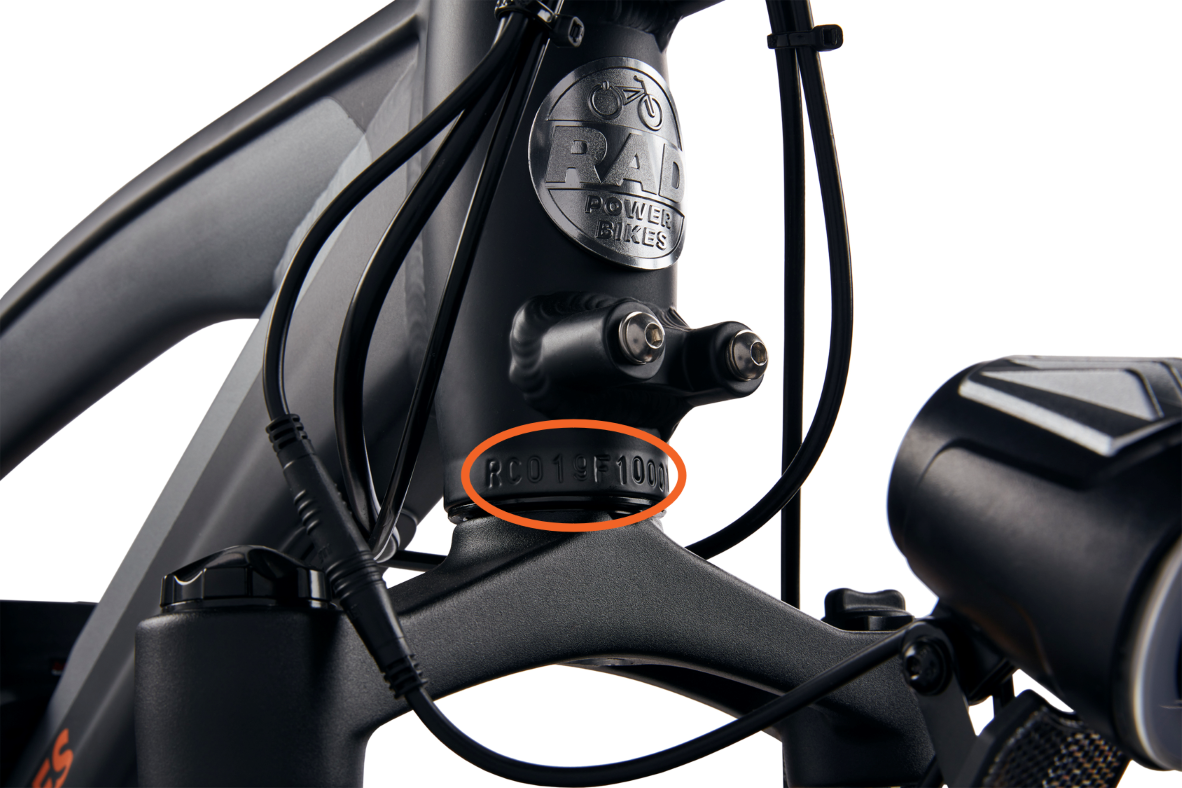
We attempt to keep a record of all serial numbers, but it's always a good idea to keep a copy of your serial number and order confirmation number for your records.
Click HERE to learn about bike security and protecting your bike against loss or theft.
Riding Your Bike
Once you've versed yourself with the safety essentials and components on your bike, review the following information to ride Rad!
| You must be age 16 or older to operate your ebike. You must also have the physical ability, reaction time, and mental capability to understand and obey all local laws governing ebike usage and to manage traffic, variable road conditions, and sudden situations. If you have an impairment or disability (e.g., visual impairment, hearing impairment, physical impairment, cognitive or language impairment, seizure disorder) or any other limitation that could affect your ability to safely operate a vehicle, consult your physician before operating any bike, ebike, or similar vehicle. |
This ebike is not to be operated by anyone under the age of 16. Children under the age of 16 may lack the necessary judgment and skill to safely operate the ebike, potentially resulting in damage to the ebike, damage to other property, serious injury, and/or death. Please also check your local laws, which may require a higher age. It is your responsibility to know and obey local regulations regarding rider age and other qualifications.
Riding any vehicle under the influence of alcohol, drugs, or any substance or condition that could impair your motor function, judgment, reaction time, or ability to safely operate a vehicle puts you at VERY HIGH RISK of serious injury or death. Operate your ebike or other vehicles only when you’re sober and otherwise physically and mentally prepared to ride safely.
| It is your responsibility to research and understand relevant laws where you ride your ebike, which meets the criteria for a Class 2 ebike in the United States. Local laws may cover required helmets and safety gear, required lights and reflectors, required hand signals, where you can legally ride an ebike (bikes and ebikes may have different restrictions), how fast you can go, what (if any) cargo or passengers you can carry, rider age, and more. Before using public transportation—buses, trains, etc.—to transport your ebike, check with the relevant transportation authority for any rules governing weight limits, tire widths, lithium-ion batteries, or any other rules that might pertain to your ebike. Make sure you know ahead of time whether and how high you will need to lift your ebike, and make sure you can do that safely. When you ride on the road, assume you must, at minimum, follow all of the rules that cars must follow. For additional information regarding traffic and vehicle laws, contact the road traffic authority in your area. |
Once you've familiarized yourself with the components on your ebike and completed the pre-ride checklist, follow these steps to ride Rad!
- Check that the battery is locked securely. Try tugging on the battery with the key removed; it must not move at all. If it does, push it down gently but firmly and try again until it latches. Always remove the key before riding the ebike.
- Turn on the ebike. Locate the Rad UI Remote (near the left handlebar grip). Press the power button for about two seconds until the display or remote turns on.
- Try out your bell if you haven’t already! It’s an important safety tool for alerting others to your presence, especially when passing. The bell is integrated into the left brake lever on your handlebar.
- Begin riding carefully. With the proper safety gear and rider knowledge, you may now operate your ebike. Start pedaling on flat ground, clear of obstacles and people, with the ebike in an easy (low) gear and at pedal assist level 0 or 1. You may also use the throttle to accelerate and maintain your desired speed.
- Use the throttle (next to the right handlebar grip) by slowly and carefully rotating it toward the rider. Do not use the throttle unless you’re on the bike, and note that the throttle can be activated with a twist any time the bike is powered on.
Be careful not to accidentally twist the throttle, which can cause sudden acceleration. If you’re not prepared for this acceleration, you can lose control of the ebike, which can lead to serious injury or death. To minimize this risk, always keep at least one hand ready to squeeze the brake lever to cut off power to the motor. When you dismount, power off the bike before moving it.
Engaging the pedal assist feature, especially at a high setting, will cause acceleration that may be greater than expected, especially for relatively new riders, and that can cause loss of control, serious injury, or death. To minimize risk, start at PAS level 0 or 1.
To have a safe and fun ride, it's important to take weather and terrain conditions into consideration when riding a bike.
- Always travel at speeds appropriate for local terrain and conditions as well as your experience level. When in doubt, slow down!
- Ride with your headlight on, which will make you more visible in any condition. The headlight will turn on when the ebike is powered on. We recommend you keep it on whenever you ride.
- Concentrate on the path ahead. Avoid potholes, gravel, ice, wet or oily roads, wet leaves, curbs, train tracks, speed bumps, drain gates, thorns, broken glass, and other obstacles, hazards, and puncture/flat risks.
Click HERE for more information about riding your ebike on different terrains and conditions.
Carrying cargo or a passenger can help you have more fun on your ebike and replace trips you’d otherwise make with a car, which we think is rad. It also involves additional risks.
Follow these instructions to maximize safety when using your ebike to carry cargo or a passenger
- Load and secure cargo carefully. Hold onto the ebike when loading and carrying cargo and/or passengers. The kickstand is not designed to be used for loading cargo or passengers. Load cargo as low as possible to keep the ebike’s center of gravity low and improve stability. Ensure cargo loads are properly secured and periodically check that nothing loosens, risks interfering with any
moving parts, or risks touching or dragging on the ground. - Practice with small loads in a safe area. Carrying extra weight significantly affects braking, acceleration, turning, balancing, etc. These effects can be increased by challenging riding conditions, such as when roads are wet or slick. Hills that are normally easy to climb or descend without cargo can become challenging or even dangerous once extra weight is loaded onto the ebike. Extra weight will also increase the time it takes to slow the ebike when braking.
- Use both brakes. With extra weight on your ebike, it’s more important than ever to use both front and rear brakes, and always engage the rear brake first to prevent excessive strain on the front wheel and fork and to prevent loss of control. Ensure both front and rear brakes are properly adjusted, maintained, and applied.
- Adjust your routes and speed. When carrying heavy loads, plan your routes to avoid challenging hills and other hazards. Ride more slowly, and leave more time and distance for braking.
Click HERE for maximum payload capacity, cargo and passenger options by model.
Exceeding the maximum payload capacity (weight of operator, gear, cargo, and passenger) or the maximum weight capacity of an individual component or accessory puts you at risk of component failure, loss of control, serious injury, or death.