Troubleshoot a bike that won’t turn on (bikes with semi-integrated battery)
In the unlikely event that your bike will not turn on, this guide will help you troubleshoot the issue so that you can get back to riding Rad as soon as possible. This procedure will involve testing the battery, and checking electrical component connections on the ebike to isolate the problem.
This article is for ebike models with semi-integrated batteries (Radster, RadRunner 3 Plus, RadRover 6 Plus, RadCity 5 Plus). If you have an ebike with an external battery (RadWagon, RadRunner, RadMission, RadCity 4 and earlier, RadRover 5 and earlier, RadExpand and RadMini), please see the troubleshooting article specific to those models Troubleshooting a Bike that Won't Turn On (bikes with external batteries).
Overview
Start by testing the battery, and then check the electrical connections to determine the underlying issue. The steps below show a RadRover 6 Plus, but the process will be similar for other models with semi-integrated batteries.
Tools Needed:
- Flat-side cutters
- A digital camera
- Proper lighting or a flashlight
- A set of Allen wrenches
- A Phillips head screwdriver
Test the battery
Start by checking the battery’s charge level and the battery terminals.
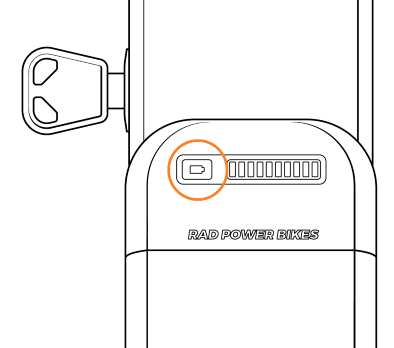
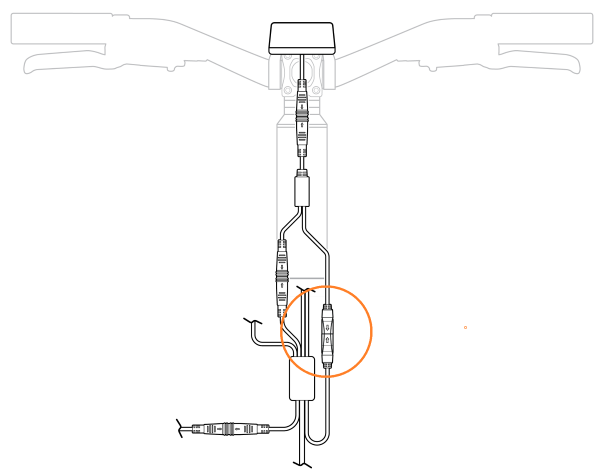
Press and release the battery button, circled in orange below. The battery can be on or off of the bike when you do this. Pressing the battery button will show you the charge level (one indicator light shows an almost depleted charge, and ten indicator lights show a fully charged battery).
- If the battery does not respond at all (none of the charge level indicators light up), there are a few possible causes. Your battery may need charging, or your battery may need to be taken out of ship mode.
- Ship mode is an "off" state for the battery that prevents it from supplying any power to the bike; it is used to keep bikes from turning on during shipping. Not all semi-integrated batteries have a ship mode feature. If you have a battery with this feature, the battery will have a bright orange sticker that explains how to take it into or out of ship mode. If you have a battery with the ship mode feature, press and hold the battery button for at least three seconds. If your battery was in ship mode and now isn't, it will display one or more of its charge level indicator lights if you press and release the battery button again.
- If the battery gauge is showing no or low charge, charge the battery and try turning the bike on after it has been charged. Follow the instructions in the Owner’s Manual on how to charge the battery. If it is not charging, record a video showing the charging process, including the lights on the charger and battery, and contact Rad Power Bikes Customer Support.
- If the battery is charged, continue with the troubleshooting.
-
Prepare your bike for maintenance. Turn off the bike, remove the battery, and press and hold the Power button to discharge remaining power.
-
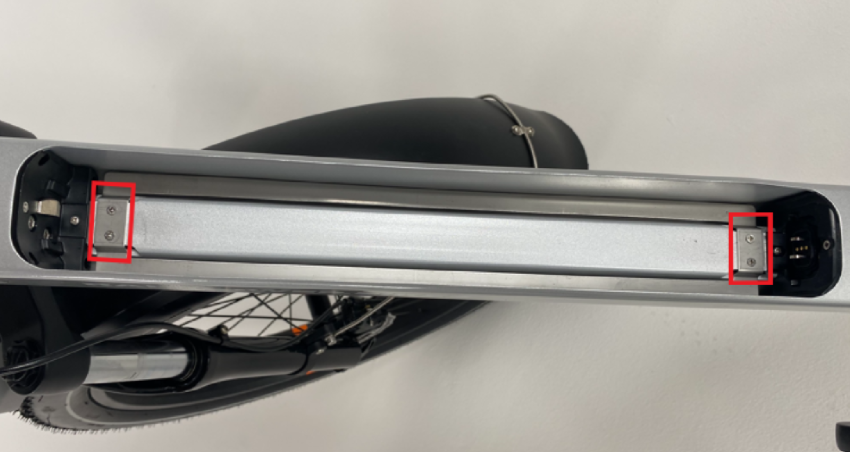
Inspect the battery and battery mount terminals. Check for any dirt, damage, or moisture at the base of the battery and at the battery mount.
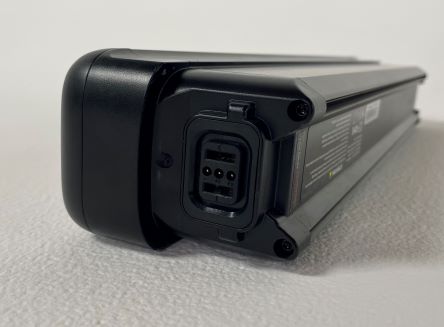
Battery terminals (pictured above)
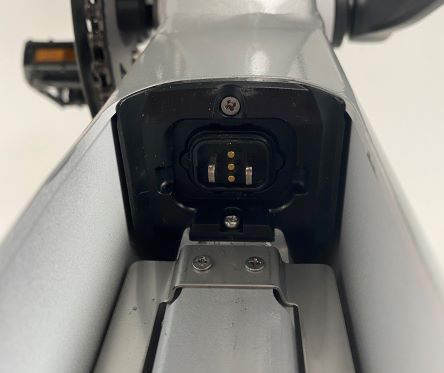
Battery mount terminals (pictured above)
If everything looks undamaged but damp, allow the battery and battery mount/terminals to air dry completely before re-inserting the battery and attempting to power on the bike.
- If the inside of the connector is damaged or dirty, do not attempt to repair the damage or clean the contacts. Take a photo and contact Customer Support for more help.
- If the connector looks normal, take a photo for your records and continue through the troubleshooting.
- Reinstall the battery and turn the bike ON.
- If the bike does NOT turn ON, continue to the connector check.
- If the bike turns ON, test the bike fully and ride Rad!
Before you start
Before checking the connectors, determine whether your bike has a jumper cable. The jumper cable will be pre-installed on some models.
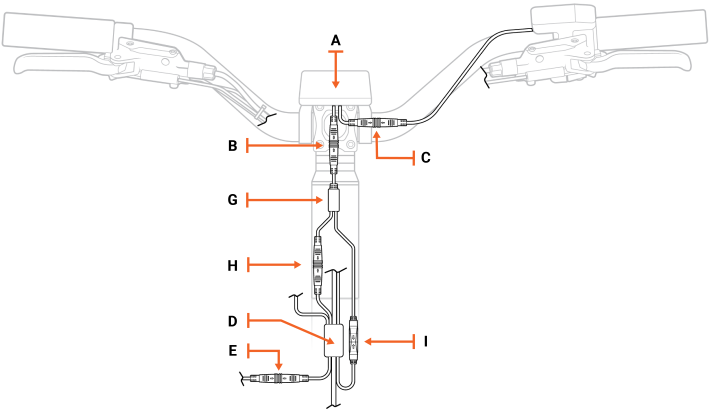
The jumper cable is an extra piece of cable that some bikes have incorporated into the wiring harness as shown below. Whether or not you have a jumper cable will affect which connector check steps apply to you.
- If your accessory cable doesn't connect with anything (it has a connector cover on its end), you do not have a jumper cable.
- If the accessory cable loops back up toward your wiring harness and connects to another cable, you do have a jumper cable.
 |
 |
| Wiring harness without a jumper cable | Wiring harness with a jumper cable |
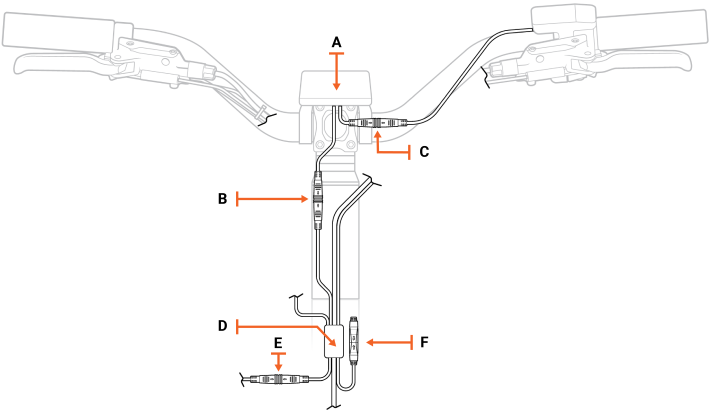
| A | Rad UI Display |
| B | Rad UI Display connector to the wiring harness (on bikes without a jumper cable). On bikes with a jumper cable, this connector connects to the jumper cable. |
| C | Rad UI Display connector to the Rad UI Remote |
| D | Wiring harness junction |
| E | Wiring harness to headlight connector |
| F | Accessory port with connector cover on its end |
| G | Jumper cable junction |
| H | Jumper cable connected to the wiring harness |
| I | Jumper cable connected to the accessory port |
Check individual connectors
There are a few main electrical connectors that can cause the bike to not turn on if they are loose, misaligned or damaged.
- Jumper cable connectors (if applicable)
- Rad UI Display and Remote connectors
- Wiring harness connector
- Battery connector
Start by preparing your bike for maintenance. Turn off the bike, remove the battery, and press and hold the Power button to discharge remaining power.
Unplug one connector at a time, inspect the inside, reconnect it, and turn on the bike to see if the error is resolved. Use flat-side cutters to snip zip ties as needed to create enough slack to unplug the connectors.
Click on each heading below and follow the instructions to check each connector.
Do not insert any tools into the connectors, use metal tools on the internal pins, or attempt to straighten bent pins. Doing so can lead to irreversible damage to the component or cause injury or death.
- Prepare your bike for maintenance. Turn off the bike, remove the battery, and press and hold the power button to discharge remaining power.
- Locate the accessory port. The accessory port is connected to the jumper cable as indicated by an orange circle in the illustration above.
- Check the accessory port connector's alignment. Before unplugging the accessory port/jumper cable connectors, check the external arrows on the connector. If the arrows are not aligned, take a picture for future reference.
- Unplug and inspect the connector. Snip any nearby zip ties if you need cable slack, and pull each side of the connector apart without twisting to unplug.
- If the inside of the connector is damaged, dirty, or wet, the part may need to be replaced. Take a photo and contact Customer Support for help.
- If the connector looks dry, clean, and undamaged, line up the internal notch and pins and external arrows, and press together without twisting to reconnect.
- Reinstall the battery and turn on the bike.
- If the bike turns ON, test the bike fully and ride Rad!
- If the bike does NOT turn on, turn off the bike, remove the battery, and discharge the remaining power. We’ll repeat this process with the remaining connectors.
In this step, you will check the Rad UI connectors. If the display and/or remote are disconnected or damaged, your ebike will not power on.
| B | Jumper cable to Rad UI Display |
| C | Rad UI Display to Rad UI Remote |
| H | Jumper cable to wiring harness |
- Locate the Rad UI Display connector ("C" in the illustration above) that goes to the Rad UI Remote by tracing the cable that goes between those two components. Pull each side of the connector apart without twisting. Snip zip ties if you need more cable slack.
- Locate the Rad UI Display connector ("B" in the illustration above) that goes to the jumper cable. There are two cables connected to the Rad UI Display. You just traced one of them to the Rad UI Remote. The other cable connects to the jumper cable. Disconnect this connector by pulling it apart without twisting.
- Locate the jumper cable connector ("H" in the illustration above) that goes to the wiring harness. Trace the connector that has been disconnected from the Rad UI to the jumper cable. At the fork, the jumper cable leads to the accessory port (labeled "I") and the wiring harness (labeled "H"). Disconnect the connector that is identical in size and color (green) to the Rad UI.
- Inspect the inside of the connectors.
- If the inside of a connector is damaged, dirty, or wet, the part may need to be replaced. Take a photo and contact Product Support for help.
- If the inside of the connector looks in good condition, line up the internal notch and pins and external arrows, and ride Rad!
- Reinstall the battery and turn on the bike.
- If the bike turns ON, test the bike fully and ride Rad!
- If the does NOT turn ON, turn off the bike, remove the battery, and discharge the remaining power. We’ll repeat this process with the remaining connectors.
In this step, you will check the Rad UI connectors that go to the jumper cable and to the Rad UI remote. If the display and/or remote are disconnected or damaged, your ebike will not power on.
| A | Rad UI Display |
| B | Rad UI Display connector to the jumper cable |
| C | Rad UI Display connector to the Rad UI Remote |
| H | Jumper cable connector to the wiring harness |
- Locate the Rad UI Display connector ("C" in the illustration above) that goes to the Rad UI Remote by tracing the cable that goes between those two components. Pull each side of the connectors apart without twisting. Snip zip ties if you need more cable slack.
- Locate the Rad UI Display connector ("B" in the illustration above) that goes to the jumper cable. There are two cables connected to the Rad UI Display. You just traced one of them to the Rad UI Remote. The other cable connects to the jumper cable. Disconnect this connector by pulling it apart without twisting.
- Locate the jumper cable connector ("H" in the illustration above) that goes to the wiring harness. Trace the connector that has been disconnected from the Rad UI Display to the jumper cable. At the fork the jumper cable leads to the accessory port (labeled "I") and the wiring harness (labeled "H"). Disconnect the connector that is identical in size and color (green) to the Rad UI Display.
- Inspect the inside of the connectors.
- If the inside of the connector is damaged, dirty, or wet, the part may need to be replaced. Take a photo and contact Product Support for help.
- If the inside of the connector looks in good condition, line up the internal notch and pins and external arrows, and press together without twisting to reconnect.
- Reinstall the battery and turn on the bike.
- If the bike turns ON, test the bike fully and ride Rad!
- If the does NOT turn ON, turn off the bike, remove the battery, and discharge the remaining power. We’ll repeat this process with the remaining connectors.
- Check the wiring harness. Ensure the wiring harness is not twisted around the front of the ebike, and there is enough slack that you can turn the handlebar fully without pinching the wiring harness.
- If the wiring harness moves easily, proceed to the next step to check the connection to the controller.
- If the wiring harness is twisted around the front of the ebike and difficult to turn, this may cause it to disconnect while riding. Use flat-side cutters to snip zip ties and reorient the cables that connect to the wiring harness, and make sure there is enough slack that it does not get pinched when turning the handlebar.
- Partially loosen the bolts on your external cable cover, and turn the handlebar to the left to create cable slack.
- Locate the wiring harness connector just behind the bottom of the seat tube. Unplug it and inspect the inside. The 11 pins must be clean and not bent. If it looks normal, line up the internal notch and pins, and external arrows, and press together without twisting to reconnect.

- If the inside of the connector is damaged, dirty, or wet, the part may need to be replaced. Take a photo and contact Customer Support for help.
- If the inside of the connector looks in good condition, line up the internal notch and pins and external arrows, and press together without twisting to reconnect.
- Double-check that the connector is secure.
- Gently pull the wiring harness cable at the top of the downtube to create cable slack at the front of the bike. Ensure the handlebar turns to both sides before tightening the bolts on the external cable cover.
- Reinstall the battery and turn on the bike.
- If the bike turns ON, test the bike fully and ride Rad!
- If the does NOT turn ON, turn off the bike, remove the battery, and discharge the remaining power. We’ll repeat this process with the battery connector.
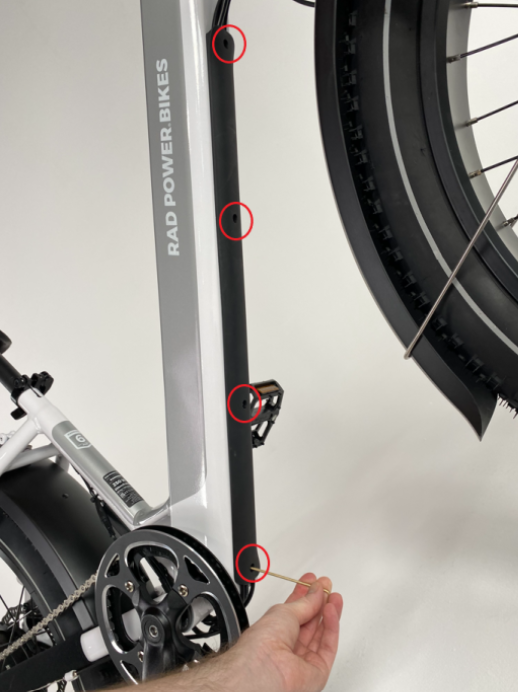
- Remove the four bolts on the internal cable cover using your Phillips head screwdriver, and set them aside.
- Remove the two bolts on the battery mount using a Phillips head screwdriver, and set them aside.
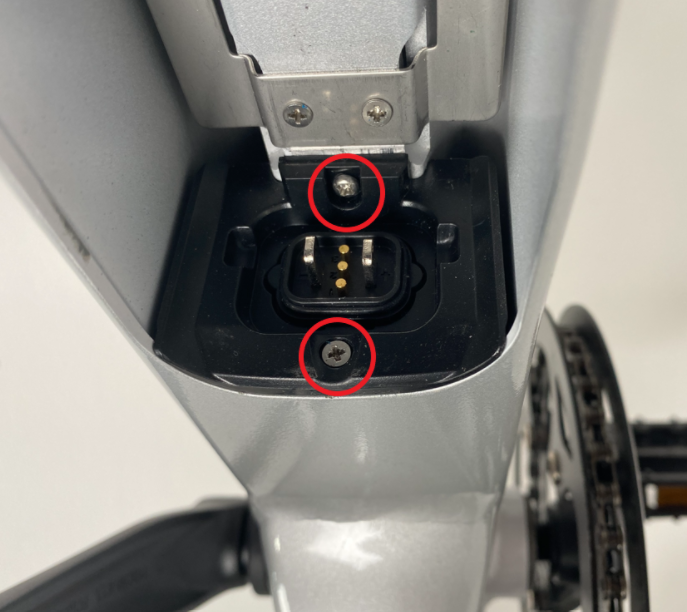
NOTICE: The bolt furthest back has a round head and the other is a flat head. Make sure that the flat head bolt goes back in the correct place when reinstalling the battery mount. - Remove the battery mount and locate the battery connector. Unplug it by pulling both ends apart without twisting, inspect the inside, and if it looks normal, carefully reconnect it.
- Reinstall the battery mount. Push the connectors back into the slot and, using the Phillips head screwdriver, thread in the round bolt partially. Then move on to the flat head bolt and tighten both.
TIP: If the bolt slips, you may need to tilt the bike so that the bolt falls out of the battery slot. There is a hole at the bottom of the downtube. - Reinstall the internal cable cover. Using the Phillips head screwdriver, reinstall the internal cable cover. Thread in all four bolts partially, and then tighten completely.
- Reinstall the battery and turn on the bike.
- If the bike turns ON, test the bike fully and ride Rad!
- If the does NOT turn ON, contact the Customer Support team for next steps.